

|
|
Version

Table of Contents
1.2 What do you need to understand this book 4
3 Installing openCRX for Tomcat 9
4.1 Initial Setup of openCRX Application 15
4.1.1 First Login as “admin-Root” 16
4.1.2 Create Data Segment “Standard” 19
4.1.3 Import Codes and Data 20
4.1.4 Set Access Levels of Codes 20
4.2 Initial Setup of Segment “Standard” 22
4.2.1 First Login as “admin-Standard” 22
4.2.2 Configure Segment “Standard” 23
4.2.3 Create a new Contact “guest” 23
4.2.4 Create a new User “guest” 25
List of Figures
Figure 1: openCRX Login page 15
Figure 2: First login as admin-Root with password admin-Root 16
Figure 3: Start screen of admin-Root 18
Figure 4: Create a new segment with Actions > Create Administrator 19
Figure 5: Create a new segment named Standard 19
Figure 6: Result of operation Create Administrator 19
Figure 7: Load Code Tables and Data – Step 1 20
Figure 8: Load Code Tables and Data – Step 2 20
Figure 9: Change perspective from Root to Advanced 20
Figure 10: Execute Operation Security > Set Access Level 21
Figure 11: Parameters of Operation Set Access Level 21
Figure 12: Result of the Operation Set Access Level 21
Figure 13: First login with admin-Standard / opencrx 22
Figure 14: As admin-Standard start the wizard Segment Setup 23
Figure 15: Wizard Segment Setup - properly configured Segment 23
Figure 16: Refresh homepage of user admin-Standard 23
Figure 17: Fly-in menu 24
Figure 18: New contact guest – step 1 24
Figure 19: New contact guest – step 2 24
Figure 20: New contact guest – step 3 24
Figure 21: New contact guest – step 4 25
Figure 22: New user guest – step 1 25
Figure 23: New user guest – step 2 25
Figure 24: New user guest – step 3 26
Figure 25: New user guest – step 4 26
Figure 26: New user guest – step 5 26
Figure 27: New user guest – step 6 26
Figure 28: New user guest – step 7 27
Figure 29: New user guest – step 8 28
List of Listings
Listing 1: The file openejb.xml for PostgreSQL 10
Listing 2: The file run.bat 11
Listing 3: The file run.sh 12
Listing 4: Connector definition in server.xml 12
Listing 5: Access Log Valve in server.xml 12
Listing 6: The file tomcat-users.xml 13
Listing 7: Tomcat console output 14
Listing 8: Console Output – Initialization of the openCRX servlet 17
Listing 9: Console Output – Importing Codes and Data 20
Listing 10: The file tomcat-users.xml 29
1 About this Book
openCRX is the leading open source CRM enterprise suite. openCRX is based on the openMDX application framework, an open source application framework based on the OMG's model driven architecture (MDA) standards, delivering maximum openness, standards compliance and a state-of-the-art component-based architecture.
This book describes the manual installation of openCRX for deployment on Apache Tomcat.
1.1 Who this book is for
The intended audience are openCRX administrators and system administrators who either want to install openCRX manually (for whatever reason) or want to install openCRX on a platform not supported by our openCRX Server installer.
1.2 What do you need to understand this book
This book describes the manual installation of openCRX for deployment on Apache Tomcat. The book assumes that you are familiar with the Tomcat management and administration.
1.3 Tips, Warnings, etc.
We make use the following pictograms:
|
|
Information provided as a “Tip” might be helpful for various reasons: time savings, risk reduction, etc. |
|
|
You should carefully read information marked with “Important”. Ignoring such information is typically not a good idea. |
|
|
Warnings should not be ignored (risk of data loss, etc.) |
2 Prerequisites
As a first step select the openCRX version you want to install. Based on the published version compatibility information you can determine the appropriate versions of openMDX, Tomcat, and Java JDK:
http://www.opencrx.org/faq.htm#versioncompatibility
|
|
Write down the version numbers of the software packages you have chosen to install – this may be helpful in the future in case you require support or want to file a bug report: openCRX v_______ (this guide is based
on openCRX v2.8.0) |
|
|
Throughout the installation of openCRX and related software it is a good idea to avoid paths containing blanks like the default installation directory ...\Program Files\... on Windows. Whenever an installer proposes an installation path containing blanks, we recommend changing the path to avoid problems down the road. |
2.1 JDK 6.0
Download and install the Sun Java JDK 6.0
available from
http://java.sun.com/javase/downloads/widget/jdk6.jsp
|
|
You really need Java 6, i.e. neither Java 4 nor Java 5 will work. |
|
|
It is not sufficient to have a Java Runtime Environment (JRE) only. The full-blown JDK is required to install the openCRX SDK. |
|
|
On Windows, it is a good idea to avoid paths containing blanks like the default installation directory ...\Program Files\.... |
|
|
Don't forget to set the environment variable JAVA_HOME. It should point to your JDK installation directory, e.g. to D:\Java\jdk1.6.0 on Windows or opt/jdk1.6.0 on Linux. |
2.2 Ant 1.8.0
Download Ant 1.8.0 (available from http://ant.apache.org/) for your platform and install it by expanding the downloaded file to a directory of your choice.
|
|
Don't forget to set the environment variables ANT_HOME and ANT_OPTS as follows:
|
2.3 openMDX SDK
Download and install the openMDX SDK: http://www.openmdx.org/sdk.htm
Installation instructions are also available from the above website.
|
|
If your platform is not supported by the openMDX SDK Installer, you can install the openMDX SDK on one of the supported platforms and then copy the required files to your target platform. |
2.4 openCRX SDK
Download and install the openCRX SDK: http://www.opencrx.org/sdk.htm
Installation instructions are also available from the above website.
|
|
If your platform is not supported by the openCRX SDK Installer, you can install the openCRX SDK on one of the supported platforms and then copy the required files to your target platform. |
|
|
For some reason unknown to us the SDK installation sometimes stalls with Ant v1.8.0 on Windows. If you experience such problems with the SDK installation, kill the process java.exe and then execute the script postinstallation.bat manually from a DOS shell. |
2.5 Apache Tomcat
Download Tomcat 6.0.26
from
http://archive.apache.org/dist/tomcat/tomcat-6/v6.0.26/bin/
This guide is based on Tomcat
v6.0.26:
http://archive.apache.org/dist/tomcat/tomcat-6/v6.0.26/bin/apache-tomcat-6.0.26.zip
(Windows)
http://archive.apache.org/dist/tomcat/tomcat-6/v6.0.26/bin/apache-tomcat-6.0.26.tar.gz (Linux)
|
|
If you want to deploy openCRX on a Tomcat version different from Tomcat v6.0.26, we recommend to build the files tomcat-juli.jar and catalina.jar matching your Tomcat version as follows:
|
2.6 Database
Please note that you must set up and load the openCRX database as described in the respective openCRX database installation guide before you continue. For example, if you want to install openCRX for PostgreSQL, you must first install PostgreSQL and create a database.
Database installation guides for the supported database management systems are available from http://www.opencrx.org/documents.htm
|
|
Please remember that you will also need a JDBC driver appropriate for your database management system (please refer to the relevant DB installation guide for additional information). Copy the JDBC driver into the directory TOMCAT_HOME\lib. |
|
|
Please note that this guides assumes that you installed PostgreSQL and create a database named CRX_CRX. If you decided for another DBMS, you might have to adapt some of the commands/instructions in this guide accordingly. |
Once you have successfully installed the database you are ready to continue with the Tomcat setup.
3 Installing openCRX for Tomcat
In a first step, install Apache Tomcat by expanding the downloaded file apache-tomcat-6.0.26.zip (or apache-tomcat-6.0.26.tar.gz respectively) to a directory of your choice, e.g. D:\apache-tomcat-6.0.26 on Windows or /opt/apache-tomcat-6.0.26 on Linux. For the remainder of this document we assume that TOMCAT_HOME points to the Tomcat installation directory, e.g. TOMCAT_HOME=D:\apache-tomcat-6.0.26
|
|
On Windows, avoid paths that contain blanks (e.g. the famous C:\Program File\...) as there are all kinds of pitfalls down the road... |
|
|
Make sure that you added JAVA_HOME
to your system environment variables as Tomcat needs the JDK to
compile JSPs, e.g. |
Now we add openMDX and Apache OpenEJB to Tomcat by copying several files from the openCRX SDK to the Tomcat directory structure:
copy the file tomcat-juli.jar from the openMDX SDK installation directory <MDX_SDK_Install_Dir>\openmdx-2.8.0\jre-1.6\core\lib to the Tomcat directory TOMCAT_HOME\bin (overwrite the existing file)
copy the file catalina.jar from the openMDX SDK installation directory <MDX_SDK_Install_Dir>\openmdx-2.8.0\openejb-3\openejb\lib to the Tomcat directory TOMCAT_HOME\lib (overwrite the existing file)

Please note that the files tomcat-juli.jar and catalina.jar are version-specific, i.e. if you want to run openCRX on a Tomcat version different from Tomcat v6.0.26 you need to go back to chapter 2.5 Apache Tomcat and build them as explained.
copy the file openmdx-base.jar from the openMDX SDK installation directory <MDX_SDK_Install_Dir>\openmdx-2.8.0\jre-1.6\core\lib to the Tomcat directory TOMCAT_HOME\lib
open the ZIP file <MDX_SDK_Install_Dir>\repository\distribution\ openmdx-2.8.0-openejb.openejb-3.zip (*.tar on Linux) and copy the file openmdx-openejb.war - located in the folder openmdx-2.8.0/openejb-3/openejb/deployment-unit - to the Tomcat directory TOMCAT_HOME\webapps and then rename it to 0 openmdx-openejb.war (Tomcat must load it as the first WebApp)
Next we create some directories and then install the openCRX enterprise archive:
create the directory TOMCAT_HOME\airsyncdir
create the directory TOMCAT_HOME\maildir
create the directory TOMCAT_HOME\apps
copy the file opencrx-core-CRX.ear from the directory <CRX_SDK_Install_Dir>\opencrx-2.8.0\jre-1.6\core\deployment-unit to to the Tomcat directory TOMCAT_HOME\apps
Next we configure the database connection (and optionally a mail resource):
create a new file TOMCAT_HOME\conf\openejb.xml and open it with an editor (Notepad, kate, etc.); paste the following text into the file:
Listing 1: The file openejb.xml for PostgreSQL
<?xml
version="1.0" encoding="UTF-8"?>
<openejb>
<Container
id="My Stateless Container" type="STATELESS">
TimeOut 0
PoolSize 10
StrictPooling
true
</Container>
<!-- openCRX with PostgreSQL,
DB: CRX_CRX -->
<Resource id="jdbc_opencrx_CRX"
type="DataSource">
JdbcDriver
org.postgresql.Driver
JdbcUrl
jdbc:postgresql://127.0.0.1:5432/CRX_CRX
UserName system
Password manager
JtaManaged true
ValidationQuery
SELECT object_oid FROM prefs_preference WHERE object_oid =
'PERSISTENCE:type' AND object_idx = 0
TestWhileIdle true
TimeBetweenEvictionRunsMillis 1000
</Resource>
<Resource
id="mail/provider/CRX" type="javax.mail.Session">
mail.debug true
mail.transport.protocol smtp
mail.smtp.user
myusername
mail.smtp.password mypassword
mail.smtp.starttls.enable true
mail.smtp.auth true
mail.smtp.host myhost
mail.smtp.port 25
mail.smtp.user
myuseruname
mail.from mymailfrom
mail.store.protocol pop3s
mail.pop3s.host myhost
mail.pop3s.port 995
mail.pop3s.auth
true
mail.pop3s.user myusername
mail.pop3s.password
mypassword
</Resource>
<Deployments dir="apps/"
/>
</openejb>
adapt the values of UserName, Password and the JdbcUrl to your own environment and then save the file (see also table below)
make sure the XML file is UTF-8 encoded
See http://openejb.apache.org/configuration.html for additional details.
The following table might be helpful to configure your database connection:
|
HSQLDB 1 |
org.hsqldb.jdbcDriver |
|
MySQL 5 |
com.mysql.jdbc.Driver |
|
PostgreSQL 8 |
org.postgresql.Driver |
|
MS SQL 2005 |
com.microsoft.sqlserver.jdbc.SQLServerDriver |
|
DB/2 9 |
com.ibm.db2.jcc.DB2Driver |
|
Oracle 10 |
oracle.jdbc.driver.OracleDriver |
|
|
Verify all the relevant information for correctness, e.g. ensure that the JdbcUrl – in particular the database name – the UserName, and the Password match with your installation. A simple copy/paste of the above sample file will typically not work, i.e. it is expected that you will have to adapt some of the parameters. |
Next we create a batch file to start Apache Tomcat with all the appropriate JVM options:
on Windows: create the file run.bat with the following content in the Tomcat directory TOMCAT_HOME\bin:
Listing 2: The file run.bat
set
TOMCAT_HOME=D:\apache-tomcat-6.0.26
set
JAVA_HOME=D:\Java\jdk1.6.0
RMDIR
/S /Q %TOMCAT_HOME%\temp
MKDIR %TOMCAT_HOME%\temp
RMDIR /S /Q
%TOMCAT_HOME%\work
MKDIR %TOMCAT_HOME%\work
REM RMDIR /S /Q
%TOMCAT_HOME%\maildir
set JAVA_OPTS=-Xmx800M
set
JAVA_OPTS=%JAVA_OPTS%
-Djava.protocol.handler.pkgs=org.openmdx.kernel.url.protocol
set
JAVA_OPTS=%JAVA_OPTS%
-Djava.util.logging.manager=org.apache.juli.ClassLoaderLogManager
set
JAVA_OPTS=%JAVA_OPTS%
-Dorg.opencrx.maildir=%TOMCAT_HOME%\maildir
set
JAVA_OPTS=%JAVA_OPTS%
-Dorg.opencrx.airsyncdir=%TOMCAT_HOME%\airsyncdir
set
JAVA_OPTS=%JAVA_OPTS%
-Dopencrx.CRX.jdbc.driverName="org.postgresql.Driver"
set
JAVA_OPTS=%JAVA_OPTS%
-Dopencrx.CRX.jdbc.url="jdbc:postgresql://localhost:5432/CRX_CRX"
set
JAVA_OPTS=%JAVA_OPTS% -Dopencrx.CRX.jdbc.userName="system"
set
JAVA_OPTS=%JAVA_OPTS% -Dopencrx.CRX.jdbc.password="manager"
REM
JAVA_OPTS=%JAVA_OPTS%
-Dorg.openmdx.persistence.jdbc.useLikeForOidMatching=false
catalina.bat
run
-
adapt D:\apache-tomcat-6.0.26 to your environment
adapt D:\Java\jdk1.6.0 to your environment
adapt the options related to the database connection to your environment (driverName, url, userName, and password)
if you are using PostgreSQL and if you set up the database as proposed by us, you can also uncomment the JVM option useLikeForOidMatching=false for enhanced performance.
on Linux: create the file run.sh with the following content in the Tomcat directory TOMCAT_HOME\bin:
Listing 3: The file run.sh
#!/bin/sh
export
CATALINA_HOME=/opt/apache-tomcat-6.0.26
export
JAVA_HOME=/opt/Java/jdk1.6.0
export
JAVA_OPTS="-Xmx800M -XX:MaxPermSize=128m
-Dtomcat.server.port=8005"
export JAVA_OPTS="$JAVA_OPTS
-Djava.protocol.handler.pkgs=org.openmdx.kernel.url.protocol"
export
JAVA_OPTS="$JAVA_OPTS
-Djava.util.logging.manager=org.apache.juli.ClassLoaderLogManager"
export
JAVA_OPTS="$JAVA_OPTS
-Dorg.opencrx.maildir=$CATALINA_HOME/maildir"
export
JAVA_OPTS="$JAVA_OPTS
-Dorg.opencrx.airsyncdir=$CATALINA_HOME/airsyncdir"
export
JAVA_OPTS="$JAVA_OPTS
-Dopencrx.CRX.jdbc.driverName=org.postgresql.Driver"
export
JAVA_OPTS="$JAVA_OPTS
-Dopencrx.CRX.jdbc.url=jdbc:postgresql://localhost:5432/CRX_CRX"
export
JAVA_OPTS="$JAVA_OPTS
-Dopencrx.CRX.jdbc.userName=system"
export
JAVA_OPTS="$JAVA_OPTS -Dopencrx.CRX.jdbc.password=manager"
cd
$CATALINA_HOME
rm -Rf temp
mkdir temp
rm -Rf
work
./bin/catalina.sh run
-
adapt /opt/apache-tomcat-6.0.26 to your environment
adapt /opt/Java/jdk1.6.0 to your environment
adapt the options related to the database connection to your environment (driverName, url, userName, and password)
if you are using PostgreSQL and if you set up the database as proposed by us, you can also add the following JVM option for enhanced performance:
-Dorg.openmdx.persistence.jdbc.useLikeForOidMatching=false
Next, we have to make a few changes to Tomcat's server.xml:
open the file TOMCAT_HOME\conf\server.xml
look for the connector definition <Connector port="8080" protocol="HTTP/1.1" and add the option URIEncoding="UTF-8" so that the connector definition looks as shown below:
Listing 4: Connector definition in server.xml
<Connector
port="8080" protocol="HTTP/1.1"
connectionTimeout="20000"
redirectPort="8443"
URIEncoding="UTF-8"
/>
-

Tomcat can create Apache-style access log files as follows: in the file TOMCAT_HOME\conf\server.xml , look for the engine definition <Engine name="Catalina" defaultHost="localhost”> and then add the following valve section just below:
Listing 5: Access Log Valve in server.xml
...
<Engine name="Catalina" defaultHost="localhost">
<Valve className="org.apache.catalina.valves.AccessLogValve"
directory="logs" prefix="combined_access_log."
suffix=".txt" pattern="combined" resolveHosts="false" />
...
As a final step, you must activate security for the openCRX application.
open the file TOMCAT_HOME\conf\tomcat-users.xml and add users and roles as follows:
Listing 6: The file tomcat-users.xml
<?xml
version='1.0' encoding='utf-8'?>
<tomcat-users>
<role rolename="OpenCrxAdministrator"/>
<role
rolename="OpenCrxUser"/>
<role
rolename="OpenCrxRoot"/>
<role
rolename="manager"/>
<user
username="admin-Root" password="admin-Root"
roles="OpenCrxRoot"/>
<user
username="admin-Standard" password="admin-Standard"
roles="OpenCrxAdministrator,OpenCrxUser"/>
<user
username="system" password="manager"
roles="manager"/>
<user username="guest"
password="guest"
roles="OpenCrxUser"/>
</tomcat-users>
-
adapt the passwords to your liking
|
|
We recommend that you stay with the file-based authentication for all users until you have finished installing openCRX. You avoid situations where you have to trouble-shoot multiple issues at the same time... |
|
|
It is recommended that you stay with the file-based authentication for the user admin-Root. This simplifies the openCRX bootstrapping. |
|
|
Just a quick reminder before you move on to starting Tomcat. Please remember to copy the JDBC driver appropriate for your database management system to the Tomcat directory TOMCAT_HOME\lib (refer to the relevant DB installation guide for additional information). |
Optionally, you may want to adjust the Tomcat log level in the file TOMCAT_HOME\conf\logging.properties from FINE to SEVERE. Open this file and replace all occurrencies of FINE with SEVERE and then save the file again.
4 Starting Tomcat
You are now ready to start Tomcat. Open a command shell and start run.bat (or run.sh on Linux). You should verify whether the start options match the ones described earlier:
Listing 7: Tomcat console output
[14:26:35.95]D:\apache-tomcat-6.0.26\bin>run.bat
[14:26:37.71]D:\apache-tomcat-6.0.26\bin>set
TOMCAT_HOME=P:\apache-tomcat-6.0.26
[14:26:37.71]D:\apache-tomcat-6.0.26\bin>set
JAVA_HOME=D:\Java\jdk1.6.0
[14:26:37.71]D:\apache-tomcat-6.0.26\bin>RMDIR
/S /Q
P:\apache-tomcat-6.0.26\temp
[14:26:37.73]D:\apache-tomcat-6.0.26\bin>MKDIR
P:\apache-tomcat-6.0.26\temp
[14:26:37.73]D:\apache-tomcat-6.0.26\bin>RMDIR
/S /Q
P:\apache-tomcat-6.0.26\work
[14:26:37.73]D:\apache-tomcat-6.0.26\bin>MKDIR
P:\apache-tomcat-6.0.26\work
[14:26:37.74]D:\apache-tomcat-6.0.26\bin>REM
RMDIR /S /Q
P:\apache-tomcat-6.0.26\maildir
[14:26:37.87]D:\apache-tomcat-6.0.26\bin>set
JAVA_OPTS=-Xmx800M
-Djava.protocol.handler.pkgs=org.openmdx.kernel.url.protocol
-Dorg.opencrx.maildir=P:\apache-tomcat-6.0.26\maildir
-Dorg.opencrx.airsyncdir=P:\apache-tomcat-6.0.26\airsyncdir
-rx.CRX.jdbc.url="jdbc:postgresql://localhost:5432/CRX_CRX"
-Dopencrx.CRX.jdbc.userName="system"
-Dopencrx.CRX.jdbc.password="manager"
-Dorg.openmdx.persistence.jdbc.useLikeForOidMatching=false
[14:26:37.87]D:\apache-tomcat-6.0.26\bin>catalina.bat
run
Using CATALINA_BASE: "D:\apache-tomcat-6.0.26"
Using
CATALINA_HOME: "D:\apache-tomcat-6.0.26"
Using
CATALINA_TMPDIR: "D:\apache-tomcat-6.0.26\temp"
Using
JRE_HOME: "D:\Java\jdk1.6.0"
Using CLASSPATH:
"D:\apache-tomcat-6.0.26\bin\bootstrap.jar"
OpenEJB
init-params:
Apache OpenEJB 3.1.2 build:
20091010-03:11
http://openejb.apache.org/
context path =
/0-openmdx-openejb
context path = /host-manager
context path =
/manager
context path = /docs
context path = /examples
context
path =
|
|
Please note that as long as Tomcat reports errors/exceptions during this startup phase (no reason to worry about warnings, though) that are not related to the IMAP servlet (which cannot start properly with an empty database) you must investigate and fix them before you continue. You might want to inspect the log files in the Tomcat directory TOMCAT_HOME\logs to find out what went wrong. |
Once Tomcat starts without errors you are ready to continue with the initial setup of the openCRX application.
4.1 Initial Setup of openCRX Application
Connect to the login page of openCRX. The exact URL depends on your deployment details. For a standard openCRX deployment on Tomcat running on your local machine and listening at port 8080 the URL is
http://localhost:8080/opencrx-core-CRX/Login
You should see the openCRX Login page as follows:
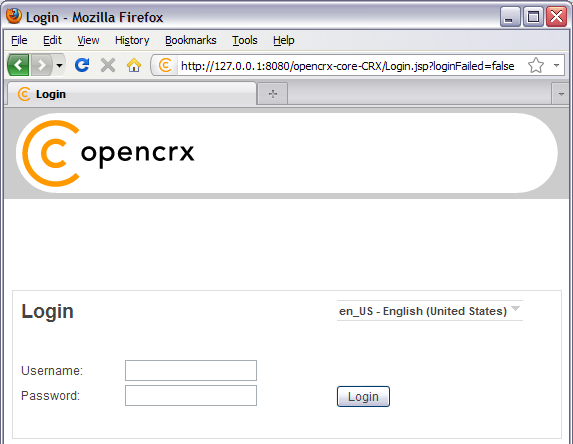
Figure 1: openCRX Login page
|
|
openCRX tries to determine the locale from your environment. You can change the locale at any time with the drop down on the login page. For information on how to directly load a locale-specific login page see http://www.opencrx.org/faq.htm#login |
4.1.1 First Login as “admin-Root”
Enter admin-Root into the field Username and then enter admin-Root into the field Password (obviously, if you chose a different password when you created the file tomcat-users.xml you have to enter that password...):
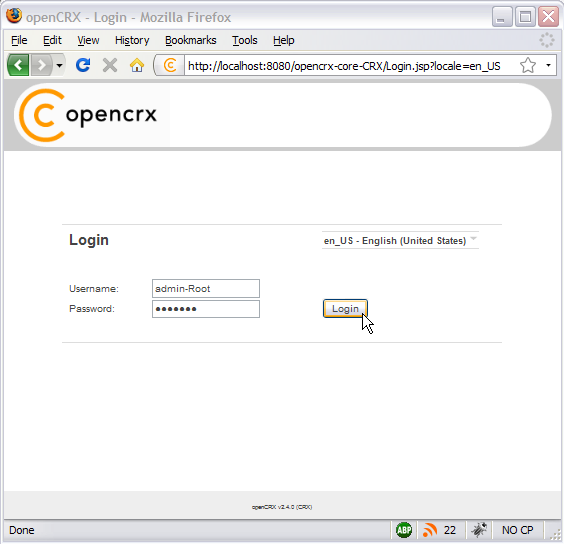
Figure 2: First login as admin-Root with password admin-Root
Click the button
![]() to start the initialization process.
to start the initialization process.
|
|
If you can't get past the login screen (with the correct Username and Password, of course) and the Warning “Browser must accept cookies” keeps showing up need to verify your browser settings related to cookies. If you have installed a personal firewall (e.g. ZoneAlarm, Comodo, etc.) you also need to verify the cookie settings of your firewall. Tomcat must be able to create/set a session cookie. |
The openCRX servlet is initialized during this first login, i.e. don't stop/kill the browser if it takes a while. The application console output will look similar to the following listing:
Listing 8: Console Output – Initialization of the openCRX servlet
Tue Apr 20 15:08:42 CEST 2010 Starting web application
"/opencrx-core-CRX"
Tue Apr 20 15:08:42 CEST 2010
Driven by openMDX/Portal. Revision: $Revision: 1.110 $
Tue Apr 20
15:08:42 CEST 2010 For more information see
http://www.openmdx.org
Tue Apr 20 15:08:42 CEST 2010 Loading...
(see log for more information)
Tue Apr 20 15:08:42 CEST 2010
Loading ui configuration...
Tue Apr 20 15:08:42 CEST 2010
Loading 2 files for locale en_US
...
Tue Apr 20 15:08:42 CEST
2010 Loading 1 files for locale ro_RO
Tue Apr 20 15:08:42 CEST
2010 Storing 41 ui elements for segment
org::openmdx::ui1/provider/CRX/segment/Advanced
Tue Apr 20
15:08:42 CEST 2010 Loading 77 files for locale en_US
...
Tue
Apr 20 15:08:42 CEST 2010 Loading 68 files for locale ro_RO
Tue
Apr 20 15:08:42 CEST 2010 Storing 3242 ui elements for segment
org::openmdx::ui1/provider/CRX/segment/Root
Tue Apr 20 15:08:42
CEST 2010 Done (2 segments)
Tue Apr 20 15:09:01 CEST 2010
Loading texts
Tue Apr 20 15:09:01 CEST 2010 Done
Tue Apr 20
15:09:01 CEST 2010 Loading layouts
Tue Apr 20 15:09:01 CEST 2010
Done (25 layouts)
Tue Apr 20 15:09:01 CEST 2010 Loading
reports
Tue Apr 20 15:09:01 CEST 2010 Done (17 reports)
Tue
Apr 20 15:09:02 CEST 2010 Loading wizards
Tue Apr 20 15:09:02
CEST 2010 Done (17 wizards)
Tue Apr 20 15:09:03 CEST 2010
Loading data
Tue Apr 20 15:09:03 CEST 2010 Loading 5 objects
from /WEB-INF/config/bootstrap/Root/100_security_policy.xml
Tue
Apr 20 15:09:03 CEST 2010 Loading 2 objects from
/WEB-INF/config/bootstrap/Root/101_security_subjects.xml
Tue Apr
20 15:09:03 CEST 2010 Loading 10 objects from
/WEB-INF/config/bootstrap/Root/102_security_realms.xml
Tue Apr 20
15:09:03 CEST 2010 Loading 1 objects from
/WEB-INF/config/bootstrap/Root/103_security_authentication.xml
Tue
Apr 20 15:09:03 CEST 2010 Loading 1 objects from
/WEB-INF/config/bootstrap/Root/200_code_segment.xml
Tue Apr 20
15:09:03 CEST 2010 Loading 1 objects from
/WEB-INF/config/bootstrap/Root/300_admin_segment.xml
Tue Apr 20
15:09:03 CEST 2010 Loading 0 objects from
/WEB-INF/config/bootstrap/Standard/dummy.xml
Tue Apr 20 15:09:03
CEST 2010 Done
Tue Apr 20 15:09:10 CEST 2010 Loading
/WEB-INF/config/filters/
Tue Apr 20 15:09:10 CEST 2010 Done
(2802 filters)
|
|
If you see lots of error messages on the console and/or your log files grow very fast (several hundred KB if not more) then it is quite likely that your DB connection is not configured correctly. If your log file contains errors like MEDIA_ACCESS_FAILURE there is definitely something wrong with your DB connection (or your DB). Please note that there is absolutely no sense in continuing before you have fixed your DB connection. You might want to verify
|
After the successful startup of openCRX you see a screen similar to the one shown in the figure below. You should see the root objects Administration, Codes, Security Realm, Security Policies, and Security Subjects:
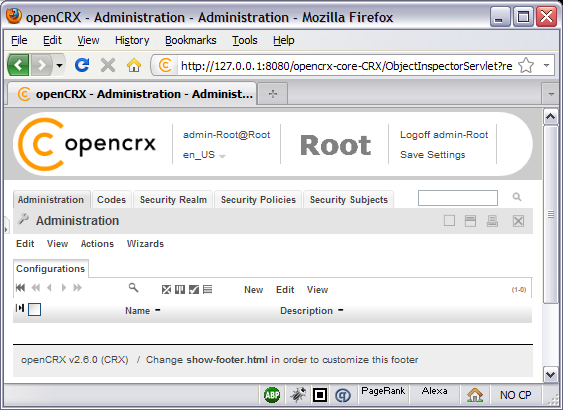
Figure 3: Start screen of admin-Root
4.1.2 Create Data Segment “Standard”
Execute the operation Actions > Create Administrator to create a new segment and selected default accounts (including an administrator's account which allows you to manage the newly created segment).
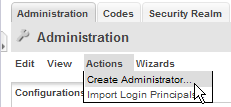
Figure 4: Create a new segment with Actions > Create Administrator
Set the field Segment name to Standard. Leave the field Admin principal name empty and set the fields Initial password and Password again to admin-Standard as shown in the figure below:
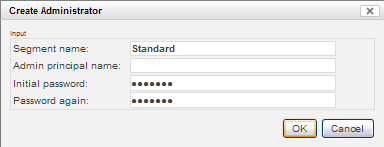
Figure 5: Create a new segment named Standard
|
|
Please verify the spelling/capitalization of
the segment name: |
Next you click OK to create the segment Standard and the segment administrator admin-Standard. The result of executing this operation should look as follows (Status 0 indicates that there were no errors):
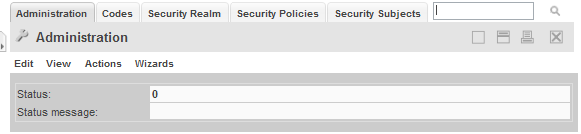
Figure 6: Result of operation Create Administrator
4.1.3 Import Codes and Data
openCRX is distributed with many code tables and several data files (e.g. unit of measurement information, activity management process). Code tables and data files must be imported from the provided XML files to make them available to openCRX. Execute the operation View > Reload and then click OK to start the import:
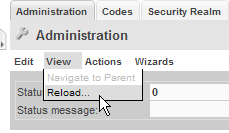
Figure 7: Load Code Tables and Data – Step 1

Figure 8: Load Code Tables and Data – Step 2
Please note that this operation takes some time to complete as thousands of objects are made persistent in your database during the import. The console output will look similar to the following listing:
Listing 9: Console Output – Importing Codes and Data
Wed Apr 21 15:04:25 CEST 2010 Loading codes
Wed Apr 21 15:04:25
CEST 2010 Storing 1708 code entries
...
Wed Apr 21 15:05:53
CEST 2010 Loading ui configuration...
Wed Apr 21 15:05:53 CEST
2010 Loading 2 files for locale en_US
...
Wed Apr 21 15:05:53
CEST 2010 Loading 1 files for locale ro_RO
Wed Apr 21 15:05:53
CEST 2010 Storing 41 ui elements for segment
org::openmdx::ui1/provider/CRX/segment/Advanced
Wed Apr 21
15:05:53 CEST 2010 Loading 77 files for locale en_US
...
Wed
Apr 21 15:05:53 CEST 2010 Loading 68 files for locale ro_RO
Wed
Apr 21 15:05:53 CEST 2010 Storing 3242 ui elements for segment
org::openmdx::ui1/provider/CRX/segment/Root
Wed Apr 21 15:05:53
CEST 2010 Done (2 segments
4.1.4 Set Access Levels of Codes
Navigate to the package Codes by clicking on the tab [Codes]. Next we change the perspective from Root to Advanced:

Figure 9: Change perspective from Root to Advanced
Execute the operation Security > Set Access Level as shown below:
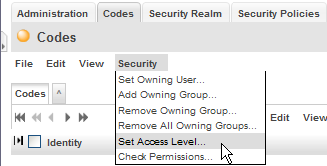
Figure 10: Execute Operation Security > Set Access Level
Set the parameters as shown below (i.e. 4, 3, 2, 1) and then click OK:
Figure 11: Parameters of Operation Set Access Level
Please note that this operation also takes a fair amount of time to complete:

Figure 12: Result of the Operation Set Access Level
The number in the status messages indicates the number of code values processed (you might get a different number, which is not a problem).
4.1.5 Restarting Tomcat
Please stop Tomcat by typing <CTRL>-C into the command window.
|
|
In case you're starting Tomcat without the help of a batch file that cleans Tomcat's temp and work directories, it is strongly advised that you clean them by hand before you start Tomcat again! |
On Windows you can start Tomcat by executing TOMCAT_HOME\bin\run.bat, on Linux you execute TOMCAT_HOME\bin\run.sh.
4.2 Initial Setup of Segment “Standard”
Once Tomcat is up and running again, we configure the new segment and create a new user guest.
4.2.1 First Login as “admin-Standard”
Connect to the login page of openCRX. The exact URL depends on your deployment details. For a standard openCRX deployment to JBoss running on your local machine and listening at port 8080 the URL is
http://localhost:8080/opencrx-core-CRX/Login.jsp
You should see the openCRX Login page. Enter admin-Standard into the field Username and then enter admin-Standard into the field Password (you may have chosen a different password, i.e. enter the password you chose when you created the segment):

Figure 13: First login with admin-Standard / opencrx
Click the button
![]() to start the login process.
to start the login process.
The ObjectInspectorServlet is initialized during this first login after restarting Tomcat, i.e. don't stop/kill the browser if it takes a while.
4.2.2 Configure Segment “Standard”
Once the admin-Standard's homepage is displayed, start the wizard Segment Setup. Select the menu Wizards > Segment Setup as shown below:
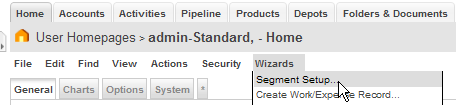
Figure 14: As admin-Standard start the wizard Segment Setup
This wizard verifies all the default objects of a segment. Running it on a newly created segments results in a lot of red crosses. Click the button [Setup] and the wizard will create all the missing objects (the red crosses will change to green check marks as shown below):
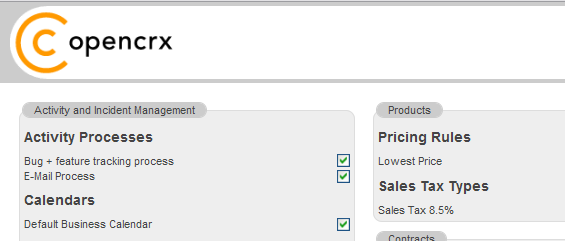
Figure 15: Wizard Segment Setup - properly configured Segment
Click on the button [Cancel] to leave the wizard and return to the homepage of the user admin-Standard.
4.2.3 Create a new Contact “guest”
Refresh the homepage of the user admin-Standard by clicking on the icon as show below:
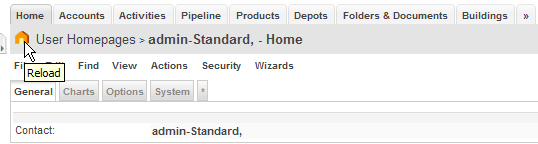
Figure 16: Refresh homepage of user admin-Standard
Hover your mouse over the fly-in tab to show the following menu:
Figure 17: Fly-in menu
Choose the entry Create Contact and click on it.
You will see an empty form ready to be populated with the data of our new user guest. At a minimum you must provide a last name, e.g. guest as shown below:
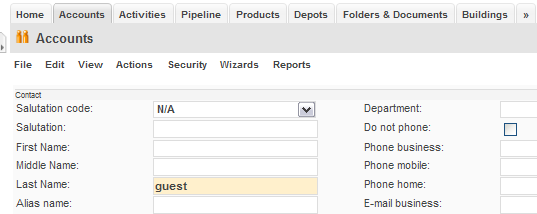
Figure 18: New contact guest – step 1
Next you click on the button [Search]. openCRX will verify that you don't already have a user with the same last name (but as we are working with a new/empty database this search doesn't bring up anything, of course).
Now you can create the new contact by clicking on the button [New Contact]:
![]()
Figure 19: New contact guest – step 2
As we don't want to create activities, leads or any other objects for our new contact, we now click [Cancel] to leave the wizard:
![]()
Figure 20: New contact guest – step 3
openCRX takes us first back to the Accounts grid and then right on to the newly created Contact guest:
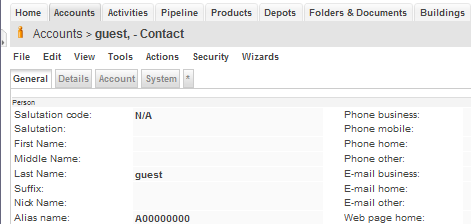
Figure 21: New contact guest – step 4
4.2.4 Create a new User “guest”
Click on the (hidden) tab [User Homepages]:
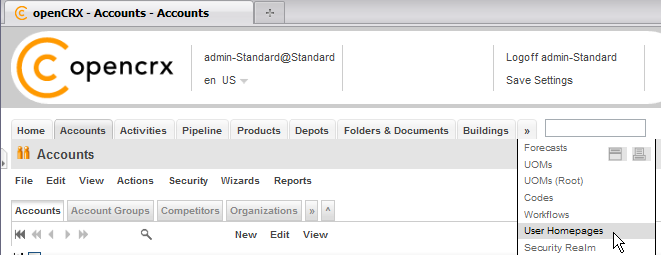
Figure 22: New user guest – step 1
Next you select the operation Actions > Create User... which allows you to create and initialize a new user:
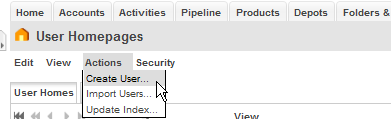
Figure 23: New user guest – step 2
Set the fields to the values as shown below – type guest into the field Principal name, use the Lookup Inspector or the auto-completer to fetch the Contact guest, leave and Primary user group empty and then type a password (e.g. guest) into the fields Initial password and Password again. Note that you must either fetch values with the Lookup Inspector or select entries from the auto-completer's drop down menu for the fields Contact and Primary user group, i.e. it is not sufficient to just type some text into these fields):
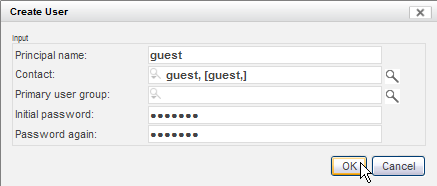
Figure 24: New user guest – step 3
Status 0 indicates that the user guest was created without errors:

Figure 25: New user guest – step 4
Next we navigate to the homepage of the newly created user guest by clicking on the icon as show below:
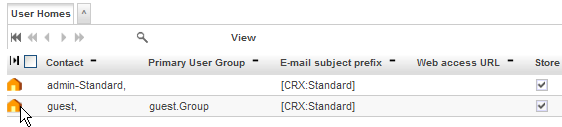
Figure 26: New user guest – step 5
Please note that we are still logged in as admin-Standard (as shown in the header of the application), but we are looking at the homepage of the user guest. Select the operation Edit > User Settings and click on it:
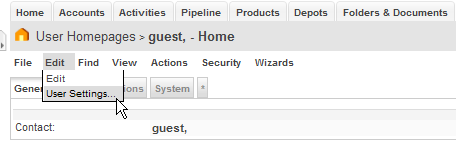
Figure 27: New user guest – step 6
This will start the wizard User Settings. You can configure various settings with this wizard. At a minimum you should probably set the timezone and enter the new user's e-mail address. Once you're done you can click the button [Apply]. The wizard will then create a bunch of objects and finalize the initialization of the user guest from the administrators point of view:
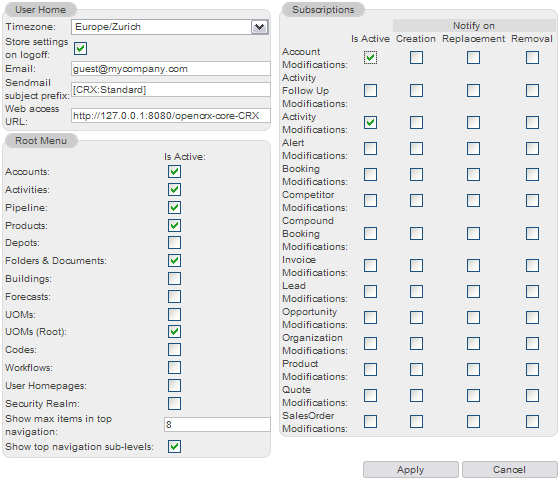
Figure 28: New user guest – step 7
Click [Cancel] to leave the wizard and then logoff as admin-Standard.
|
|
The wizard User Settings created a user group <username>.Group, in our case guest.Group. The primary user group of our user guest was automatically set to this new user group guest.Group. If you want to change the primary user group to anything else or if you ever must reset a user (lost password, etc.), you can re-execute the operation Create User as admin-Standard at any time. If you want to reset a user without changing the user's password, you can simply leave the password fields empty when recreating the user. |
4.2.5 Login as “guest” / User Settings
Let's verify whether our new user guest can actually login. Enter guest into the field username, guest into the field password, and then click [Login].
Select the operation Edit > User Settings and click on it:
Figure 29: New user guest – step 8
This will start the wizard User Settings. You can configure various settings with this wizard. Adjust the settings as you like. Once you're done you can click the button [Apply]. The wizard will then create a bunch of objects and finalize the initialization of the user guest.
That's it – you have successfully completed the installation and initialization of openCRX and you have also created a user guest.
5 Next Steps
As a final step, you should remove the entries for admin-Standard and guest from tomcat-users.xml (authentication will then be based on the information stored in the database).
open the file TOMCAT_HOME\conf\tomcat-users.xml and comment out users and roles as follows:
Listing 10: The file tomcat-users.xml
<?xml
version='1.0' encoding='utf-8'?>
<tomcat-users>
<role rolename="OpenCrxAdministrator"/>
<role
rolename="OpenCrxUser"/>
<role
rolename="OpenCrxRoot"/>
<role
rolename="manager"/>
<user
username="admin-Root" password="admin-Root"
roles="OpenCrxRoot"/>
<!--
<user username="admin-Standard"
password="admin-Standard"
roles="OpenCrxAdministrator,OpenCrxUser"/>
<user
username="guest" password="guest"
roles="OpenCrxUser"/>
-->
<user
username="system" password="manager"
roles="manager"/>
</tomcat-users>
|
|
It is recommended that you stay with the file-based authentication for the user admin-Root. |
Now that you have successfully installed and configured openCRX you might want to have a look at some of the additional documentation published at http://www.opencrx.org/documents.htm.
License
The contents of this file are
subject to a BSD license (the "License"); you may not use
this file except in compliance with the License. You may obtain a
copy of the License at http://
Copyright 2011 ©
CRIXP Corp. All rights reserved. ![]()