

|
|
Version

openCRX is the leading enterprise-class open source CRM suite. openCRX is based on openMDX, an open source MDA framework based on the OMG's model driven architecture (MDA) standards. This guarantees total openness, standards compliance, a state-of-the-art component-based architecture, and virtually unlimited scalability.
Table of Contents
1.2 What do you need to understand this book 4
2.1 Selection of Software Packages / Versions 5
2.3 Installing / Configuring Database 7
2.4 Installing Apache Tomcat or JBoss Application Server 7
3 openCRX Setup and Configuration 8
3.2 Verify/Create Application Server Logins 8
3.3 Initial Setup of openCRX Application 9
3.3.1 First Login as “admin-Root” 10
3.3.2 Create Data Segment “Standard” 12
3.3.3 Import Codes and Data 13
3.3.4 Set Access Levels of Codes 14
3.3.5 Restarting the Application Server 15
3.4 Initial Setup of Segment “Standard” 15
3.4.1 First Login as “admin-Standard” 15
3.4.2 Configure Segment “Standard” 17
3.4.3 Create a new Contact “guest” 18
List of Figures
Figure 1: openCRX Login page 9
Figure 2: First login with admin-Root / rootSecret 10
Figure 3: Start screen of admin-Root 11
Figure 4: Create a new segment named Standard 12
Figure 5: Result of operation Create Administrator 12
Figure 6: Load Code Tables and Data – Step 1 13
Figure 7: Load Code Tables and Data – Step 2 13
Figure 8: Execute Operation Set Access Level 14
Figure 9: Parameters of Operation Set Access Level 14
Figure 10: Result of the Operation Set Access Level 14
Figure 11: First login with admin-Standard / adminSecret 16
Figure 12: As admin-Standard start the wizard Segment Setup 17
Figure 13: Wizard Segment Setup - properly configured Segment 17
Figure 14: Create new Contact – Step 1 18
Figure 15: Create new Contact – Step 2 18
Figure 16: Create new User 19
Figure 17: Result of operation Create User 20
List of Listings
Listing 1: Console Output – JBoss startup 7
Listing 2: File users.properties with syntax user=password 8
Listing 3: File roles.properties with syntax user.Roles=role1,role2,... 8
Listing 4: Console Output – Initialization of the openCRX servlet 11
Listing 5: Console Output – Importing Codes and Data 13
1 About this Book
This book describes what you need to get started with openCRX and how to configure openCRX. Please note that this is a guide on how to manually set up a runtime environment.
If you're looking for an automated installation method, please consider our openCRX Server Installer available from http://www.opencrx.org/server.htm.
1.1 Who this book is for
The intended audience are openCRX administrators and advanced users who plan to manually install the openCRX application.
1.2 What do you need to understand this book
This book describes how to install openCRX and how to configure openCRX. Even though it is possible to install openCRX without a deeper understanding of J2EE applications, application servers, and database management systems, it is still a plus if you are comfortable with these topics.
openCRX is an enterprise-class J2EE application. Installation, administration, and maintenance of such applications is somewhat more involved than running a simple setup.exe (or make install, for that matter). So please do not expect that you will manage to install openCRX in 10 minutes as even experienced administrators can easily spend an hour or more on their first manual install.
1.3 Tips, Warnings, etc.
We make use the following pictograms:
|
|
Information provided as a “Tip” might be helpful for various reasons: time savings, risk reduction, etc. - it goes without saying that we advise to follow our guides meticulously
meticulous \muh-TIK-yuh-luhs\,
adjective: |
|
|
You should carefully read information marked with “Important”. Ignoring such information is typically not a good idea. |
|
|
Warnings should not be ignored (risk of data loss, etc.) |
2 Prerequisites
Installing openCRX is a somewhat involved process as you are required to install/configure various other components as well.
|
|
If you are not comfortable with setting up an application server, installing a database management system, building EARs, etc. you might want to have a look at the openCRX Server Installer. The installer will take care of all the installation tasks so that there is no need to work through this QuickStart guide. |
Before you get started with the selection process, however, it is a good idea to spend some time browsing the various pages containing information about the products and reviewing the openCRX version compatibility information provided at http://www.opencrx.org/faq.htm#versioncompatibility.
2.1 Selection of Software Packages / Versions
|
|
In the end, you will have installed several software packages and it makes sense to write down the names and version numbers of these software packages – this information might be helpful in the future in case you require support or want to file a bug report: |
|
|
|
|---|
2.2 JDK 5.0
Install the Sun Java JDK 5.0 available
from
http://java.sun.com/javase/downloads/index_jdk5.jsp
|
|
You really need Java 5, i.e. neither Java 4 nor Java 6 will work. |
|
|
It is not sufficient to have a Java Runtime Environment (JRE) only. The full-blown JDK is required to run openCRX. |
|
|
Don't forget to set the environment variable JAVA_HOME |
|
|
If you deploy openCRX on Sun's JVM you might run into a problem that is mind-boggling (but specific to the Sun JVM). It's the dreaded PermGen OutOfMemoryError While increasing the size of the PermGen space
with the appropriate JVM option might postpone the problem it is
not really a solution: Lots of people have been struggling with this error (which is by the way not related to openCRX – any application could trigger it) and as of today we have not come across a solution other than to avoid Sun's JVM (JVMs by Oracle/BEA and IBM are – by construction – not prone to this error). Do a Google search if you want to convince yourself or drop us a line if you have a solution. But be aware that increasing the memory allocated for the permanent generation is no solution – it will only postpone the problem: |
2.3 Installing / Configuring Database
As far as the database is concerned, the openCRX FAQ might give you some guidance in making your choice (please note that the openCRX distribution includes all the required configuration and deployment files for PostgreSQL, HSQLDB, MySQL, MS SQL, IBM DB/2 and Oracle). Various openCRX installation guides for database management systems are available from http://www.opencrx.org/documents.htm.
The remainder of this document assumes that you decided for MySQL and hence – after following the openCRX Installation Guide for MySQL – you should have a working installation of the MySQL database before you continue with this guide.
2.4 Installing Apache Tomcat or JBoss Application Server
openCRX v2.2+ can be deployed on Apache Tomcat resulting not only in much reduced complexity without loss of functionality compared to the deployment on a full-blown application server, there is also a performance gain of at least a factor of 2. Additional information regarding the openCRX deployment matrix is available from http://www.opencrx.org/faq.htm#deploymentmatrix
In order to install Apache Tomcat, please use the openCRX Server Installer. While you could obviously do a manual installation of Tomcat, using the installer is both the easiest and the fastest way to end up with a working openCRX instance.
If you prefer to deploy openCRX on the JBoss application server, please refer to the openCRX Installation Guide for JBoss. The remainder of this document assumes that you decided for JBoss and hence you should have a working installation of the JBoss application server before you continue with this guide.
Obviously, if you ended up making different choices, you can still follow this guide. You might have to make some minor adjustments to the instructions given here and some of our screen shots might look somewhat different from what you will see on your screen.
|
|
Do NOT deploy any other openCRX EARs (e.g. groupware) in addition to opencrx-core-CRX.ear before having completed the setup based on this guide. |
Assuming you have JBoss up and running, the last few lines of your console output should look similar to the following ones:
Listing 1: Console Output – JBoss startup
...
17:23:05,728 INFO
[Http11AprProtocol] Starting Coyote HTTP/1.1 on
http-0.0.0.0-8080
17:23:05,759 INFO [Server] JBoss (MX
MicroKernel) [4.2.2.GA (build: CVSTag=Branch_4_2 date=200810162339)]
Started in 32s:141ms
Now you are ready to continue.
3 openCRX Setup and Configuration
Once the database is ready and openCRX properly deploys on your application server there are still a few tasks left to set up and configure openCRX. This chapter guides you through these tasks on a step-by-step basis.
3.1 Overview
Let us give you a brief overview of the tasks ahead before we get started:
Verify/Create Application Server Logins {openCRX/AppServer Admin}
Initial Setup of openCRX Application {openCRX Admin}
First Login as “admin-Root” {openCRX Admin}
Create Data Segment “Standard” {openCRX Admin}
Import Codes and Data {openCRX Admin}
Set Access Levels of Codes {openCRX Admin}
Initial Setup of Segment “Standard” {Segment Admin}
First Login as “admin-Standard” {Segment Admin}
Configure Segment “Standard” {Segment Admin}
Create a new Contact “guest” {Segment Admin}
All right, let's get started.
3.2 Verify/Create Application Server Logins
For the following steps we assume that the openCRX administrator has configured the users admin-Root, admin-Standard and guest with the appropriate roles on the application server. In the case of JBoss this requires creating/editing the files users.properties and roles.properties as follows:
Listing 2: File users.properties with syntax user=password
admin-Root=rootSecret
admin-Standard=adminSecret
guest=guest
Listing 3: File roles.properties with syntax user.Roles=role1,role2,...
admin-Root.Roles=OpenCrxRoot
admin-Standard.Roles=OpenCrxAdministrator
guest.Roles=OpenCrxUser
|
|
It is strongly recommended that you stay with the file-based UsersRolesLoginModule for the user admin-Root. This greatly simplifies the openCRX bootstrapping |
3.3 Initial Setup of openCRX Application
Connect to the login page of openCRX. The exact URL depends on your deployment details. For a standard openCRX deployment to JBoss running on your local machine and listening at port 8080 the URL is
http://localhost:8080/opencrx-core-CRX/Login
You should see the openCRX Login page as follows:
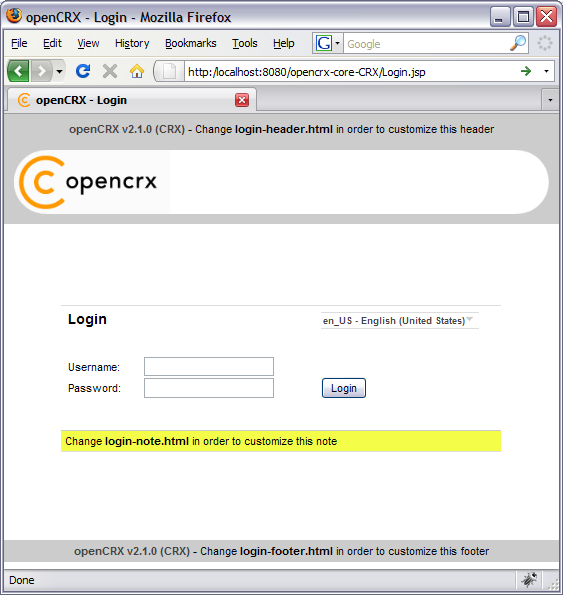
Figure 1: openCRX Login page
3.3.1 First Login as “admin-Root”
Enter admin-Root into the field Username and then enter rootSecret into the field Password (you may have chosen a different password, i.e. enter the password you chose during installation/configuration of the application server):
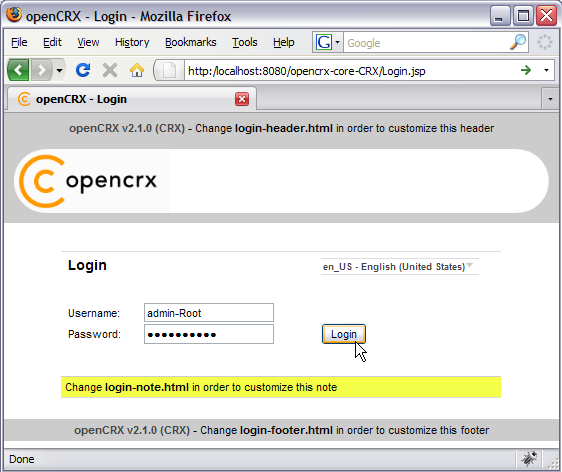
Figure 2: First login with admin-Root / rootSecret
Click the button
![]() to start the initialization process.
to start the initialization process.
|
|
If you can't get past the login screen (with the correct Username and Password, of course) and the Warning “Browser must accept cookies” keeps showing up need to verify your browser settings related to cookies. If you have installed a personal firewall (e.g. ZoneAlarm, Comodo, etc.) you also need to verify the cookie settings of your firewall. The application server must be able to create/set a session cookie. |
The openCRX servlet is initialized during this first login, i.e. don't kill the browser if it takes a while. The application console output will look similar to the following listing:
Listing 4: Console Output – Initialization of the openCRX servlet
10:09:48,756 INFO [STDOUT] Wed Dec 13 10:09:48 CET 2006: Login: requestURL=http://localhost:8080/opencrx-core-10:10:23,026 INFO [STDOUT] Inspecting /WEB-INF/config/filters
|
|
If you see lots of error messages on the console and/or your log files grow very fast (several hundred KB if not more) then it is quite likely that your DB connection is not configured correctly. If your log file contains errors like MEDIA_ACCESS_FAILURE there is definitely something wrong with your DB connection (or your DB). Please note that there is absolutely no sense in continuing before you have fixed your DB connection. You might want to verify
|
After the successful startup of the openCRX servlet you see a screen similar to the one shown in the figure below. You should at least see the root objects Administration, Codes, Security Realm, Security Policies, and Security Subjects:
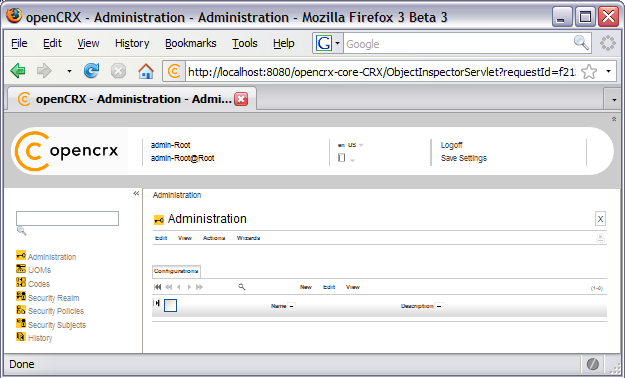
Figure 3: Start screen of admin-Root
3.3.2 Create Data Segment “Standard”
Execute the operation Actions > Create Administrator to create a new segment and selected default accounts (including an administrator's account which allows you to manage the newly created segment).
Set the field Segment name to Standard. Leave the field Admin principal name empty and set the fields Initial password and Password again to opencrx as shown in the figure below:
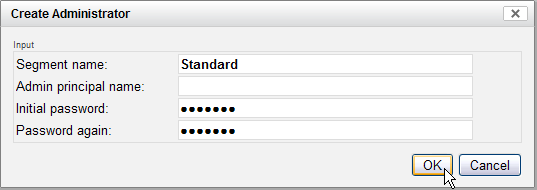
Figure 4: Create a new segment named Standard
|
|
Please verify the spelling of the segment
name: |
Next you click OK to execute the operation Create Administrator which creates the segment named Standard and user admin-Standard. The result of executing this operation should look as follows (Status 0 indicates that there were no errors):
![]()
Figure 5: Result of operation Create Administrator
3.3.3 Import Codes and Data
openCRX is distributed with many code tables and several data files (e.g. unit of measurement information, standard activity management process). Code tables and data files must be imported from the provided XML files to make them available to openCRX.
Execute the operation View > Reload and then click Yes to start the import:
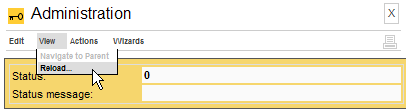
Figure 6: Load Code Tables and Data – Step 1
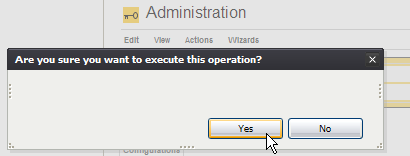
Figure 7: Load Code Tables and Data – Step 2
Please note that this operation takes some time to complete as thousands of objects are made persistent in your database during the import. The console output will look similar to the following listing:
Listing 5: Console Output – Importing Codes and Data
...
10:31:59,894 INFO [STDOUT] Loading codes
10:31:59,894
INFO [STDOUT] Loading
/WEB-INF/config/code/Root/en_US/accesslevel.xml
10:31:59,925 INFO
[STDOUT] Loading
/WEB-INF/config/code/Root/en_US/accountcategory.xml
10:31:59,925
INFO [STDOUT] Loading
/WEB-INF/config/code/Root/en_US/accountrole.xml
...
10:32:00,300
INFO [STDOUT] Loading
/WEB-INF/config/code/Root/de_CH/accesslevel.xml
10:32:00,316 INFO
[STDOUT] Loading
/WEB-INF/config/code/Root/de_CH/accountcategory.xml
10:32:00,316
INFO [STDOUT] Loading
/WEB-INF/config/code/Root/de_CH/accountrole.xml
...
13:18:02,441
INFO [STDOUT] Loading
/WEB-INF/config/code/Root/es_CO/usageproductbaseprice.xml
13:18:02,457
INFO [STDOUT] Loading
/WEB-INF/config/code/Root/es_CO/utcoffset.xml
13:18:02,488 INFO
[STDOUT] Storing 1538 code entries
13:19:06,585 INFO [STDOUT]
Done
13:19:06,648 INFO [STDOUT] Loading data
13:19:06,648
INFO [STDOUT] Loading
/WEB-INF/config/data/Standard/bug-and-feature-process.xml
13:19:07,384
INFO [STDOUT] Storing 26 objects
13:19:10,093 INFO [STDOUT]
Loading /WEB-INF/config/data/Standard/contracts.xml
13:19:10,908
INFO [STDOUT] Storing 1 objects
13:19:11,033 INFO [STDOUT]
Loading /WEB-INF/config/data/Standard/products.xml
13:19:13,022
INFO [STDOUT] Storing 1 objects
13:19:13,319 INFO [STDOUT]
Loading /WEB-INF/config/data/Root/uom_SI_and_Paper.xml
13:19:14,415
INFO [STDOUT] Storing 42 objects
13:19:15,903 INFO [STDOUT]
Done
3.3.4 Set Access Levels of Codes
Navigate to the package Codes by clicking on the Root menu entry Codes. Then execute the operation Security > Set Access Level as shown below:
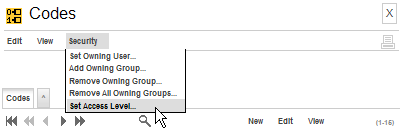
Figure 8: Execute Operation Set Access Level
Set the parameters as follows (see also figure below):
Browse access level: [4]
global
Update access level: [2]
basic
Delete access level: [2]
basic
Mode: [1]
recursive
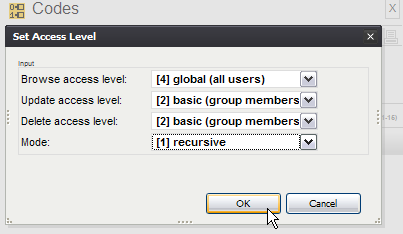
Figure 9: Parameters of Operation Set Access Level
Please note that this operation can also take a fair amount of time to complete:
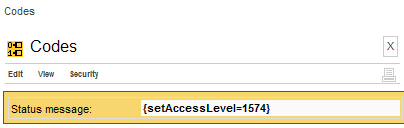
Figure 10: Result of the Operation Set Access Level
3.3.5 Restarting the Application Server
Please restart the application server for the newly imported codes to become active. You can stop JBoss by typing <CTRL>-C into the command window.
|
|
After stopping JBoss and before restarting JBoss it is strongly advised that you delete the tmp and work directories: jboss-4.2.1.GA\server\default\tmp jboss-4.2.1.GA\server\default\work |
On Windows you can start JBoss by executing run.bat located in the directory jboss-4.2.1.GA\bin (on Linux you execute run.sh).
3.4 Initial Setup of Segment “Standard”
Once your application server is up and running again and openCRX properly deployed, we configure the new segment and create a new user.
3.4.1 First Login as “admin-Standard”
Connect to the login page of openCRX. The exact URL depends on your deployment details. For a standard openCRX deployment to JBoss running on your local machine and listening at port 8080 the URL is
http://localhost:8080/opencrx-core-CRX/Login
You should see the openCRX Login page as follows. Enter admin-Standard into the field Username and then enter adminSecret into the field Password (you may have chosen a different password, i.e. enter the password you chose during installation/configuration of the application server):
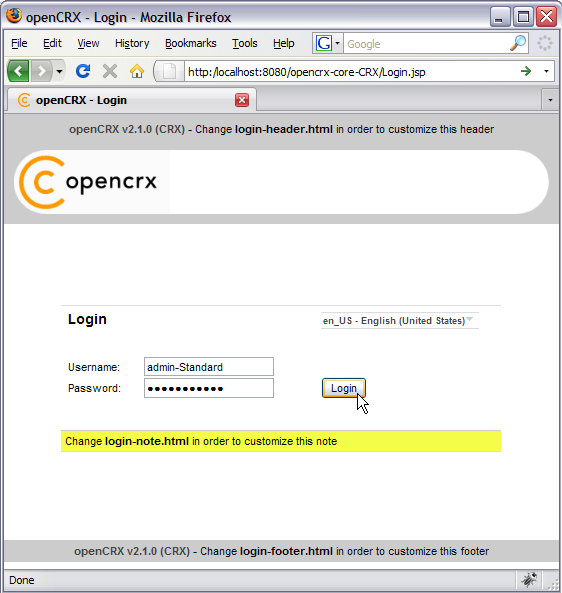
Figure 11: First login with admin-Standard / adminSecret
Click the button
![]() to start the login process.
to start the login process.
The openCRX servlet is initialized during this first login after restarting JBoss, i.e. don't kill the browser if it takes a while.
|
|
Please note that no charts are displayed when a users logs in for the first time. Activate charts by executing the operation View > Recalculate and Refresh. |
3.4.2 Configure Segment “Standard”
Once the admin-Standard's homepage is displayed, start the wizard Segment Setup. Select the menu Wizards > Segment Setup as shown below:
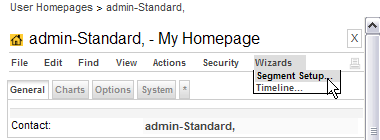
Figure 12: As admin-Standard start the wizard Segment Setup
This wizard verifies all the default objects of a segment. Running it on a newly created segments results in a lot of red crosses. Click on the button [Setup] and the wizard will create all the missing objects. You should end up with green check marks as shown in the following figure:
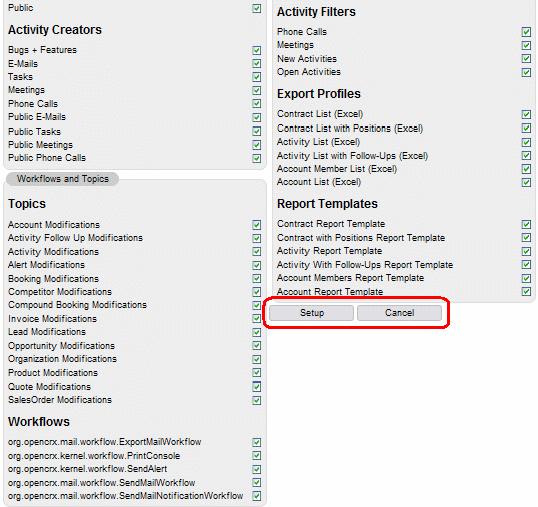
Figure 13: Wizard Segment Setup - properly configured Segment
Click on the button [Cancel] to return to the homepage of admin-Standard.
3.4.3 Create a new Contact “guest”
Click on the package Accounts in the root menu and then select the creator menu New > Contact as shown in the figure below:
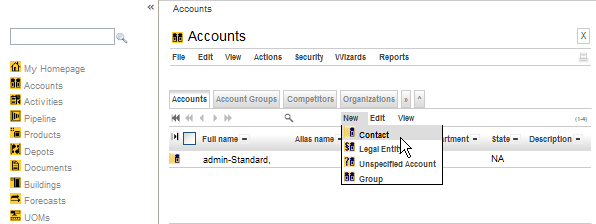
Figure 14: Create new Contact – Step 1
This brings up the form for new contacts. Enter guest into the field Last name (feel free to provide additional information, but don't change the Qualifier, which is generated automatically by openCRX, unless you know exactly what you are doing):
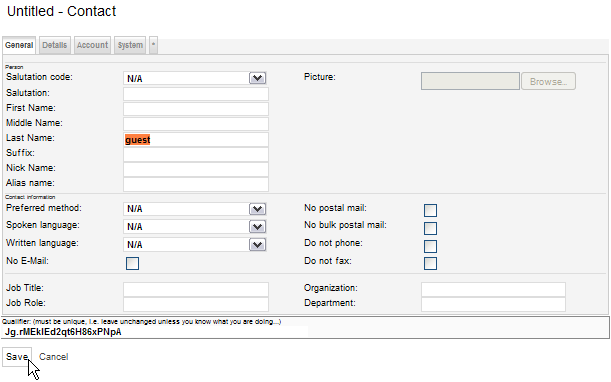
Figure 15: Create new Contact – Step 2
Next you click Save to store this new Contact. This will take you back to the Account grid.
3.4.4 Create a new User “guest”
Click on the package User Homepages and select the operation Actions > Create User... which allows you to create and initialize a new user. Set the fields to the values as shown below – type guest into the field Principal name, use the Lookup Inspector or the autocompleter to fetch values for Contact and Primary user group (note that you must either fetch values with the Lookup Inspector or select entries from the autocompleter's drop down menu for the parameters Contact and Primary user group, i.e. it is not sufficient to just type some text into these fields), and then type a password (e.g. guest) into the fields Initial password and Password again:
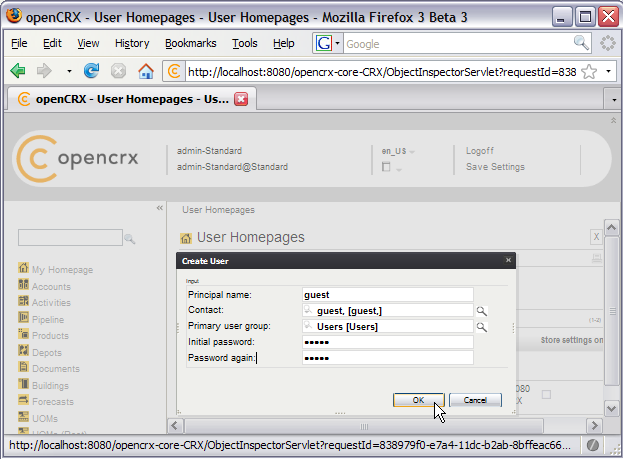
Figure 16: Create new User
|
|
Passwords are stored in the table security_Credential. If you do not have the login module of your application server configured to access the table security_Credential then the setting of the passwords in openCRX has no effect (with JBoss, for example, you can edit the files users.properties and roles.properties to add users with file-based authentication). |
Next you click [OK] to execute the operation Create User which creates the User named guest. The result of executing this operation should look as follows (Status 0 indicates that there were no errors):
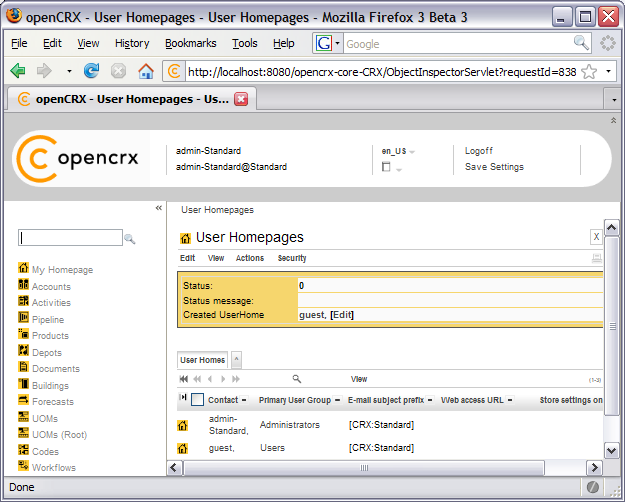
Figure 17: Result of operation Create User
The grid User Homes contains now 2 entries: admin-Standard and guest.
Congratulations! You have successfully created the new user guest. The new user should now be able to login. You can verify this by logging off and then logging on with Username guest and Password guest.
|
|
You can usually fix corrupt data of an existing user by creating this user's homepage again – note, however, that the respective user's personal settings are reset to default values by executing the operation Create User. |
4 Next Steps
Now that you have successfully installed and configured openCRX you might want to have a look at some of the additional documentation published at http://www.opencrx.org/documents.htm.
License
The contents of this file are
subject to a BSD license (the "License"); you may not use
this file except in compliance with the License. You may obtain a
copy of the License at http://
Copyright 2008 ©
CRIXP Corp. All rights reserved. ![]()