

|
|
Version

Table of Contents
1.2 What do you need to understand this book 4
3 Issue(s) specific to PostgreSQL 8.x 6
3.1 Puzzling behavior of PostgreSQL 8.3 6
3.1.1 Implications for openCRX 6
3.3 Support for SOUNDS LIKE and SOUNDS NOT LIKE 7
3.4 PostgreSQL Installation Hints / Locale Support 8
4 Upgrading from previous openCRX versions 9
5.1 Create the database with psql terminal 10
5.2 Create the database with pgAdmin III 12
List of Figures
Figure 1: Initdb parameters of pgInstaller on Windows 8
Figure 2: Use openCRX “Database schema wizard” to upgrade schema 9
Figure 3: Start pgAdmin III and connect to the database 12
Figure 4: Create a new Login Role system – Step 1 12
Figure 5: Create a new Login Role system – Step 2 13
Figure 6: Create a new Database – Step 1 13
Figure 7: Create a new Database – Step 2 14
Figure 8: Create a new Database – Step 3 14
Figure 9: Use openCRX “Database schema wizard” to create schema 15
List of Listings
Listing 1: Configure access to DB 10
Listing 2: Remove ident sameuser 10
Listing 3: Stop PostgreSQL server 10
Listing 4: Start PostgreSQL server 10
Listing 5: Create user system with psql terminal 11
Listing 6: Create the database CRX_CRX with psql terminal 11
1 About this Book
This book describes how to setup an openCRX database instance for PostgreSQL.
1.1 Who this book is for
The intended audience are openCRX database administrators.
1.2 What do you need to understand this book
This book describes the installation of openCRX for PostgreSQL. The book assumes that you are familiar with PostgreSQL installation and configuration.
1.3 Tips, Warnings, etc.
We make use the following pictograms:
|
|
Information provided as a “Tip” might be helpful for various reasons: time savings, risk reduction, etc. |
|
|
You should carefully read information marked with “Important”. Ignoring such information is typically not a good idea. |
|
|
Warnings should not be ignored (risk of data loss, etc.) |
2 Prerequisites
As a first step you must download the following software packages:
Download and install openCRX Server Installer. It is available from http://www.opencrx.org/server.htm
openCRX Server includes a HSQLDB database from which the openCRX Database Schema wizard can construct the schema of the PostgreSQL database (you don't need to run any schema scripts...)
Download PostgreSQL Database Server from http://www.postgresql.org/download/

We recommend PostgreSQL v9.0 or newer as the performance is much better than with previous versions.
For Windows, get the pgInstaller (and not the “one click installer”) – the reason is explained in chapter 3.4 PostgreSQL Installation Hints / Locale Support.
Download pgAdmin III from http://www.postgresql.org/download/
Download the current PostgreSQL JDBC 4 driver from http://jdbc.postgresql.org/download.html
The JDBC driver is required to connect to the database.
|
|
Please ensure that you install the correct JDBC driver (i.e. correct in terms of type, version, etc.) and one JDBC driver only! Ignoring this wisdom leads to problems as the connection to the database will fail. Read the information provided at http://jdbc.postgresql.org/ carefully as picking the wrong driver will cause you misery. For example, with postgreSQL v9.0 and openCRX v2.10 (and hence JDK 6) you should choose the current JDBC 4 driver “9.0-802 JDBC 4” (as of 29-AUG-2012). |
|
|
Read the next chapter “Issue(s) specific to PostgreSQL” before you install PostgreSQL – at a minimum you should read chapter 3.4 PostgreSQL Installation Hints / Locale Support to understand the importance of a correctly configured database cluster. |
As a next step you must install PostgreSQL and pgAdmin III (please refer to the PostgreSQL documentation for installation details).
3 Issue(s) specific to PostgreSQL 8.x
Like any other DBMS, PostgreSQL has some issues and we want you to be aware of them.
3.1 Puzzling behavior of PostgreSQL 8.3
Based on our analysis, it seems PostgreSQL is not behaving consistently across platforms. The replies to the following (trivial) select statements are irritating:
|
Select Statement |
expected |
pg 8.3 on |
pg 8.2 on |
pg 8.3 on |
pg 9.0 on |
|
select '0' > '/' |
true |
true |
true |
true |
true |
|
select '0' > '/a' |
true |
true |
false |
false |
true |
|
select '0' > '/aa' |
true |
true |
false |
false |
true |
|
The replies of pg 8.3 on Windows are correct, some of the replies of pg on Linux are (in our opinion) not correct. This puzzling behavior is the reason why you might need some special settings to improve performance of openCRX with PostgreSQL.
A note to the PostgreSQL community:
We
are aware of locale-specific sorting, but the results of the above 3
select statements should be true for any locale as
'0' > '/' implies '0' > '/(.)+'
(unless '/' is treated as some kind of special escape character in a particular locale so that '/a < '0' is true for such a locale; to our best knowledge, such a locale does not exist).
|
|
Details of PostgreSQL locale support are
available
from |
3.1.1 Implications for openCRX
As “object ID matching” (OID matching) is a frequent operation it is absolutely crucial that it can be done in a very efficient way, otherwise openCRX will suffer from a heavy performance hit. The openCRX database plugin does OID matching with SQL statements containing comparisons like
(object_id > id_pattern_0) and (object_id < id_pattern_1)
Given the issues that exist with PostgreSQL the default configuration of the openCRX database plugin resorts to a comparison based on LIKE. We are aware of the implications – a severe performance hit – as prepared statements with LIKE comparisons typically don't use indices.
3.2 Enhancing performance
If any of the following conditions is true you can override the default setting of the openCRX database plugin:
the locale of the openCRX database is equal to C
the locale of the openCRX database is equal to POSIX
lc_collate and lc_ctype of your pg cluster are equal to C; open a query window in pgAdmin and execute “show all” to see the settings of your database cluster:

With PostgreSQL, the system property
org.openmdx.persistence.jdbc.useLikeForOidMatching
is by default set to true; this ensures that OID matching works as expected, but the price is a severe performance hit. If any of the above conditions is satisfied you can safely set this system property to false resulting in much improved performance. You can override the default setting by providing the following startup option to openCRX:
-Dorg.openmdx.persistence.jdbc.useLikeForOidMatching=false
|
|
Setting useLikeForOidMatching to false without ensuring that
is asking for severe trouble as OID matching will not work as intended. Sooner or later you will run into data consistency issues. Hence, initialize your database cluster as described below or leave useLikeForOidMatching at its default value (true). |
3.3 Support for SOUNDS LIKE and SOUNDS NOT LIKE
Out of the box PostgreSQL does not suppport the operators SOUNDS LIKE and SOUNDS NOT LIKE. However, you can run the script fuzzystrmatch.sql, which is contained in the directory <pg installation directory>/share/contrib. Executing the script will add support for SOUNDS LIKE and SOUNDS NOT LIKE.
3.4 PostgreSQL Installation Hints / Locale Support
Assuming you want full UTF-8 support for the openCRX database, we recommend you set the locale behavior of the server to C as follows.
On Linux,
install the latest version of PostgreSQL (and the required libraries)
install pgadmin
please note that the package installer runs initdb automatically, but probably not with the desired locale settings (by default, initdb is run with the same locale as your OS default locale, i.e. typically UTF-8; this leads to problems as indicated in chapter 3.1 Puzzling behavior of PostgreSQL 8.3), hence we need to redo the initialization:
stop pg daemon
rename /var/lib/pgsql/data to /var/lib/pgsql/data.ori
su - postgres
initdb --pgdata=data --encoding=UTF8 --locale=C --username=postgres --pwprompt
Alternatively, you can set "LC_ALL=C" in the environment of the relevant pg processes; if LC_ALL is set to "C", the PostgreSQL sort order is also correct.
On Windows, use the pgInstaller which allows you to set initdb parameters as follows (more information at http://pginstaller.projects.postgresql.org/):
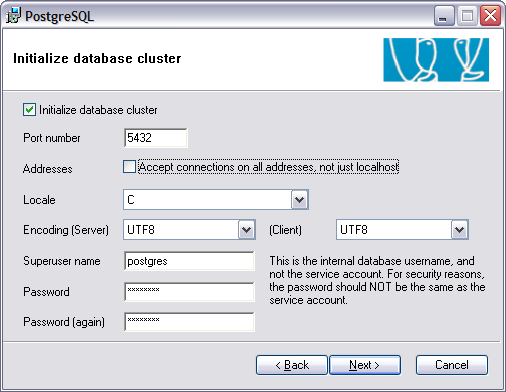
Figure 1: Initdb parameters of pgInstaller on Windows
Warning: Note that the one click installer does not set the locale to C!
4 Upgrading from previous openCRX versions
If you already have PostgreSQL for openCRX installed, upgrade the database schema with the openCRX wizard “Database schema wizard” as explained in the openCRX wiki.
|
|
Backup your database before you run the wizard! |
|
|
Please consult http://www.opencrx.org/faq.htm#upgrade and find out whether there exist specific instructions for your openCRX version. Instructions below are generic and might not cover all steps required to successfully upgrade your openCRX version. |
|
|
Please note that you cannot skip openCRX versions when upgrading your database. |
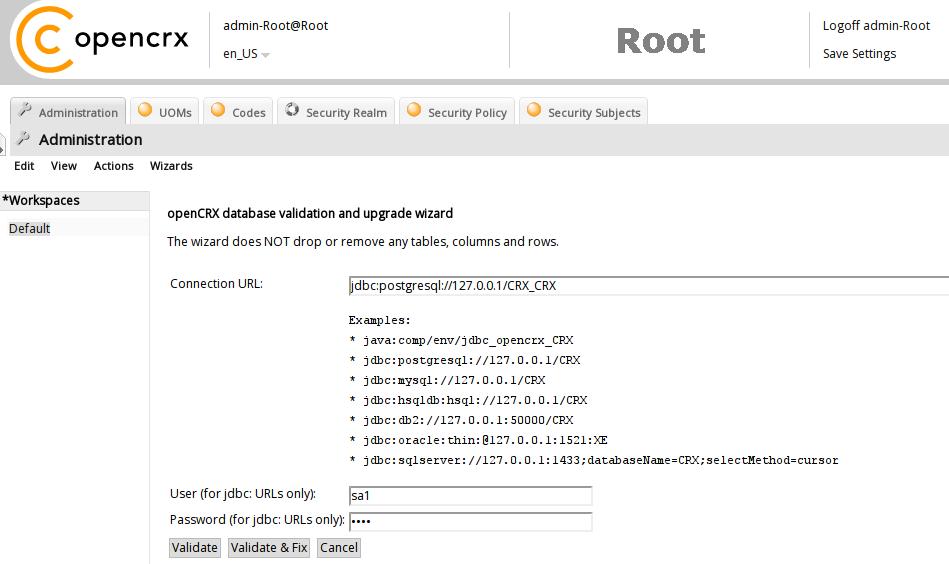
Figure 2: Use openCRX “Database schema wizard” to upgrade schema
5 Create the database
You can either create the database with the psql terminal or with pgAdmin III.
5.1 Create the database with psql terminal
In order to connect to a PostgreSQL server from a remote pgAdmin III instance you have to properly configure the PostgreSQL server.
Let the PostgreSQL server accept connections from inside your network (suppose 192.168.1.0/24) by postgres and system users. We suppose the connections will be clear (not ssl) and protected by a password authentication mechanism. To do this, add the following lines at the end of the file <postgres home dir>/data/pg_hba.conf:
Listing 1: Configure access to DB
#TYPE DATABASE USER IP-ADDRESS
IP-MASK METHOD
local all all
password
host CRX_CRX system
192.168.1.0 255.255.255.0 password
host all
postgres 192.168.1.0 255.255.255.0 password
|
|
Remove the line with ident sameuser if it exists in pg_hba.conf: Listing 2: Remove ident sameuser host all all 127.0.0.1 255.255.255.255 ident sameuser |
If the PostgreSQL server is running, stop it before you continue:
Listing 3: Stop PostgreSQL server
postgres$pg_ctl stop
Next, the PostgreSQL server has to be configured to accept more than one connection through a socket. To do this, log-in to the system with the PostgreSQL server user account (usually postgres) and start the PostgreSQL server with the following options:
Listing 4: Start PostgreSQL server
postgres$pg_ctl -o -i -l postmaster.log start
Now you can connect to the default PostgreSQL server database (template1) with the postgres user (DB Administrator).
Create a PostgreSQL user named system. Set the password of the user to manager (for the purpose of this guide). Allow the user to create databases.
Listing 5: Create user system with psql terminal
su - postgres # change to your
postgresql Account.
createuser -P system # Create the user
system and ask for a password
Create the database CRX_CRX with the following commands:
Listing 6: Create the database CRX_CRX with psql terminal
su – postgres
createdb -h localhost -E
utf8 -U system CRX_CRX
|
|
Set the Encoding to UTF-8 if you intend to make use of the openCRX UTF-8 support (but make sure you fully understand the information provided in chapters 3.1 Puzzling behavior of PostgreSQL 8.3 and 3.4 PostgreSQL Installation Hints / Locale Support. |
|
|
Please note that you are free to choose any database name you like, i.e. there is no requirement to name the database CRX_CRX. However, you must ensure that the database name you choose is also used in the respective database definition file (e.g. tomee.xml for Apache TomEE) and any other configuration that contains the database name. For example, don't forget to adapt the
following Java
option |
You have completed creating the openCRX database.
5.2 Create the database with pgAdmin III
Start pgAdmin III and connect to the appropriate database server:
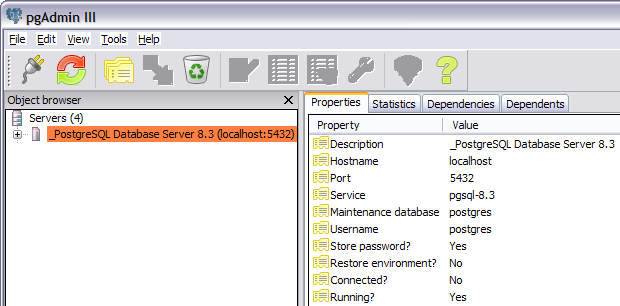
Figure 3: Start pgAdmin III and connect to the database
Next you create a new login role system as follows:

Figure 4: Create a new Login Role system – Step 1
You will get a new window New Login Role where you can enter the Role name system and a password (we use password manager for the purpose of this guide) – verify that you check options as shown below:
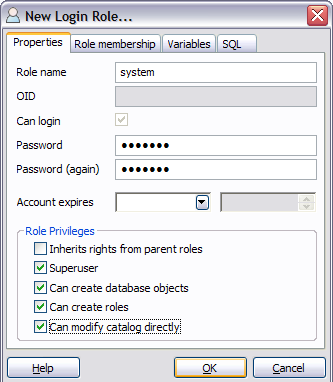
Figure 5: Create a new Login Role system – Step 2
|
|
Please note that the login role system must be a Superuser |
pgAdmin III allows you to create and manage databases. Before you can install the openCRX database schema objects you must create a new database for openCRX. Right-click on the tree item Databases and then select the pop-up menu entry New Database as shown below:
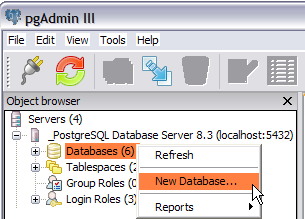
Figure 6: Create a new Database – Step 1
You will get a new window New Database – populate it as shown below to create the database CRX_CRX owned by system:
|
|
It is highly recommended to set the encoding to UTF-8 so that you can make use of the openCRX's multi-language support that requires a UTF-8 encoded database. |
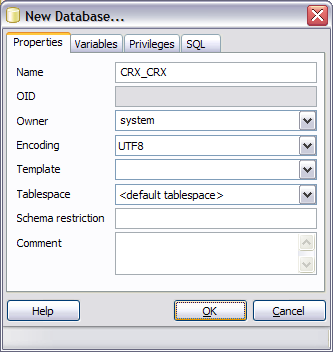
Figure 7: Create a new Database – Step 2
After creating the new Database CRX_CRX your pgAdmin III window should look similar to the following figure:

Figure 8: Create a new Database – Step 3
You have completed creating the database CRX_CRX.
6 Create the openCRX Database Schema
After creating the database you are now ready to create the openCRX database schema. With earlier openCRX versions it was necessary to run various database scripts. These days you can create the database schema with a wizard. Follow detailed instructions provided in the openCRX wiki to use this wizard:
Figure 9: Use openCRX “Database schema wizard” to create schema
7 Next Steps
If you have completed successfully the database installation you are ready to use the openCRX database CRX_CRX. The application server installation guides explain how to connect the application server to the openCRX database instance.
License
The contents of this file are
subject to a BSD license (the "License"); you may not use
this file except in compliance with the License. You may obtain a
copy of the License at http://
Copyright 2009-2012 ©
CRIXP Corp. All rights reserved. ![]()