
Version

Table of Contents
1.2 What do you need to understand this book 3
3.1 Create campaign target selector 6
3.2 Create campaign tracker and creator 8
3.3 Create campaign with wizard “Bulk - Create Activities” 10
3.4 Send Campaign E-mails with Bulk Activity Follow-Up 15
3.5 The Bulk Activity Workflow Monitor 16
3.6 The Bulk E-Mail Process 17
List of Figures
List of Listings
1 About this Book
This book is designed to help you understand how to create and manage a campaign with openCRX.
1.1 Who this book is for
The intended audiences are openCRX administrators and openCRX users.
1.2 What do you need to understand this book
A basic understanding of account management and activity management.
1.3 Tips, Warnings, etc.
We make use the following pictograms:
|
|
Information provided as a “Tip” might be helpful for various reasons: time savings, risk reduction, etc. - it goes without saying that we advise to follow our guides meticulously meticulous
\muh-TIK-yuh-luhs\, adjective: |
|
|
You should carefully read information marked with “Important”. Ignoring such information is typically not a good idea. |
|
|
Warnings should not be ignored (risk of data loss, etc.) |
2 Prerequisites
If you intend to reproduce the examples given in this guide, you might want to make sure you have a access to a working instance of openCRX. For detailed information on how to setup/install an openCRX instance, see information at http://www.opencrx.org/server.htm
Enter the sample data as explained below.
2.1 Sample data
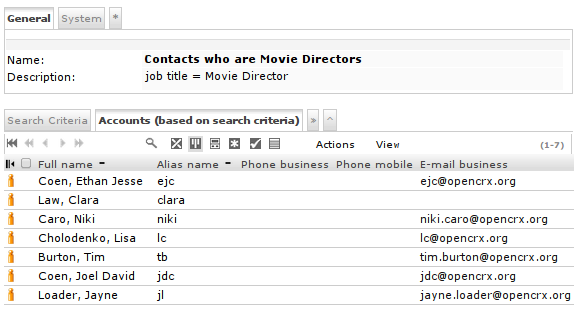
Let's assume that we have the following 7 contacts available in openCRX:
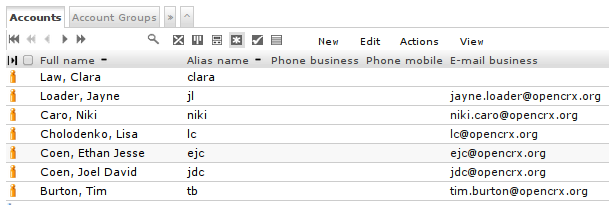
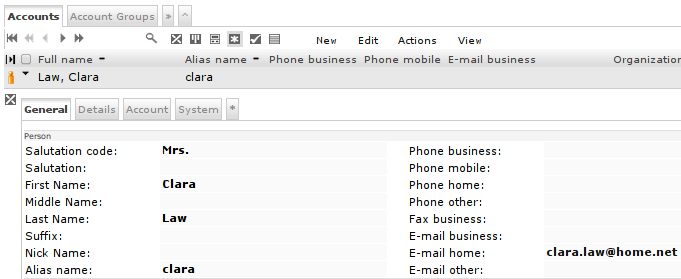
Note that Clara Law doesn't have an active business e-mail address. She does have a home e-mail address, though:
In addition, Tim Burton has the flag “no E-Mail” set.
3 Create an e-mail campaign
An openCRX e-mail campaign consists of the following elements:
a campaign tracker – all campaign activities are assigned to the campaign tracker (an Activity Tracker)
a campaign creator – all campaign activities are created with the campaign creator (an Activity Creator); the campaign creator determines the type of activity that is created (e.g. e-mails)
a campaign target selector – the targets of the campaign (accounts, e-mail addresses, postal addresses, etc.) are selected with the campaign target selector (can be a Group, an Address Group, a Saved Search Accounts or a Saved Search Addresses)
a campaign message – an e-mail template (subject and body)
The basic steps for creating a campaign are:
create/update a campaign target selector (unless you can use an existing target selector)
create campaign tracker and creator
create campaign with wizard “Bulk - Create Activities”
send campaign e-mails with wizard “Bulk Activity Follow-Up”
Let's now create a simple e-mail campaign:
3.1 Create campaign target selector
Creating campaign target selectors can be quite involved depending on the requirements, and sometimes it is not even obvious which type of target selector is best suited for the job at hand. Nevertheless, the following overview should get you started:
|
Address Group |
Address Groups are well suited to manage a list of addresses, manually or automated. Example:
|
|
Group |
Groups are well suited to manage a list of accounts, manually or automated. Examples:
|
|
Saved Search Addresses |
A Saved Search for Addresses is an address filter, i.e. well suited for the fully automated management of address lists. Addresses can be selected based on their attributes and/or attributes of their the parent account (or even more complex rules). It is important to note, however, that a saved search for addresses always produces a list of addresses. Example:
|
|
Saved Search Accounts |
A Saved Search for Accounts is an account filter, i.e. well suited for the fully automated management of account lists. Accounts can be selected based on their attributes (or even more complex rules that involve other objects, e.g. accounts with unpaid invoices, etc.). It is important to note, however, that a saved search for accounts always produces a list of accounts. Example:
|
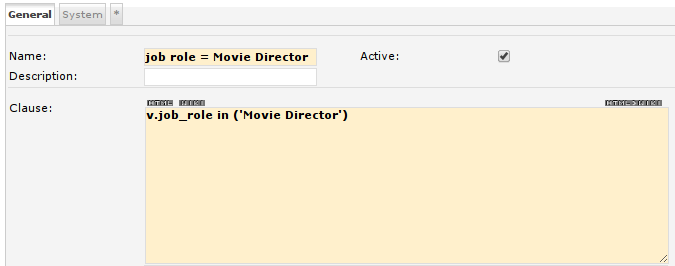
As we want to create an e-mail campaign to movie directors, we create a Saved Search Accounts that we can use as our campaign target selector.
navigate to [Manage Accounts] and click on [>>] to show hidden tabs
click on tab [Saved Search – Accounts]
choose New > Saved Search – Accounts and enter the following data:
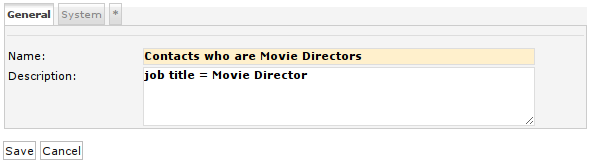
click on [Save] to create the saved search
under [Search Criteria], choose New > Search Criteria – Disabled and enter data as follows:
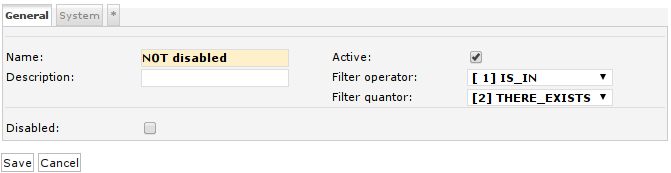
click [Save]
under [Search Criteria], choose New > SQL Query and enter data as follows:
click [Save] to store the query
click on the tab [Accounts (based on search criteria)] to inspect the result set:
|
|
It is important that saved searches (both for accounts and addresses) are performing well. Queries which are too slow can easily bog down your system and result in very bad performance during the activity creation phase (creating the campaing activities will be very slow). You can test the performance of a saved search with the following steps:
|
3.2 Create campaign tracker and creator
With the following steps you can create both a campaign tracker and a campaign creator for e-mail activities:
navigate to [Manage Activities]
choose File > New Campaign and then enter the following values:
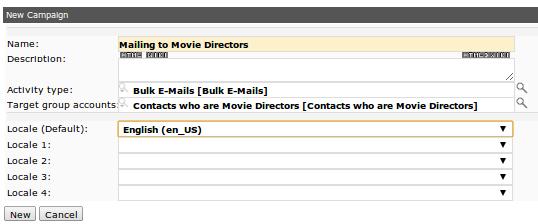
Note that you can use the auto-completer to select the target group; also, you can optionally choose multiple locales if your campaign is in more than one language.
click [New] to create the campaign
select the tab [Activity Creators] and verify that the creator for bulk e-mails was created as well:

|
|
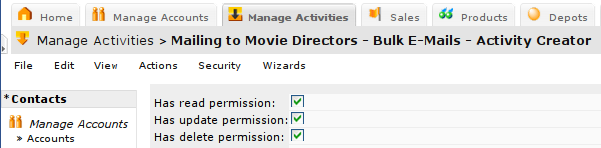
Please note that the user who will eventually
create the campaign activities needs to have update permission
for the campaign creator. Use Security > Check Permissions on
the campaign creator to verify whether the respective user
actually has update permission: |
3.3 Create campaign with wizard “Bulk - Create Activities”
Most of the tasks related to creating a campaign are done with the wizard “Bulk – Create Activites”. This wizard enables you to configure all the details of your campaign, create test activities, save and load campaign configurations, and also prepare the workflow to create all the campaign activities.
|
|
At any stage of the campaign management process you can save the current configuration and then reload it again at a later time to continue working on the campaign. Please note that the configuration of a campaign is specific to
In order to reload a previously saved campaign configuration, simply follow these steps:
|
Let's get started creating our campaign to movie directors:
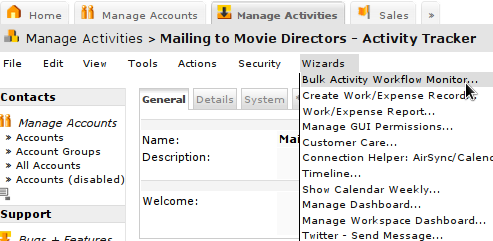
navigate to the campaign tracker, e.g. “Mailing to Movie Directors”
choose Wizards > Bulk – Create Activities
leave the locale set to English (unless you want to do a mailing in another language) and verify the target group:

click [Reload] to load the configuration of the mailing; since we are creating a new campaign (i.e. there does not exist any previously saved campaign configuration), an empty default configuration is loaded
as we are creating an e-mail campaign, you must enter some values into the fields “Sender”, “Subject” and “Message”:
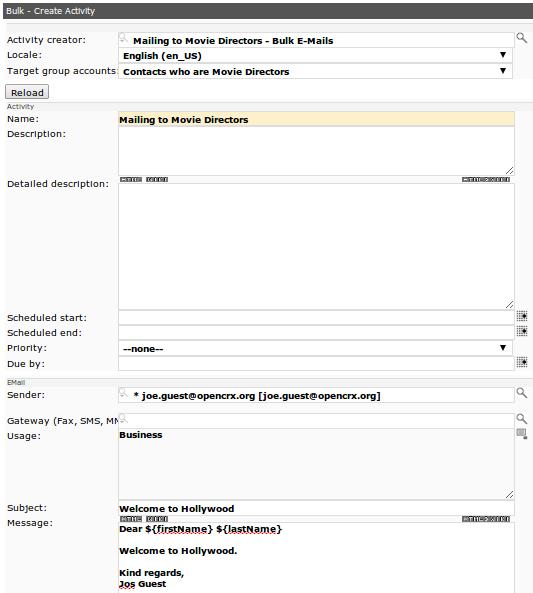
click [Save] to store your campaign configuration; note that the wizard added some information to the field “Text”:

Let's look at some of the fields in more detail:
|
Field |
Explanation |
|
Name |
name of the campaign |
|
Description |
a short description of the campaign |
|
Detailed description |
a more detailed description of the campaign |
|
Scheduled start |
date/time the campaign is scheduled to start |
|
Scheduled end |
date/time the campaign is scheduled to be completed |
|
Priority |
priority of the campaign |
|
Due by |
latest date/time the campaign must be completed |
|
Sender |
the e-mail address of the sender of the campaign's e-mails; if a recipient inspects an e-mail, he will see this e-mail address in the e-mail's field “from” |
|
Gateway (Fax, SMS, MMS) |
if the e-mails generated by this campaign are to be delivered as facsimile/SMS/MMS to the recipients (and hence need to be routed through an appropriate gateway, e.g. an e-mail-to-SMS gateway) you can enter the gateway's e-mail address into this field |
|
Usage |
here you can enter (optionally) a list of address usages; any addresses provided by the campaign target selector will be filtered so that only addresses that contain all the listed usages will be used for the campaign; by default, the usage “Business” is entered, i.e. only business addresses will be used for the campaign |
|
Subject |
enter the subject line of the campaign e-mail; placeholders are supported |
|
Message |
enter the message body of the campaign e-mail; placeholders are supported; note that you can use your favorite (external) e-mail design tool to create hand-crafted “HTML blobs” outside of openCRX and then copy them into this field |
|
Text |
this is the area where all the place holders in use (automatically collected from the fields subject and message) are listed together with their default values, e.g. lastName=N/A firstName=N/A The syntax for place holders is ${<placeholderName>} where <placeholderName> is typically the name of an attribute of the objects produced by the campaign target selector. If the campaign target selector – for example – produces objects of type “Contact” then ${firstName} and ${lastName} are valid place holders. Please refer to the UML model to find out more about attributes of openCRX objects: http://www.opencrx.org/uml.htm A somewhat more advanced use of place holders is also possible: You can write a Janino-Script (basically a bit of Java code) that calculates the values that will replace the place holders on the fly during the generation of the campaign activities. The use of such scripts allows you to fully control the replacement of place holders and create impeccable campaign e-mails even if your data is not in perfect shape (e.g. missing first names, missing salutations, etc.). See chapter “BulkScript” for more information. |
|
|
Do not forget to click [Save] to store your campaign configuration before you leave the wizard. Closing the wizard without saving resets values to the last saved configuration. |
click on the button [Create/Update 3 Test Activities]
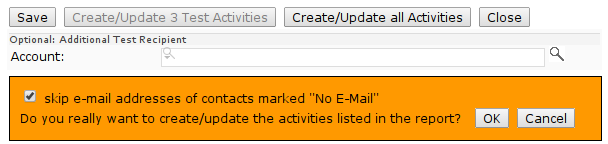
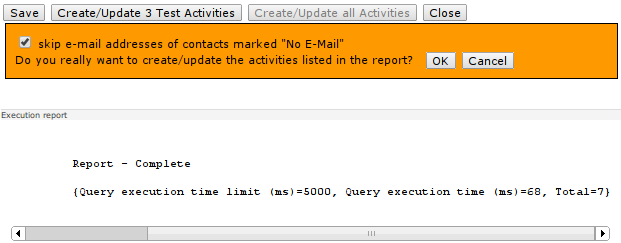
click [OK] and the wizard will create 3 test activities (or update existing test activities if you already created them earlier); the execution report contains information about the number of activities created/updated:
Report @Tue Jul 23 08:05:49 CEST 2013
{Updated=0, Created=0, Failed=0, Pending=7, Skipped=0, Missing e-mail=0, Total=7}
Report – Complete
{Updated=0, Created=3, Failed=0, Pending=3, Skipped=0, Missing e-mail=1, Total=7}
and the grid [Activities] contains the 3 test activities:
you can inspect individual test activities (hold down the <CTRL>-key and click on the icon to open an activity in a new browser tab/window) and even send the rendered e-mail as an attachment to your own e-mail address:
open a test activity (e.g. by holding down the <CTRL>-key and clicking on the icon)
select Actions > Follow-Up and then select the transition “Export as mail attachment to current user” and click [Save]; during the next run of the workflow handler the mail will be generated and mailed to the e-mail address of the current user (as defined in [Home] > Edit > User Settings)
you can edit/change the campaign configuration as many times as you like (don't forget to save your changes) and then create/update the test activities again until you are happy with the result
click on the button [Create/Update all Activities] and then click [OK] to create all campaign e-mail activities – please note that the wizard tests the query execution time (slow queries would slow down the system for all users – if you're query is too slow, you need to optimize the query before you can create the campaign):
the wizard creates a workflow (so that the e-mail activities can be created in the background with multiple threads) and then forward you to the campaign tracker
start the wizard “Bulk Activity Workflow Monitor” to monitor progress of the activity creation workflow
3.4 Send Campaign E-mails with Bulk Activity Follow-Up
While it's possible to send out each e-mail individually, it is more convenient to create a workflow that sends out your campaign's e-mails in a bulk fashion, optionally at future date/time. Here is how you can do that:
navigate to any of your campaign's e-mail activities
select Wizards > Bulk Activity Follow-Up
the wizards counts the number of activities that are assigned to the same tracker and in the same state as the activity you navigated to and then offers you to choose up to 2 transitions that will be executed on the respective activities; before an activity can be mailed it needs to be approved, i.e. the first transition should be “Approve”; if you select “Send as mail” as the second transition then all your e-mail activities created for the campaign will be sent:
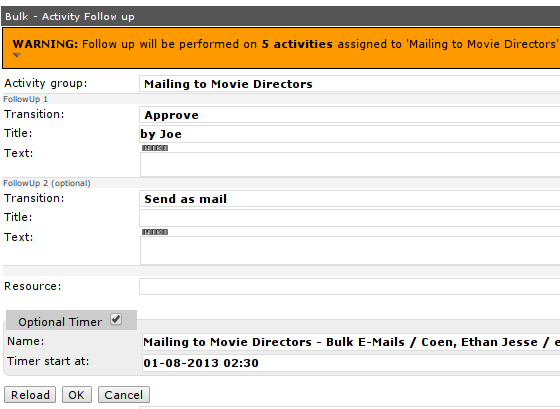
optionally you can set a timer if you want to start processing/mailing your campaign's e-mails at a future date/time
click [OK] to create the workflow; afterwards you will be forward to the campaign tracker
start the wizard “Bulk Activity Workflow Monitor” to monitor progress of the activity creation workflow
3.5 The Bulk Activity Workflow Monitor
The Wizard Bulk Activity Workflow Monitor can be
started from the campaign tracker and provides overview information
about workflows and progress related to the campaign – you can
refresh the view at any time by clicking the button [Reload]: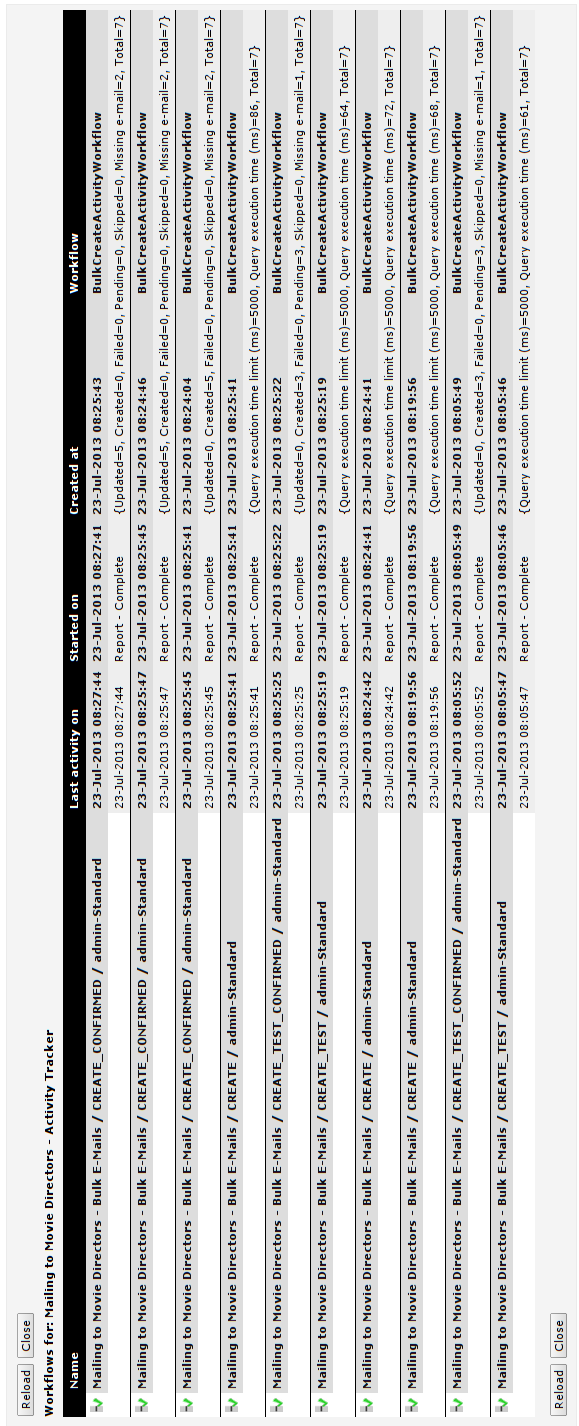
3.6 The Bulk E-Mail Process
E-mail campaigns are controlled by the activity process “Bulk E-Mail”; the following chart shows all the relevant states and transitions:

3.7 Troubleshooting
3.7.1 Activities are not created/updated
verify that you have sufficient permissions to actually create/update activities – you might want to create an activity manually (navigate to the respective Activity Creator and select File > New Activity) and verify that this works as expected
verify that the workflow handler is active (login as admin-Root and select Wizards > openCRX Workflow Controller); if it is not active, turn it on – you can configure the workflow handler in such a way that it starts automatically upon starting openCRX:

3.7.2 E-mails are not sent
verify that your mail resource is correctly configured (see openCRX Admin Guide, chapter E-mail Services)
verify that the workflow handler is active (see above)
inspect mail workflows and look at the error messages:
navigate to the userhome of admin-Standard
click on [>>] to expand the grid tab row and select the tab [Pending / Completed Workflows]
use the filters to find failed workflows or workflows with a high step counter (the sendmail workflow does not fail immediately, i.e. there are multiple retries...)
inspect the workflows and their action log entries – maybe the mail server is down or the mail server rejects the sender or certain recipients; quite likely you will have to work together with the mail server admin to solve any open issues
4 Next Steps
You might want to have a look at some of the additional documentation published at http://www.opencrx.org/documents.htm.
License
The contents of this file are
subject to a BSD license (the "License"); you may not use
this file except in compliance with the License. You may obtain a
copy of the License at http://
Copyright 2012-2013 ©
CRIXP Corp. All rights reserved. ![]()