

|
|
Version

Table of Contents
1.2 What do you need to understand this book 3
3 Upgrading from previous versions 5
3.1 The SQL Script upgrade-from-... 5
3.2 The SQL Script migrate-from-... 5
3.3 The SQL Script drop-from-... 6
3.4 The SQL Script dbcreate-views.sql 6
3.5 The SQL Script dbcreate-indexes.sql 6
List of Figures
Figure 1: Create a new database 7
Figure 2: Create schema crx-crx 7
Figure 3: Add new user 8
Figure 4: Grant privileges to user system 9
Figure 5: Execute script dbcreate-tables.sql 10
List of Listings
Listing 1: Setting in my.ini so that MySQL defaults to InnoDB 4
Listing 2: Setting lower_case_table_names in my.ini 11
1 About this Book
This book describes how to setup an openCRX database instance for MySQL.
1.1 Who this book is for
The intended audience are openCRX database administrators.
1.2 What do you need to understand this book
This book describes the installation of openCRX for MySQL. The book assumes that you are familiar with MySQL installation and configuration.
1.3 Tips, Warnings, etc.
We make use the following pictograms:
|
|
Information provided as a “Tip” might be helpful for various reasons: time savings, risk reduction, etc. |
|
|
You should carefully read information marked with “Important”. Ignoring such information is typically not a good idea. |
|
|
Warnings should not be ignored (risk of data loss, etc.) |
2 Prerequisites
As a first step you must download the following software packages:
Download and install the openCRX SDK: http://www.opencrx.org/sdk.htm
Installation instructions are also available from the above website. You will find all the required the MySQL database scripts in the directory <SDK_Install_Dir>\opencrx-2.5.1\core\src\sql\mysql-5.

If your platform is not supported by the openCRX SDK Installer, you can install the openCRX SDK on one of the supported platforms and then copy the required files to your target platform.
Download MySQL Database Server from http://dev.mysql.com/downloads/mysql/5.1.html
Download MySQL GUI Tools (Administrator, Query Browser) from
http://dev.mysql.com/downloads/gui-tools/5.0.htmlDownload the JDBC driver MySQL Connector/J from
http://dev.mysql.com/downloads/connector/j/5.1.html
-

Please ensure that you download (and later install) the correct JDBC driver (i.e. matching JDK, MySQL version, etc.) and one JDBC driver only!
As a next step you must install MySQL Database Server and MySQL GUI Tools (Administrator, Query Browser) - please refer to the MySQL documentation for installation details.
|
|
Please ensure that your installation of MySQL creates tables of type InnoDB. By default, MySQL creates tables of type MyISAM. MyISAM tables are not appropriate for openCRX because the key length is limited to roughly 1000 bytes (~ characters with UTF-8 support). Add the following line to the section [mysqld] in your file my.ini containing MySQL settings and MySQL will default to InnoDB: Listing 1: Setting in my.ini so that MySQL defaults to InnoDB [mysqld] |
This document assumes that you use the MySQL Administrator for database administration. The JDBC driver is required for the application server installation.
3 Upgrading from previous versions
If you already have MySQL for openCRX installed, upgrade the database as explained below. You can then skip the rest of this document.
|
|
Do not forget to backup your database before you run any upgrade or migrate scripts! |
|
|
Please consult http://www.opencrx.org/faq.htm#upgrade and find out whether there exist specific instructions for your openCRX version. Instructions below are generic and might not cover all steps required to successfully upgrade your openCRX version. |
|
|
Please note that the behavior of MySQL is not very consistent if it comes to the spelling/naming of tables. Regardless of the CREATE TABLE statement table names are always created with small letters (e.g. CREATE TABLE prefs_Preference(...); creates a table named prefs_preference as opposed to prefs_Preference); if you try to DROP or DELETE the table prefs_Preference, however, the table name is case-sensitive; as a consequence, the DROP or DELETE statement will fail you might have to adapt the capitalization of some of the table names with MySQL. This peculiarity also strikes with VIEW names, by the way. |
3.1 The SQL Script upgrade-from-...
In a first step you must upgrade your database. openCRX distributions provide an SQL script of the form
upgrade-from-<version from>-to-<version to>.sql
If you have installed openCRX 2.4.0, for example, and you want to upgrade to version 2.5.0 you have to run the script upgrade-from-2.4.0-to-2.5.0.sql on your database instance.
3.2 The SQL Script migrate-from-...
In a second step you must migrate your database. openCRX distributions often times provide an SQL script of the form
migrate-from-<version from>-to-<version to>.sql
If you have installed openCRX 2.4.0, for example, and you want to upgrade to version 2.5.0 you have to run the script upgrade-from-2.4.0-to-2.5.0.sql on your database instance.
3.3 The SQL Script drop-from-...
Next you can drop unused tables from your database. openCRX distributions often times provide an SQL script of the form
drop-from-<version from>-to-<version to>.sql
If you have installed openCRX 2.4.0, for example, and you want to drop tables not used by openCRX 2.5.0 you can run the script drop-from-2.4.0-to-2.5.0.sql on your database instance. Alternatively, you can also rename such tables, e.g. from transition_type to _unused_transition_type. Also, it goes without saying that you should never drop a table before you made a backup!
3.4 The SQL Script dbcreate-views.sql
Most new openCRX versions make use of new/changed views, i.e. if an openCRX distribution includes an SQL script of the form
dbcreate-views.sql
then you should run that script. If you have installed openCRX 2.4.0, for example, and you want to upgrade to openCRX 2.5.0 you should run the script dbcreate-views.sql on your database instance. Make sure that old views are indeed dropped and new views properly created (the script first deletes old views and then creates new views – if you deleted the views manually it is sufficient to execute the create view statements...).
3.5 The SQL Script dbcreate-indexes.sql
Most new openCRX versions make use of new/changed indexes, i.e. if an openCRX distribution includes an SQL script of the form
dbcreate-indexes.sql
then you should run that script. If you have installed openCRX 2.4.0, for example, and you want to upgrade to openCRX 2.5.0 you should run the script dbcreate-indexes.sql on your database instance.
3.6 Populate Preferences
The last step involves deleting old preferences and populating the table with new ones. Run the SQL script populate-preferences.sql to do this.
|
|
Make sure that old preferences are indeed removed. MySQL typically creates tables with small letters only (e.g. prefs_preference instead of prefs_Preference) which can cause the DELETE command to fail. |
4 Create the database
As a first step you create the database with MySQL Administrator. Start MySQL Administrator and connect to your DB Server. Select Catalogs and then Create New Schema from the pop-up menu as shown below:
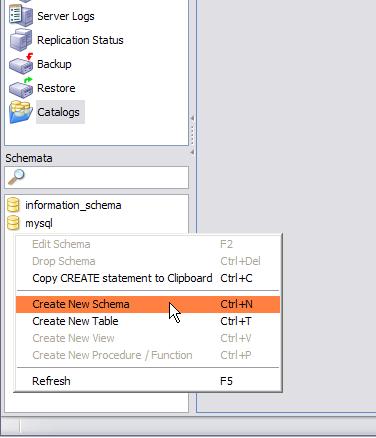
Figure 1: Create a new database
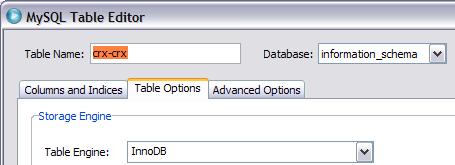
Enter crx-crx as database name (please note that MySQL on Windows ignores capitalization, whereas MySQL on Linux is case-sensitive) and click OK:

Figure 2: Create schema crx-crx
|
|
Verify that InnoDB is selected as Table Engine.
|
Next you must create a database user and grant this user access to the newly created database. Select User Administration and then Add new User from the pop-up menu as shown below:
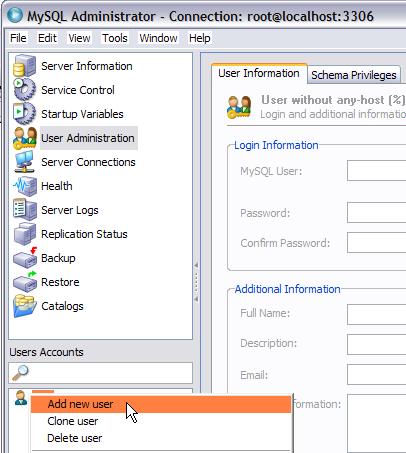
Figure 3: Add new user
Complete the Login Information and Additional information. We assume that you create the user system and set the password to manager .
Next you must grant the user system access to the database crx-crx. Select the tab Schema Privileges and then select the schema crx-crx. Move all privileges from the pane Available Privileges to the pane Assigned Privileges and click the button Apply changes as shown below:
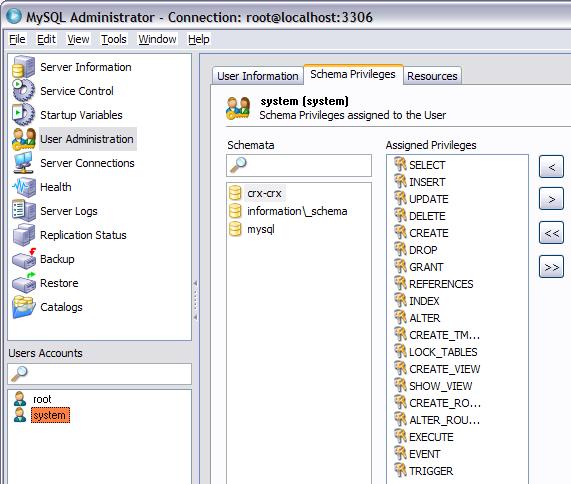
Figure 4: Grant privileges to user system
You have completed creating the database crx-crx.
5 Install the openCRX Database Schema Objects
After creating the schema you are now ready to install the openCRX database schema objects. The following scripts must be executed:
dbcreate-tables.sql
dbcreate-views.sql
dbcreate-indexes.sql
populate-preferences.sql
|
|
Do not execute any other scripts included in the distribution. |
Start the MySQL Query Browser and connect to your DB server. Select the schema crx-crx, then create a new script tab with File > New Script Tab. Copy/paste the database script dbcreate-tables.sql and execute by clicking on the button Execute:
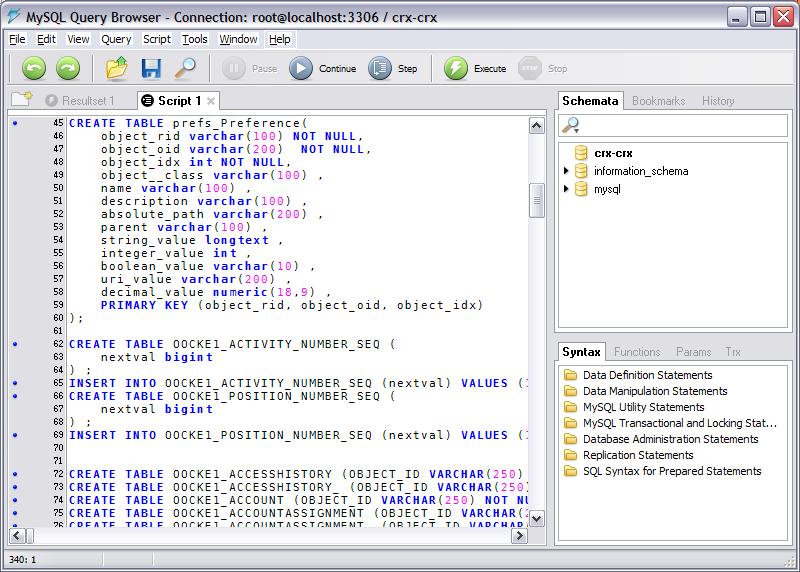
Figure 5: Execute script dbcreate-tables.sql
|
|
Please note that you will get a lot of errors running the above script if MySQL creates new tables of the type MyISAM. You must ensure that your installation of MySQL creates tables of type InnoDB. MyISAM tables are not appropriate for openCRX because the key length is limited to roughly 1000 bytes (~ characters with UTF-8 support). See Listing 1 for more information on how to configure MySQL. |
|
|
If you want/need UTF-8 support you should verify that tables and columns of type varchar were indeed created with the options character set utf8 collate utf8_bin Some versions/configurations of MySQL have a tendency to pick latin_1 or some other default character set instead of utf8 – if your installation suffers from such troubles try to fix it now before you have a lot of data in your tables! |
|
|
The case sensitivity of the underlying operating system plays a part in the case sensitivity of database and table names. This means database and table names are not case sensitive in Windows, and case sensitive in most varieties of Unix. See http://dev.mysql.com/doc/refman/5.0/en/identifier-case-sensitivity.html for details. Add the following line to the section [mysqld] in your file my.ini containing MySQL settings: Listing 2: Setting lower_case_table_names in my.ini [mysqld] |
Similarly, execute the remaining scripts in the following order:
dbcreate-views.sql (hint: you can ignore error messages like Unknown table 'crx-crx.kernel_view_xxx' or you can remove the DROP statements before executing the script as the DROP statements are not needed to set up a new database).
dbcreate-indexes.sql (hint: you can ignore error messages of the following sort: Duplicate key name 'xxx' Error 1061).
populate-preferences.sql
The scripts should run without errors and after execution you might want to verify with MySQL Administrator that all the tables, indices, and views were properly created (panes [Schema Tables] , [Schema Indices], and [Views]).
6 Next Steps
If you have completed successfully the database installation you are ready to use the openCRX database crx-crx. The application server installation guides explain how to connect the application server to the openCRX database instance.
License
The contents of this file are
subject to a BSD license (the "License"); you may not use
this file except in compliance with the License. You may obtain a
copy of the License at http://
Copyright 2009 ©
CRIXP Corp. All rights reserved. ![]()