
Version

Table of Contents
1.2 What do you need to understand this book 3
3.1.1 Create a new Legal Entity 6
3.1.2 Update an existing Legal Entity 9
3.2.2 Update an existing Contact 13
3.3 Groups and Unspecified Accounts 13
3.4 Relationships between Accounts 14
3.4.1 The concept of relationships 16
3.4.2 Manually create a new Relationship 16
3.4.3 Easily create/maintain relationships with wizards 17
List of Figures
List of Listings
1 About this Book
This book is designed to help you understand how to create and manage a campaign with openCRX.
1.1 Who this book is for
The intended audiences are openCRX administrators and openCRX users.
1.2 What do you need to understand this book
A basic understanding of account management and activity management.
1.3 Tips, Warnings, etc.
We make use the following pictograms:
|
|
Information provided as a “Tip” might be helpful for various reasons: time savings, risk reduction, etc. - it goes without saying that we advise to follow our guides meticulously meticulous
\muh-TIK-yuh-luhs\, adjective: |
|
|
You should carefully read information marked with “Important”. Ignoring such information is typically not a good idea. |
|
|
Warnings should not be ignored (risk of data loss, etc.) |
2 Prerequisites
If you intend to reproduce the examples given in this guide, you might want to make sure you have a access to a working instance of openCRX. For detailed information on how to setup/install an openCRX instance, see information at http://www.opencrx.org/server.htm
3 Account Management
With the account management module of openCRX you can manage accounts. The following types of accounts are available in openCRX:
 Legal Entities (companies, etc.)
 Contacts (individual persons)
 Groups (to
keep different accounts together)
Groups (to
keep different accounts together)-
Unspecified Accounts

Each account can have one or more of various types of addresses (openCRX does not impose a limit on the number of addresses an account can have):
 Postal Addresses
 E-mail Adresses
 Phone/Fax numbers
 Web Addresses
 Rooms
Rooms

The account management module of openCRX also enables you to keep track of competitors and an organization's structure, at a granularity that you can define at will:
 Competitors
 Organizations
A very powerful and useful feature of openCRX is how you can keep track of all kinds of relationships between the various objects, e.g. a contact can be an employee of a legal entity for a particular period, another contact is the key account manager of a client X, a legal entity is member of a group, etc.
openCRX also features powerful filtering and sorting functionality. Reuse is made easy with the concept of saved searches.
3.1 Legal Entities
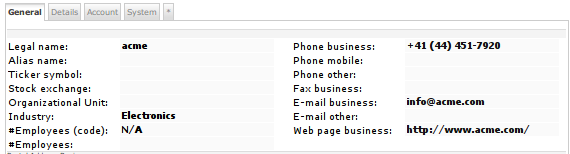
Use legal entities to keep track of companies, e.g. legal name, alias name, phone/fax numbers, e-mail addresses, etc.
3.1.1 Create a new Legal Entity
With the following steps you can create a new legal entity:
navigate to [Manage Accounts]
choose File > New Legal Entity:
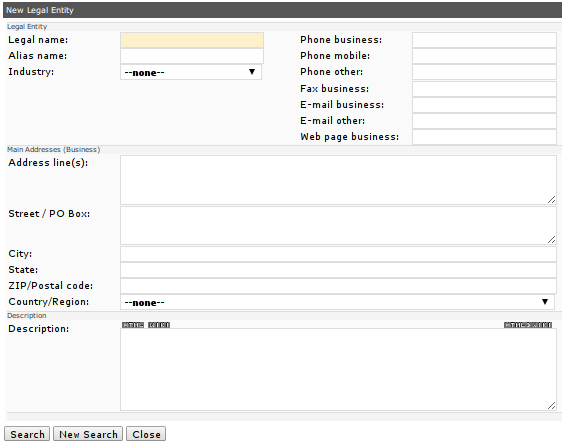

Please note that openCRX offers you an opportunity to easily search through already existing legal entities before you actually create a new one. The reason is that it is both easier and more effective to avoid creating duplicates in the first place rather than eliminating existing duplicates later on; the process of eliminating duplicates can bei quite involved as it typically involves some kind of merging of data because each of the duplicates might contain correct/valid information that should be retained.
you can search for existing legal entities with the same name, phone number, e-mail address, etc. don't enter too much information into the search form, however – the more information you provide, the less likely it is that you will find existing accounts that match (maybe you have a new phone number while the existing account in openCRX still features an old/outdated one...)
it is perfectly OK to enter only part of the name or only the the area code of the phone number; good search fields are typically Legal name, Phone business, E-mail business, etc.) - click [Search] to find matches:
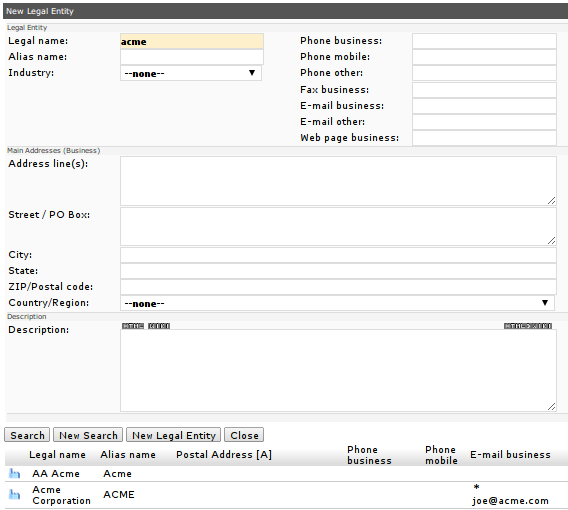
if there are any legal entities that match/contain the values you entered they will listed just below the search form (see above) – you can now decide whether you want to edit an existing legal entity (click on the respective icon to load its values into the form, see chapter 3.1.2 Update an existing Legal Entity) or whether you want to create a new legal entity (click on the button [New Legal Entity]).
Please note that clicking the button [New Legal Entity] immediately creates the new legal entity, but the edit form stays open (so that you can continue entering information about the new legal entity)once you have entered all the relevant information you can click the button [Save] to store it:

click [Close] to leave the wizard; the view changes automatically to browse mode and you are presented with a view of the newly created legal entity:
3.1.2 Update an existing Legal Entity
With the following steps you can update an existing legal entity:
navigate to the legal entity you want to change
choose Edit > Edit (enhanced) to change from browse to edit mode:
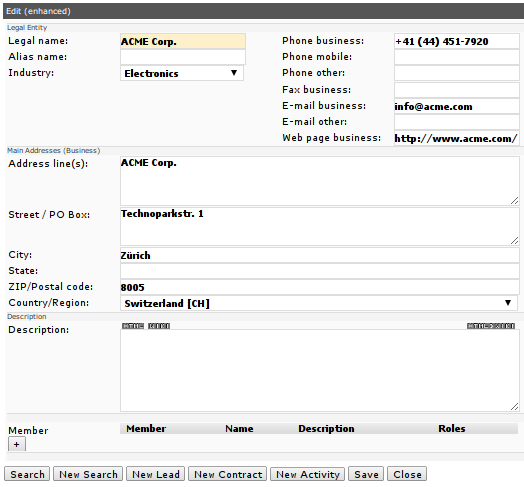
once you've entered all your changes, click [Save] to store them and then click [Close] to change back to browse mode
3.2 Contacts
Use contacts to keep track of people and their information, e.g. first name, last name, alias name, phone/fax numbers, e-mail addresses, etc.
3.2.1 Create a new Contact
With the following steps you can create both a campaign tracker and a campaign creator for e-mail activities:
navigate to [Manage Activities]
choose File > New Contact:
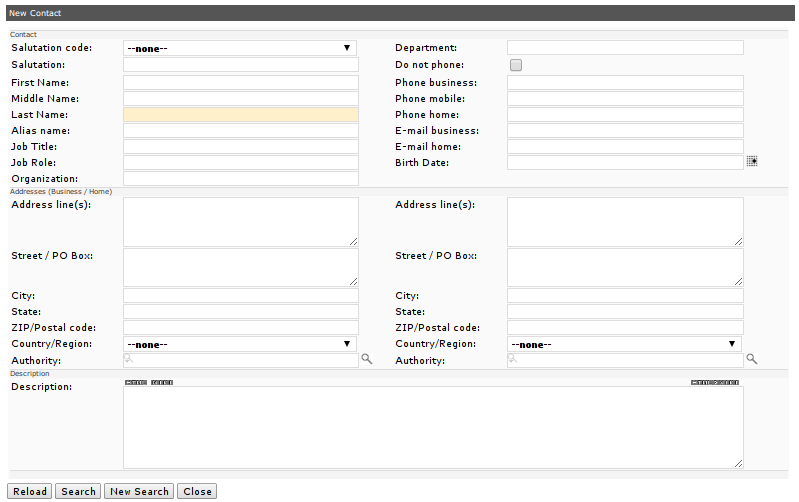
|
|
Please note that openCRX offers you an opportunity to easily search through already existing contacts before you actually create a new one. The reason is that it is both easier and more effective to avoid creating duplicates in the first place rather than eliminating existing duplicates later on; the process of eliminating duplicates can be quite involved as it typically involves some kind of merging of data because each of the duplicates might contain correct/valid information that should be retained. |
you can search for existing contacts by last name, first name, phone number, e-mail address, etc. however, don't enter too much information into the search form – the more information you provide, the less likely it is that you will find existing accounts that match (maybe you have a new phone number while the existing account in openCRX still features an old/outdated one...)
it is perfectly OK to enter only part of the name or only the the area code of the phone number; good search fields are typically Last name, First name, Phone business, E-mail business, etc.) - click [Search] to find matches:
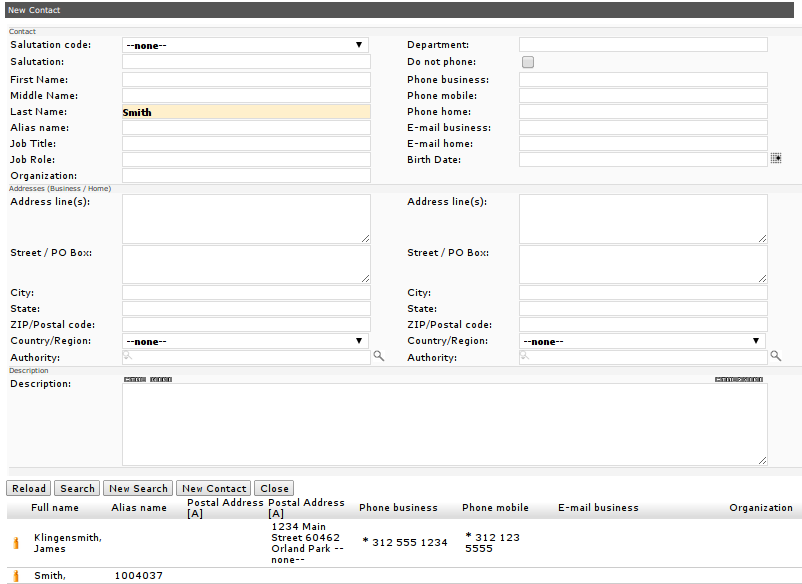
if there are any contacts that match/contain the values you entered they will listed just below the search form (see above) – you can now decide whether you want to edit an existing contact (click on the respective icon to load its values into the form, see chapter 3.2.2 Update an existing Contact) or whether you want to create a new contact (click on the button [New Contact]).
Please note that clicking the button [New Contact] immediately creates the new contact, but the edit form stays open (so that you can continue entering information about the new contact)once you have entered all the relevant information you can click the button [Save] to store it:
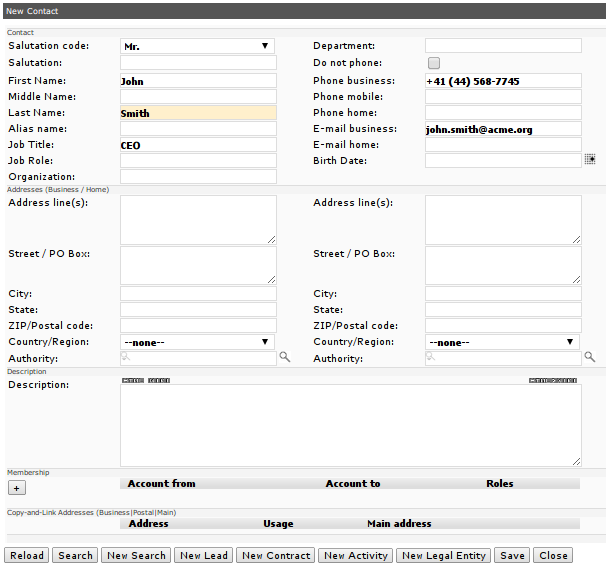
click [Close] to leave the wizard; the view changes automatically to browse mode and you are presented with a view of the newly created contact:
3.2.2 Update an existing Contact
With the following steps you can update an existing contact:
navigate to the contact you want to change
choose Edit > Edit (enhanced) to change from browse to edit mode:
once you've entered all your changes, click [Save] to store them and then click [Close] to change back to browse mode
3.3 Groups and Unspecified Accounts
Use Groups to keep together different types of accounts (e.g. members of your bowling group). Use Unspecified Accounts only if it is not clear whether an account is a legal entity or a contact (e.g. if you import data from a legacy ERP system).
3.4 Relationships between Accounts
openCRX allows you to establish relationships between accounts. The following example (Contact John Smith is an employee of Legal Entity ACME Corp.) shows you how you can establish a relationship between two accounts::
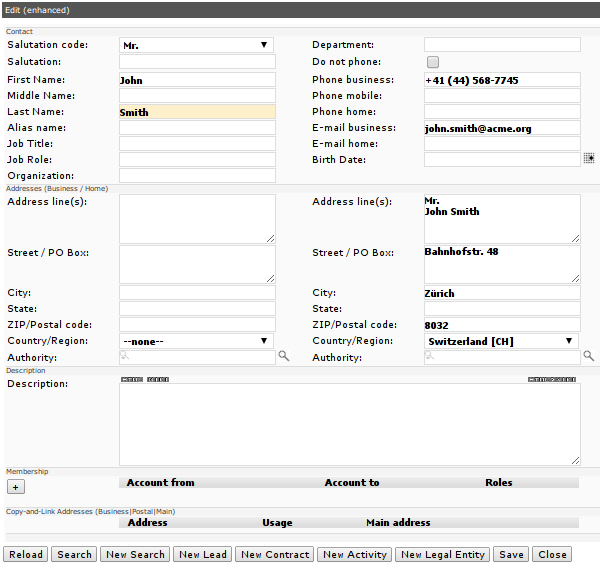
navigate to the contact you want to make an employee of a legal entity
choose Edit > Edit (enhanced) to change from browse to edit mode:
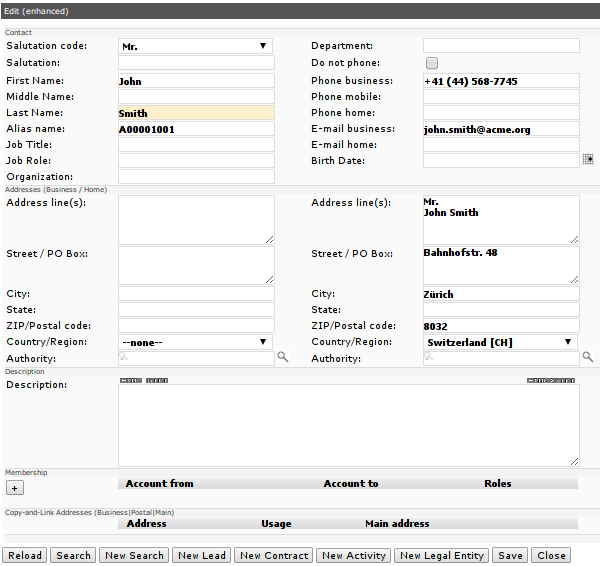
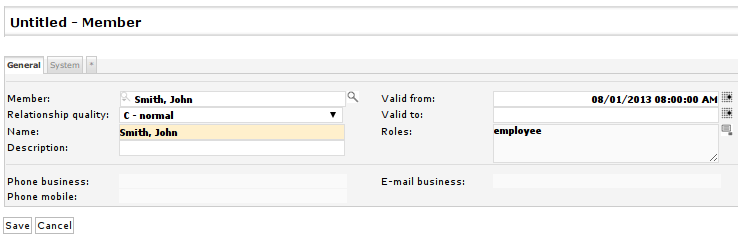
click the button [+] to create a new relationship:
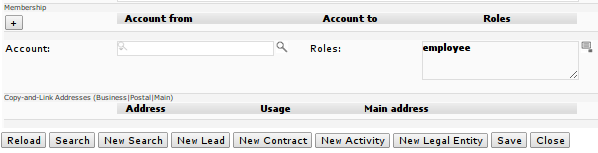
note that the role employee is set by default, but you can easily change the role by clicking on the edit icon
 and then either selecting another role or even add an additional
role:
and then either selecting another role or even add an additional
role:click into the field Account to set the cursor and then start typing the name of the legal entity, e.g. ACME Corp. - once you see it in the autocompleter menu, select the appropriate menu entry:
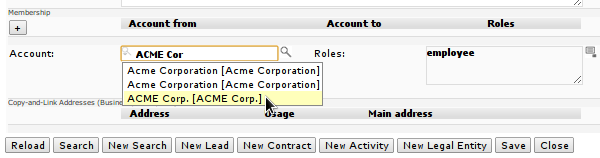
click the button [Save] to store the newly added relationship:
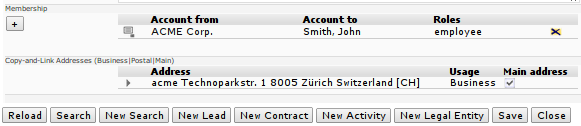
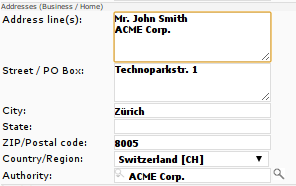
in case the now linked legal entity has any postal addresses, they are automatically listed – if you want to create a postal address for the contact that is “managed” by the legal entity, you can do so by clicking on the little triangle on the left side of the respective address entry; the postal address is copied from the legal entity and linked (authority is set to point to the legal entity that owns/manages this postal address); don't forget to complete the contact's main business address by entering some information into the field Address line (the wizard does not populate this field automatically):
finally, click [Save] to store this information as well
3.4.1 The concept of relationships
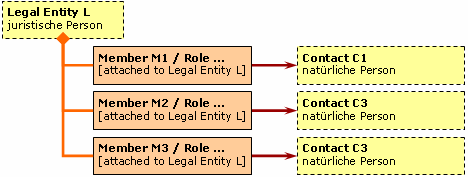
openCRX uses a “hierarchical” model of relationships; that is, one of the two accounts of a relationship is designated as parent account. The relationship is not established directly, but through an intermediate object called “Member”, which can have attributes like role, valid from, valid to, etc. The member object references the child account of the relationship:
Often times, the hierarchy you want to impose in openCRX follows directly from the “natural” hierarchy in the real world (e.g. contacts are employees of a legal entity); at other times, there is no obvious or natural hierachy between the two accounts (e.g. relationship between two contacts who are friends or married). However, more important than getting the hierarchy “right” is to ensure that you map a particluar type of relationship always in the same fashion to openCRX. Consistent mapping facilitates working with the data.
3.4.2 Manually create a new Relationship
With the following steps you create a new relationship between two accounts:
navigate to the account that will be the parent account
click on the grid tab [Members] and then select New > Member
use the autocompleter of the lookup inspector to select the second account of the relationship and then enter data into the other fields as desired (name is mandatory):
click the button [Save] to create the member and establish the relationship between the two accounts
|
|
Even though openCRX relationships are hierarchical (one could also say “directed”), there is no need to create a second relationship that captures “the other direction”. Once you have created a member (attached to the parent account X of a relationship) that references another account Y, openCRX can automatically derive the relationship “in the other direction”, i.e. from account Y to account X. The openCRX GUI contains the following tabs for each account:
|
3.4.3 Easily create/maintain relationships with wizards
Both wizards that offer enhanced editing functionality for contacts and legal entities – you can start them by navigating to an account and then selecting Edit > Edit (enhanced) – also feature advanced relationship functionality:
if you're editing a legal entity you can create new members of this legal entity with the role employee with a single click:

if you're editing a contact, you can make this contact a member of another account (i.e. add a membership) with a single click:

3.5 Disabling an account and its components
|
|
Deleting objects is usually not encouraged in openCRX because object deletion can lead to “dangling” references (references to objects that do not exist anymore); furthermore, when you delete an object you also delete the whole history (audit trail) of that object and all its composites (e.g. deleting an account also deletes all the account's addresses). In order to indicate that an object is no longer needed and/or relevant you can mark such an object as “disabled”. This is a much better appraoch than outright deletion because you can retain the history of the object. |
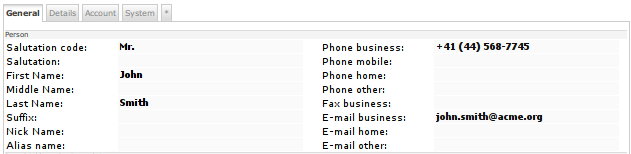
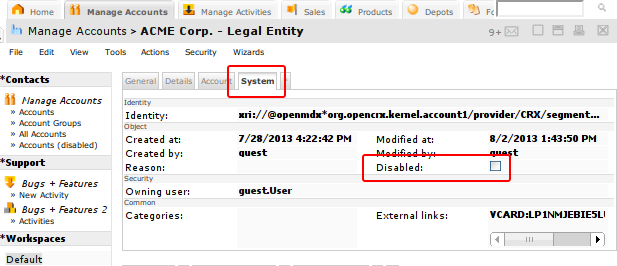
To find out whether an object is disabled or not you can always click on the tab System and inspect the attribute Disabled:
With the following steps you can disable an account (or any other object):
navigate to the account/object
choose Edit > Edit
click on tab System
check Disabled
click the button [Save]
Certain objects (e.g. accounts) are associated with other objects (e.g. addresses) in such a way that the associated objects are part of the parent object, i.e. they cannot exist by themselves; in other words, component parts have no “life” of themselves and they cannot be transferred to another parent object.
|
|
In UML, composition is a kind of association where the composite object has sole responsibility for the disposition of the component parts. The relationship between the composite and the component is a strong “has a” relationship, as the composite object takes ownership of the component. This means the composite is responsible for the creation and destruction of the component parts. An object may only be part of one composite. If the composite object is destroyed, all the component parts must be destroyed. The part has no life of itself and cannot be transferred to another object. Composition enforces encapsulation as the component parts usually are members of the composite object. |
In the realm of account management, some examples of components are:
addresses – they always belong to a particular account; deleting an account also deletes all its addresses)
members – they always belong to a particular account; deleting an account also deletes all its members
|
|
The child account of a relationship between two accounts, i.e. the account referenced by a member, is NOT a component. Hence:
|
Let's have another look at the example presented earlier, the legal entity L with three employees C1, C2 and C3:
If they legal entity L ceases to exist (e.g. goes bankrupt), the three contacts C1, C2 and C3 are obviously no longer employees of L (→ the three members M1, M2 and M3 also cease to exist). However, the three contacts C1, C2 and C3 clearly continue to exist and there is no reason the delete/disable them just because the legal entity L is deleted/disabled.
As mentioned earlier, deleting objects is usually not encouraged in openCRX. Instead of deleting objects, you should disable them. Disabling an object and all of its components can be quite tedious. That is why openCRX feautures a wizard that allows you to disable an object including all of its components in one go:
navigate to the account/object you want to disable
select Edit > Disable
click the button [OK]
|
|
In case you disabled an account and its components by mistake, there is also a wizard that allows you to enable an object including all of its components in one go:
|
4 Next Steps
You might want to have a look at some of the additional documentation published at http://www.opencrx.org/documents.htm.
License
The contents of this file are
subject to a BSD license (the "License"); you may not use
this file except in compliance with the License. You may obtain a
copy of the License at http://
Copyright 2012-2013 ©
CRIXP Corp. All rights reserved. ![]()