Version

Table of Contents
1.2 What you need to know with this book 10
3.1.1 Basic Concepts and Conventions 12
3.1.2 Permissions / Access Control 15
3.1.3 Default Principal Groups 17
3.1.4 The SQL approach to understanding security 18
3.4 Security Settings of New Objects 20
3.6.1 Apache Tomcat / Application Server Login 22
4.1 Creating Users – Overview 24
4.1.1 Create Users as Segment Administrator 25
4.1.2 Import Subjects and Application Login Principals 28
4.2 Disable/Deactivate Users 30
4.2.1 Disable Users at the level Tomcat /Application Server 30
4.2.2 Disable Users at the level openCRX 30
5.1 Typical Deployment Scenarios 31
5.2 Multi Entity Deployment Scenarios 33
5.2.1 Multiple Data Segments in a single DB 33
5.3 openCRX Custom Applications 34
6 Workflow Controller and Servlets 35
6.1 Workflow Controller Configuration 37
6.1.1 Startup Configuration in web.xml 37
6.1.3 Handler pingrate and autostart 38
6.3 Servlet SubscriptionHandler 39
6.4 Servlet DocumentScannerServlet 40
6.5 Servlet WorkflowHandler 41
6.6 Servlet MailImporterServlet 42
6.7 Trouble Shooting Servlets 42
7 Subscribe / Notify Services 43
7.1 Example Subscription – Account Modifications 45
7.2 Example Subscription – Activity Assignment Changes 45
7.3 Example Subscription with Filtering 46
7.5 Trouble Shooting Notification Services 47
8.1 Install and Configure Mail Resource and E-Mail Services 49
8.1.1 Installation of JavaMail 49
8.1.2 Mail Resource for openCRX on Apache Tomcat 49
8.1.2.1 Add resource definition(s) to openejb.xml / tomee.xml 49
8.1.2.2 Mail Resource in web.xml 51
8.2.1 Outbound E-mail Configuration 53
8.2.2 Outgoing E-mail's FROM value 55
8.2.4 Send E-mails directly from openCRX 56
8.2.5 Send E-mails as Attachments to your Mail Client 57
8.2.6 Send E-mails to Fax-/SMS-Gateways 58
8.3.1 Inbound E-mail with IMAP Adapter 59
8.3.2 Inbound E-mail with Wizard Upload E-Mail 62
8.3.3 Inbound E-mail with Wizard FetchEMail.jsp 63
8.3.4 Inbound E-mail with MailImporterServlet 65
8.4 Use openCRX as an E-mail Archive/Audit Tool 70
8.5 Trouble Shooting E-mail Services 71
9.1 Directory Service / LDAP 72
9.1.1 Configuring the openCRX LDAP Port 73
9.1.2 Enabling SSL Support for LDAP 73
9.1.3 LDAP Configuration of Thunderbird 74
9.1.4 LDAP Configuration of MS Outlook 75
9.2.1.1 Connecting MS Outlook to the openCRX vcard servlet 77
9.2.1.2 Connecting Thunderbird to the openCRX vcard servlet 77
9.3 openCRX carddav Servlet 77
9.4.1 Calendar as a Set of Activities 78
9.4.2 Calendar Selectors (ICS and CalDAV) 79
9.4.3 ActivityTracker/-Creators <username>~Private 82
9.4.4 Mapping of Activities to Calendar Events and Tasks 82
9.4.4.1 Conversions between VEVENT and VTODO 84
9.4.5 Calendaring / Free Busy 84
9.4.5.1 Free Busy Configuration of Thunderbird/Lightning 85
9.4.5.2 Free Busy Configuration of MS Outlook 86
9.4.5.3 Free Busy Information as an ICS calendar 86
9.4.6 Calendaring / iCalendar (ICS) 87
9.4.6.1 ICS Configuration of Thunderbird/Lightning and Sunbird 88
9.4.6.2 ICS Configuration of MS Outlook 88
9.4.6.3 ICS Configuration of Zimbra 89
9.4.6.4 ICS Configuration of iPhone 89
9.4.6.6 iCalender Guard Event 91
9.4.7.2 CalDAV Configuration of Thunderbird/Lightning and Sunbird 94
9.4.7.3 CalDAV Configuration of MS Outlook 94
9.4.7.4 CalDAV Configuration of iPhone (OS3.0+, iOS4+, iOS5+) 95
9.4.7.5 CalDAV Configuration of Android devices 96
9.4.8 Calendaring / Timeline 98
9.5.1 Configuring the openCRX IMAP Port 100
9.5.2 Configuring the IMAP Maildir Cache 101
9.5.2.1 Maildir Configuration with Apache Tomcat 101
9.5.3 Enabling SSL Support for IMAP 101
9.5.4 IMAP Configuration of Thunderbird 102
9.5.5 IMAP Configuration of MS Outlook 103
10 openCRX AirSync Server (ActiveSync compatible) 104
10.1 Configuring the AirSync Directory 104
10.2 Mapping of openCRX Objects to AirSync Objects 105
10.3 A User's AirSync Profile 106
10.3.1 Creation of a User's AirSync Profile 106
10.3.2 Creating/Configuring an AirSync Calendar Feed 107
10.3.3 Creating/Configuring an AirSync Contacts Feed 107
10.3.4 Configuration of AirSync E-Mail 110
10.3.5 AirSync Security – Deleting Data on Devices 110
10.4 Connecting ActiveSync Clients to an AirSync Profile 111
10.4.1 iPhone (iOS 3.0+, iOS4.0+, iOS5+) 111
10.4.1.1 Setting up an Exchange Account on the iPhone 111
10.4.1.2 Setting up Synchronization for Contacts 113
10.4.1.3 Setting up Synchronization for Calendars 115
10.4.1.4 Setting up Synchronization for Mail 116
10.4.2 HTC Desire (Android 2.2 - Froyo) 117
10.4.2.1 Setting up an Exchange Account on the HTC Desire 117
10.4.2.2 Setting up Synchronization 119
10.4.3 Google Nexus S (Android 4.0.3 – ICS) 121
10.4.3.1 Setting up an Exchange Account on the Google Nexus S 121
11 openCRX AirSync Client (ActiveSync compatible) 124
11.1 AirSync Client Profile 125
11.1.1 Creation of an AirSync Client Profile 125
11.1.2 ActiveSync Provisioning 126
11.1.3 Synchronizing Folders 126
11.1.3.1 Prepare your MS Exchange Account 127
11.1.3.2 Retrieve Synchronizable Folders / Sync Feeds 128
11.1.3.3 Synchronization with MS Exchange Contact Folders 128
11.1.3.4 Synchronization with MS Exchange Calendar Folders 129
11.1.3.5 Synchronization with MS Exchange Task Folders 130
11.1.3.6 Synchronization with MS Exchange E-Mail Folders 131
11.1.4 Synchronizing Items 131
11.1.5 Resync – Clear all items of a feed on server 131
11.1.6 Resync – Replace all items of a feed on server 131
11.1.7 Automating Synchronization 131
12.1.1 Register with Twitter 132
12.1.2 Create Twitter Account 133
12.1.3 Using openCRX Wizards 133
12.1.4 Using the SendDirectMessageWorkflow 133
13 openCRX is a REST Service (Web Service) 134
14.1 Importing Data into openCRX 135
14.2.1 Importing Excel Files ( openCRX Accounts) 138
14.2.2 Importing vCard Files ( openCRX Contacts) 142
14.3 Exporting Data from openCRX 143
14.3.1 Exporting XML Files 143
14.3.2 Exporting Data to MS Excel / Open Office Calc Files 144
14.3.3 Exporting openCRX Contacts ( MS Excel Files) 145
14.3.4 Exporting openCRX Contacts ( vCard Files) 146
14.3.5 Exporting openCRX Meetings ( iCalendar Files) 147
14.3.7 Exporting openCRX Grids 148
15.2.1 Enabling/Disabling Root Menu Entries 151
15.3 Role-based GUI / GUI Permissions 152
15.3.1 Activating GUI Permissions 152
15.3.2 Managing GUI Permissions 154
15.3.2.1 Granting a role to an openCRX user 154
15.3.2.2 Revoking a role previously granted to an openCRX user 155
15.3.2.3 Enabling/Disabling GUI elements 156
16 Integration with Office Application 158
16.1 MS Word, LibreOffice Writer, OpenOffice Writer, etc. 158
16.2 MS Excel, LibreOffice Calc, OpenOffice Calc, etc. 159
16.3 MS Outlook, Thunderbird/Lightning, Sunbird, etc. 159
17.3 Large Scale Reporting 161
18.1 Configuration of AutoCompleter 163
18.2 Extended Service for openCRX/Tomcat Management 164
18.2.1 Multiple Instances of Tomcat 164
18.2.2 IMAPServer: pause / resume 164
18.2.3 WorkflowController: pause / resume 165
18.3 SNMP Monitoring (with Sun JVM) 166
18.4 Tomcat w/ openCRX and LDAP-based Authentication 167
List of Figures
Figure 1: Security Realms, Principals and Subjects after Initial Setup 13
Figure 2: Segment Administration 14
Figure 3: Role Drop Down with list of available Segment Login Principals 14
Figure 4: openCRX UML Model – Class Diagram SecureObject 15
Figure 5: System attributes of an openCRX object as shown in the GUI 16
Figure 6: Default Principal Groups 17
Figure 7: Table OOCKE1_SEGMENT after default installation 19
Figure 8: Table OOCKE1_SEGMENT after modification 20
Figure 9: Result of Check Permissions 21
Figure 10: Role Drop Down with list of available Segment Login Principals 22
Figure 11: New user guest – step 1 25
Figure 12: New user guest – step 2 25
Figure 13: New user guest – step 3 25
Figure 14: New user guest – step 4 26
Figure 15: New user guest – step 4 26
Figure 16: New user guest – step 5 26
Figure 17: New user guest – step 6 27
Figure 18: Operation Actions > Import Login Principals (admin-Root) 28
Figure 19: Operation Actions > Import Users (admin-Standard) 29
Figure 20: Disabling of Segment Login Principal guest by admin-Standard 30
Figure 21: 3-Tier with Apache Tomcat / OpenEJB 31
Figure 22: 4-Tier with multiple Tomcat / OpenEJB instances 31
Figure 23: 3-Tier with J2EE-compliant Application Server 31
Figure 24: 4-Tier with Clustered Application and DB Servers 32
Figure 25: Multiple Data Segments in a single DB 33
Figure 26: Dedicated DB for each Entity 34
Figure 27: Accessing the openCRX Workflow Controller 35
Figure 28: openCRX 2.10.0 Workflow Controller 35
Figure 29: Default Configuration of WorkflowController 36
Figure 30: openCRX Administration – WorkflowController 37
Figure 31: Workflow Controller Configuration – serverURL 38
Figure 32: Workflow Controller Configuration – pingrate and autostart 38
Figure 33: Default Workflow Processes created by WorkflowHandler 41
Figure 34: Event and Notification Service 43
Figure 35: Standard Topics included in the openCRX distribution 44
Figure 36: Create a new Subscription 45
Figure 37: Create a Subscription with Filters 46
Figure 38: Flow of e-mail messages between openCRX, MTA and MUA 48
Figure 39: Create a new E-Mail Account – step 1 53
Figure 40: Create a new E-Mail Account – step 2 53
Figure 41: Create a new E-Mail Account – step 3 54
Figure 42: E-mail subject prefix and Web access URL 54
Figure 43: Send E-Mail from openCRX – Overview 56
Figure 44: Send E-Mail from openCRX with Actions > Follow Up 56
Figure 45: Send E-Mail as Attachment from openCRX – Overview 57
Figure 46: Export E-Mail from openCRX with Actions > Follow Up 57
Figure 47: Import E-Mails from Mail Client 65
Figure 48: Envelope E-Mail with attached E-Mail to be imported 67
Figure 49: Activity Tracker E-Mail is created automatically 68
Figure 50: Activity Creator Default E-mail Creator 69
Figure 51: E-Mail Audit – import all inbound/outbound e-mail messages 70
Figure 52: Thunderbird LDAP Configuration 74
Figure 53: MS Outlook LDAP Configuration 75
Figure 54: openCRX Activity Groups / openCRX Activity Filters 78
Figure 55: An openCRX activity's iCal representation 83
Figure 56: An openCRX activity in the standard GUI 83
Figure 57: iCalendar conversion between VEVENT and VTODO 84
Figure 58: Configuration of Thunderbird's FreeBusy Add-on 85
Figure 59: Inviting Attendees with Thunderbird using free busy information 86
Figure 60: Timeline visualizes time-based events 98
Figure 61: Thunderbird IMAP Configuration 102
Figure 62: MS Outlook IMAP Configuration 103
Figure 63: openCRX AirSync Server – Over The Air (OTA) Synchronization 104
Figure 64: openCRX AirSync Client – backend-sync with Exchange 124
Figure 65: XML import from 3rd party system – overview 136
Figure 66: Interactive import of XML Files 136
Figure 67: Interactive import of XML Files 137
Figure 68: Import Accounts from Excel Sheet – Sample Excel Sheet 138
Figure 69: Import Accounts from Excel Sheet – Import Report 141
Figure 70: Operation vCard Import 142
Figure 71: Exporting SalesOrder as XML File 143
Figure 72: XML Exporter provides XML data file and code tables as ZIP file 143
Figure 73: Exporting SalesOrder as Spreadsheet File 144
Figure 74: Exported Spreadsheet File 145
Figure 75: Manually Export Contact as vCard 146
Figure 76: Export individual Contact as vCard with Wizard 146
Figure 77: Export multiple Contacts as vCards with Wizard 146
Figure 78: Exporting Meeting / Sales Visit as iCalendar File 147
Figure 79: Export individual Activity as iCal with Wizard 147
Figure 80: Launch Wizard User Settings 151
Figure 81: Wizard User Settings – enable/disable Root Menu Entries 151
Figure 82: RTF Document generated by merging live data with template 158
Figure 83: Contacts Export Dialog 159
List of Listings
Listing 1: File Format Subjects and Application Login Principals 28
Listing 2: Example File Subjects and Application Login Principals 28
Listing 3: File Format Users 29
Listing 4: Example File Users 29
Listing 5: web.xml – auto startup of the Workflow Controller 37
Listing 6: DocumentScannerServlet – init-param for WorkflowController 40
Listing 7: DocumentScannerServlet – Servlet Declaration 40
Listing 8: DocumentScannerServlet – Mapping 40
Listing 9: Servlets managed by Workflow Controller log to server.log 42
Listing 10: File openejb.xml/tomee.xml – mail resource outgoing mail 49
Listing 11:File openejb/tomee.xml – mail resource incoming mail POP3 50
Listing 12:File openejb/tomee.xml – mail resource incoming mail POP3S 50
Listing 13: File openejb/tomee.xml – mail resource incoming mail IMAP 50
Listing 14:File openejb/tomee.xml – mail resource incoming mail IMAPS 50
Listing 15: Uncomment mail resource definition (outgoing mail) in web.xml 51
Listing 16: add mail resource definition (incoming mail) in web.xml 51
Listing 17: add path name of MailImporterServlet to web.xml 51
Listing 18: add class name of MailImporterServlet to web.xml 52
Listing 19: add servlet mapping of MailImporterServlet to web.xml 52
Listing 20: Importing certificate into keystore cacerts 52
Listing 21: Debug Output of MailImporterServlet 68
Listing 22: Importing Certificate 71
Listing 23: init-param tags required to enable LDAP SSL 73
Listing 24: init-param tags required to enable IMAP SSL 101
Listing 25: Set org.opencrx.airsyncdir for Apache Tomcat 104
Listing 26: Apache config file httpd.conf / fronting Tomat 121
Listing 27: Importing Certificate 126
Listing 28: Locales in web.xml 149
Listing 29: Activating/Deactivating Locales in web.xml 149
Listing 30: Packages in web.xml 150
Listing 31: Activating/Deactivating Packages in web.xml 150
1 About this Book
This book describes various configuration settings and tasks that make an openCRX administrator's life easier.
openCRX is the leading enterprise-class open source CRM suite. openCRX is based on openMDX, an open source MDA framework based on the OMG's model driven architecture (MDA) standards. This guarantees total openness, standards compliance, a state-of-the-art component-based architecture, and virtually unlimited scalability.
1.1 Who this book is for
The intended audience are openCRX administrators.
1.2 What you need to know with this book
This book describes some of the settings and configurations an openCRX administrator can use to control the behavior of openCRX.
1.3 Tips, Warnings, etc.
We make use the following pictograms:
|
|
Information provided as a “Tip” might be helpful for various reasons: time savings, risk reduction, etc. - it goes without saying that we advise to follow our guides meticulously. meticulous
\muh-TIK-yuh-luhs\, adjective: |
|
|
You should carefully read information marked with “Important”. Ignoring such information is typically not a good idea. |
|
|
Warnings should not be ignored (risk of data loss, etc.). |
2 Prerequisites
This guide assumes that you have access to a
properly installed instance of openCRX
You can either follow the openCRX Server Installer documentation (http://www.opencrx.org/server.htm) or you can do a manual installation of openCRX following the installation guide for TomEE.
3 Security
In this chapter we will present a high-level overview of openCRX security and discuss a few important issues.
|
|
We do not recommend learning about security with mission critical data. Backup your data before you make changes if you are not certain what the consequences are! The risk of you being locked out is real and the resources required to fix broken security settings can not be overestimated! The default settings should work for virtually all users; the probability of getting yourself into trouble by changing default settings should not be underestimated. Read and understand at least the basics of openCRX security BEFORE you make any changes. |
3.1 Introduction
3.1.1 Basic Concepts and Conventions
Each “real user” is represented by a Subject (e.g. “Guest”). Subjects are managed by the openCRX Root administrator (admin-Root).
Each subject has an Application Login Principal (also called login id). Application login principals are managed by the openCRX Root administrator (admin-Root).
Each application login principal is assigned to a subject (e.g. principal “guest” is assigned to subject “Guest”) and allows a “real user” to login.
A “real user” can have one or more additional segment login principals. The Segment Login Principal has typically the same name as the application login principal (e.g. “guest”) and grants a “real user” login access to a segment. Segment login principals are managed by openCRX segment administrators (e.g. admin-Standard for the Segment Standard).
Each “real user” who has access to a segment (i.e. has a segment login principal) has (in addition to the segment login principal) a segment user principal, e.g. “guest.User”. The Segment User Principal is required to assign objects to an Owning User. Each “real user” also has a Principal Group, e.g. “guest.Group”.
Each segment has a corresponding realm to manage Principals:
The application login principals are stored in the realm Default.
The segment login principals for segment <segment name> are stored in the realm <segment name> (e.g. principals for the segment Standard are stored in the realm Standard).
Each segment has a segment administrator principal (admin-<segment name>) (e.g. admin-Standard for the segment Standard).
The following figure shows the situation after the initial setup of openCRX (assuming you installed openCRX Server or followed the installation guide for Tomat 6):
Figure 1: Security Realms, Principals and Subjects after Initial Setup
Summarizing the above:
there is a realm for each segment (e.g. a realm Standard corresponding to the segment Standard)
the realm Default acts as login realm; it contains all principals who are allowed to login to the openCRX application; PrincipalGroups in this realm are only used to configure Granted Roles by inheritance (in addition to configuring them directly in the appropriate grid).
there is a subject for each “real user” and all principals of a user are assigned to the same subject; this allows openCRX to find all principals of a user (--> role selection drop down)
The segment administrator (e.g. admin-Standard) creates principals and User home pages with the operation createUser():
Each segment login principal has a home page in the corresponding segment (qualifier of principal and home page must match!).
Each segment login principal is correlated with a contact. This correlation is for example required to find all activities and contracts assigned to the logged in principal.
Figure 2: Segment Administration
While each “real user” (typically) has 1 application login principal only, “real users” may have multiple segment login principals (e.g. because a “real user” is allowed to access multiple segments or because a “real user” is allowed to access a particular segment in different roles like Head of Sales or CFO).
Available segment login principals are listed in the so-called Role Drop Down:
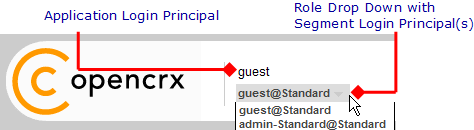
Figure 3: Role Drop Down with list of available Segment Login Principals
3.1.2 Permissions / Access Control
The openCRX security framework makes a clear distinction between Ownership Permissions (permissions granted on a particular object) and Model Permissions (permissions granted on a particular model element). As the latter are not implemented (yet) we only talk about Ownership Permissions in this guide.
Ownership permissions are used to control browse/delete/update access to openCRX objects by Users and UserGroups (i.e. Ownership access control). Every openCRX object is a SecureObject. The following figure shows an extract from the UML model (if you are interested in all the details and the formally correct and complete specifications you should refer to the latest openCRX UML models):
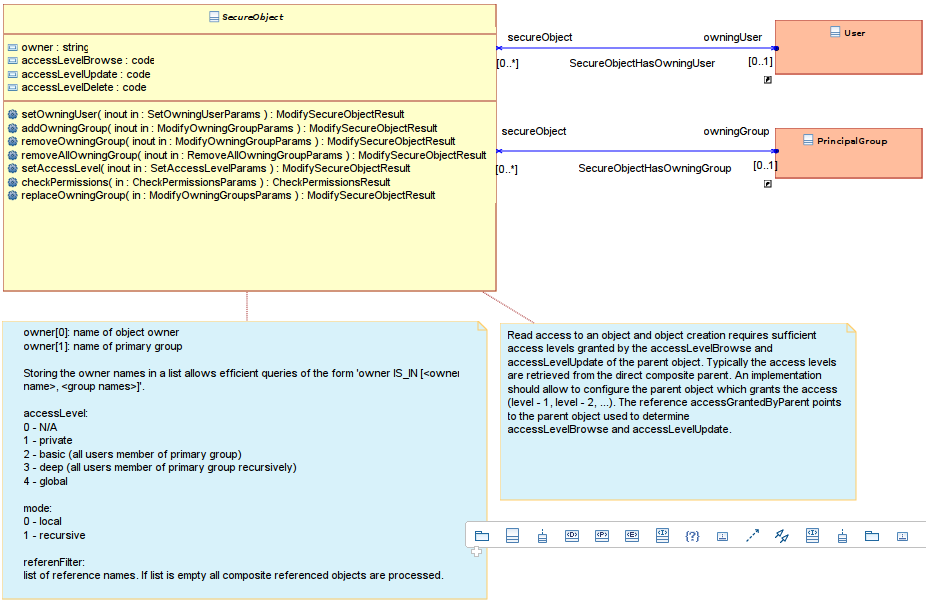
Figure 4: openCRX UML Model – Class Diagram SecureObject
|
|
If you see N/P in a reference field instead of a more meaningful value you probably do not have browse access to the respective object (N/P stands for No Permission) |
|
|
If you see N/A in a reference field instead of a more meaningful value the object cannot be retrieved (N/A stands for Not Available); maybe the object was deleted or the respective provider is not accessible/available. |
The most important security attributes of an object X are discussed below:
Owning User: this user "owns" object X; the Owning User can always browse/delete/update object X (unless the access level is set to 0 [in which case nobody has access – probably not a desirable situation]).
Owning Groups: these groups might enjoy privileged treatment for browsing/deleting/updating object X depending on the relevant access level settings.
Access Granted by Parent: this attribute is set by configuration and refers to the parent object that grants access to object X.
Browse Access Level: this setting determines which users/user groups are granted browse access to direct composite objects of object X [i.e. who can view/inspect direct composite objects of object X (including all their attributes)].

It is a common misconception that browse access level of an object X controls browse access to this object X – please read the above definition carefully!
Delete Access Level: this setting determines which users/user groups are granted delete access to object X and all its composite objects (recursively!) [i.e. who can delete object X and all its composite objects (recursively!)].
Update Access Level: this setting determines which users/user groups are granted update access to object X [i.e. who can change object X; this includes adding composite objects to object X].
Figure 5: System attributes of an openCRX object as shown in the GUI
The following access levels are available to control which users/user groups are granted permission to browse/delete/update a particular object X:
|
Access Level |
Meaning |
|---|---|
|
0 – N/A |
no access |
|
1 – private |
access is granted if the user is owning user of object X |
|
2 – basic |
access is granted if at least one of the following conditions is true: (a) the user is owning user of object X (b) the user is member of any of the owning groups of object X (c) any of the owning groups of object X is a subgroup** of any group the user is member of |
|
3 – deep |
access is granted if at least one of the following conditions is true: (a) the user is owning user of object X (b) the user is member of any of the owning groups of object X (c) any of the owning groups of object X is a subgroup** of any group the user is member of (d) any of the owning groups of object X is a subgroup** of any supergroup* of any group the user is member of |
|
4 – global |
all users are granted access |
|
* Owning group Gsuper is a supergroup of an owning group G if every user who is member of G is also member of Gsuper |
|
|
** Owning group Gsub is a subgroup of an owning group G if every user who is member of Gsub is also member of G |
|
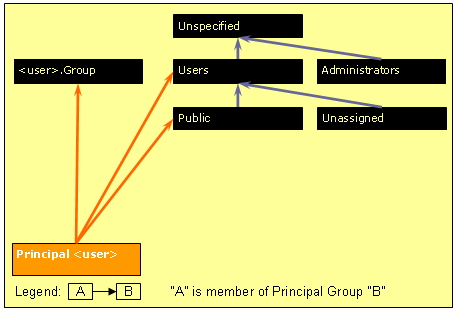
3.1.3 Default Principal Groups
|
The figure on the right shows the openCRX default principal groups and their memberships:
Figure 6: Default Principal Groups |
|
3.1.4 The SQL approach to understanding security
If you are familiar with SQL, the following approach to understanding security might be helpful. Let's put ourselves into the role of the AccessControl Plugin; accessing an object (read mode) results in a SELECT statement as follows:
SELECT * FROM T WHERE owner IN (p1, p2, ....)
owner is a column that is present in all (multi-valued) tables xACCOUNT_, xADDRESS_, etc.) and it contains a list of principals who are permitted to access the respective object in read-mode
the set P = {p1, p2, ...} is calculated by the AccessControl Plugin before accessing the object and it corresponds to the principals who are assigned to the current user based on the object's AccessLevel as shown in the following table:
-
Access Level
Set P = {p1, p2, ...}
0 – N/A
P = {}
1 – private
P = Pp
where
Pp = {all groups directly assigned to the principal p}
2 – basic
P = Pp + Pupper
where
Pp = {all groups directly assigned to the principal p}
Pupper = {all groups that contain at least one group contained in Pp}
3 – deep
P = Pp + Pupper + Plower
where
Pp = {all groups directly assigned to the principal p}
Pupper = {all groups that contain at least one group contained in Pp}
Plower = {all groups contained in Pupper}
4 – global
the where-clause “WHERE owner IN (p1, p2, ....)” is not required, i.e. the SELECT statement reduces to
SELECT * FROM T
|
|
You can mark PrincipalGroups as “Base group” to better control the inclusion of PrincipalGroups with Access Level 3. |
3.2 Activating Security
Security (including Access Control) is not just a fancy add-on, rather it is an integral part of openCRX; openCRX Access Control is always activated.
The openCRX security provider manages all security data and provides access control services for all requests through the openCRX API. Hence, you can rely on openCRX access control even if you write you own clients or adapters for openCRX.
|
|
The only “hardening” you might want to do is the one described in the following chapter: set browse access level to 3 for non-Root segments. |
3.3 Default Settings
Default access level settings for non-Root segments (e.g. segment Standard) after a clean install are as follows:
|
Browse Access Level: |
4 – global |
|---|---|
|
Update Access Level: |
3 – deep |
|
Delete Access Level: |
1 – private |
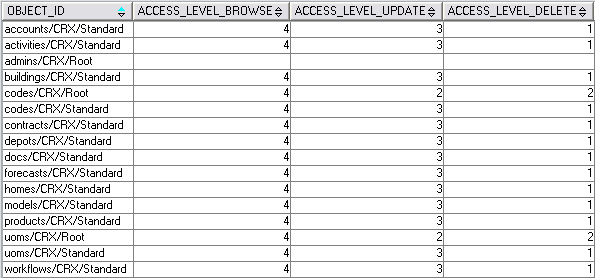
Figure 7: Table OOCKE1_SEGMENT after default installation
Due to the setting access_level_browse = 4 (global) any user with access to a particular segment is allowed to browse top level objects (i.e. any user can browse all accounts, all activities, all documents, etc.).
These default settings are suitable for test environments and deployments in smaller companies/teams with a generous access policy; for most real-world applications, however, it is more appropriate to set access_level_browse = 3 (deep) for non-Root segments. You can do this by changing the values in the column access_level_browse from 4 to 3 (table OOCKE1_SEGMENT).
After this change, the table OOCKE1_SEGMENT will look as follows:

Figure 8: Table OOCKE1_SEGMENT after modification
|
|
Segment security settings are loaded during the initialization of the openCRX servlet. Hence, if you change settings you must redeploy openCRX for the new settings to become active. |
3.4 Security Settings of New Objects
New objects are by default created with the following security settings:
|
Browse Access Level: |
3 – deep |
|---|---|
|
Update Access Level: |
2 – basic |
|
Delete Access Level: |
2 – basic |
|
Access Granted by Parent |
in general: Parent object as modeled exceptions: there are some select exceptions, but they are all pre-configured |
|
Owning User: |
User who is creating the object |
|
Owning Groups: |
Primary User Group of the user who is creating the object and (meaning as well as) Owning Group(s) of the parent object of the new object (except Users, see below). |
|
|
Please note that the User Group Users (e.g. Standard\\Users) is not added to the list of Owning Groups of newly created objects unless the creating user's Primary User Group is equal to Users. |
|
|
By default, a user's primary user group is <user>.Group. This group is created automatically when the segment administrator runs the wizard User Settings from a user's homepage (see chapter 4.1 Creating Users – Overview). |
|
|
Please note that a User's Primary User Group can be set by the segment administrator with the operation Create User . To change an existing user's primary group, the segment administrator simply executes the operation Create User again with a new parameter for primary user group. |
|
|
In the context of activity management there are various operations that set/change the Owning Groups of objects based on the settings of an assigned Activity Creator or assigned Activity Group and not based on the settings of the user who executes the operation. |
3.5 Checking Permissions
You can check security permissions on any SecureObject with the operation Security > Check Permissions. Provide the principal name as a parameter. The following figure shows the result of the operation on a user's homeage:
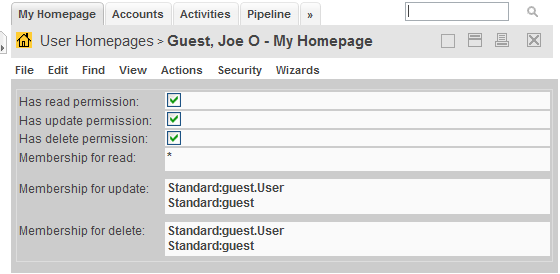
Figure 9: Result of Check Permissions
The meaning of the above result is as follows:
|
Has read permission: |
|
|---|---|
|
Has update permission: |
|
|
Has delete permission: |
|
|
Membership for read: |
principal has read permission if the intersection of the resulting list of groups and the list of owning groups of the respective SecureObject is not empty |
|
Membership for update: |
principal has modify/update permission if the intersection of the resulting list of groups and the list of owning groups of the respective SecureObject is not empty |
|
Membership for delete: |
principal has delete permission if the intersection of the resulting list of groups and the list of owning groups of the respective SecureObject is not empty |
3.6 Login Procedure
The openCRX login procedure consists of 2 levels:
3.6.1 Apache Tomcat / Application Server Login
The Apache Tomcat / application server login procedure depends on various parameters:
Servlet container (Apache Tomcat, JBoss, BEA WLS, IBM WAS, etc.)
configuration of Apache Tomcat / application server
file-based realm (e.g. tomcat-users.xml for Tomcat)
DB-based realm (e.g. DataSourceRealm Tomcat)
LDAP-based realm (e.g. JNDIRealm for Tomcat; see also chapter 18.4 Tomcat w/ openCRX and LDAP-based Authentication)
company-specific / custom-tailored realms
Please note that even though openCRX might be involved in managing some of the above-mentioned realms (e.g. DB-based realm) the login procedure is not really under control of openCRX. As a consequence, many login problems are related to incomplete/faulty configuration settings of the servlet container.
|
|
Detailed documentation about the many Realms supported by Apache Tomcat is available at http://tomcat.apache.org/tomcat-7.0-doc/realm-howto.html |
3.6.2 Segment Login
Access to segments is managed/controlled by the ObjectInspectorServlet. The included DefaultRoleMapper identifies all Segment Login Principals of a given Subject and grants access to the respective segments through the Role Drop Down:
Figure 10: Role Drop Down with list of available Segment Login Principals
It is possible to deploy user-specific implementations of the DefaultRoleMapper so that you can adapt the segment login procedure to your requirements.
3.6.3 Disabling Login
Please refer to the chapter “Disable/Deactivate Users”.
3.7 Resetting Security
|
|
If you get the setting of Update Access Level wrong you may not be able to change the respective object from the GUI anymore (and that includes the security settings of that object!). For example, the only way to recover from setting Update Access Level to 0 – N/A for a particular object is to edit the data directly in the database! It is simply not possible to disable openCRX Security. |
If you (or one of your users) managed to screw up the security settings in a major way you might be forced to reset all security settings to a well-defined state. Not an easy task – and it typically involves a lot of manual work.
|
|
Educate your users about openCRX security. You might also consider disabling some of the more powerful operations and/or security attributes in the default GUI. |
4 Managing Users
|
|
Read through the chapter Basic Concepts and Conventions (Security) before reading this chapter. It is quite helpful to have a good understanding of the terms Subject, Application Login Principal, Segment Login Principal, User, etc. before you start reading here. |
4.1 Creating Users – Overview
Even though you can create users with a variety of methods, “behind the scenes” the following steps are always required to create a new openCRX user:
|
Who |
Steps |
|---|---|
|
Root administrator |
|
|
Segment administrator |
|
Depending on how you create a new user, some of the above steps might be taken care of by a wizard. If you want to have full control over the user creation process, however, then you can certainly create new users following the above instructions step by step.
Have a look at Figure 1: Security Realms, Principals and Subjects after Initial Setup and Figure 2: Segment Administration to see how this all fits together.
4.1.1 Create Users as Segment Administrator
The Segment administrator can create new users with the following steps:
Login as Segment administrator (e.g. admin-Standard)
Create a contact for the new user
Click on the (potentially hidden) tab [User Homepages]:
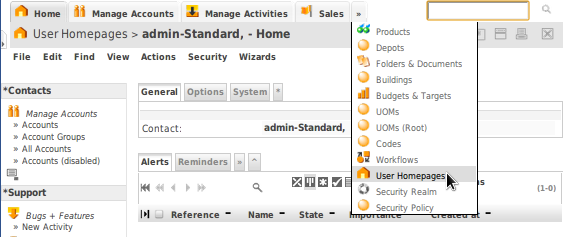
Figure 11: New user guest – step 1
Next you select the operation Actions > Create User... which allows you to create and initialize a new user:

Figure 12: New user guest – step 2
Type the new user's principal name (e.g. guest) into the field Principal name, use the Lookup Inspector or the auto-completer to fetch values for Contact and Primary user group (unless you have a good reason to provide a user group, leave Primary User Group empty and openCRX will automatically create a user group with name <principal name>.Group), and then type a password (e.g. opencrx) into the fields Initial password and Password again:
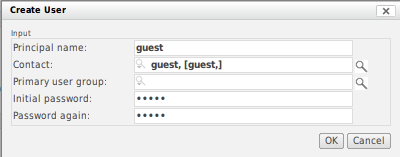
Figure 13: New user guest – step 3
Status 0 indicates that the user guest was created without errors:

Figure 14: New user guest – step 4
Next we navigate to the homepage of the newly created user guest by clicking on the icon as show below:
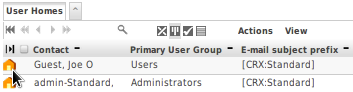
Figure 15: New user guest – step 4
Please note that we are still logged in as admin-Standard (as shown in the header of the application), but we are looking at the homepage of the user guest. Execute the operation Edit > User Settings:
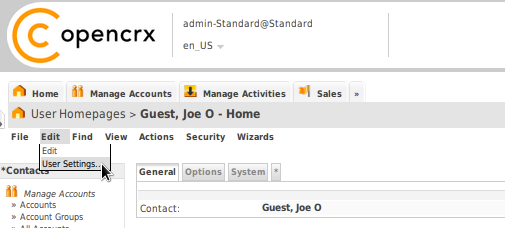
Figure 16: New user guest – step 5
This will start the wizard User Settings. You can configure various settings with this wizard. At a minimum you should probably set the timezone and enter the new user's e-mail address. Once you're done you can click the button [Save]. The wizard will then create a bunch of objects and finalize the initialization of the user guest:
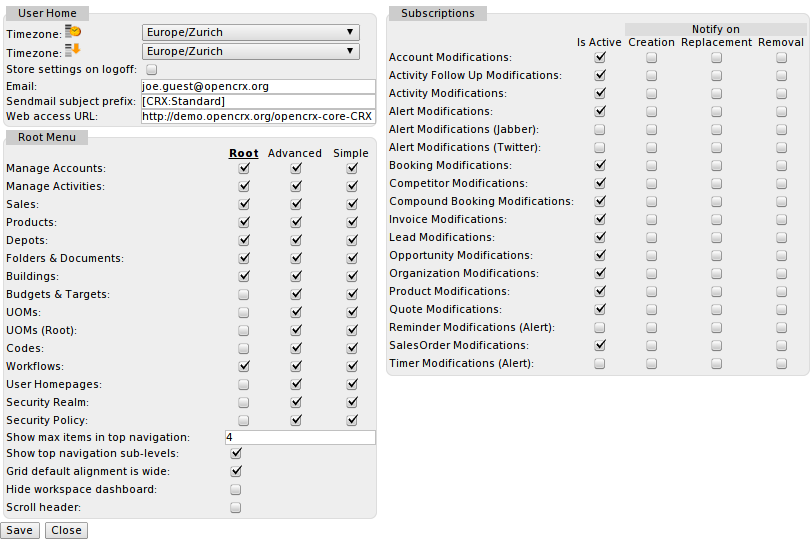
Figure 17: New user guest – step 6
Click [Cancel] to leave the wizard.
The wizard User Settings creates a user group <username>.Group, in the above case guest.Group. The primary user group of the user guest was automatically set to this new user group guest.Group.
If you want to change the primary user group to anything else or if you ever must reset a user (lost password, etc.), you can re-execute the operation Create User as admin-Standard at any time.
If you want to reset a user without changing the user's password, you can simply leave the password fields empty when recreating the user.
Logoff as admin-Standard and login as the newly created user (guest in our example)
Execute the operation Edit > User Settings and click [Save]. This time (i.e. when executed by the newly created user) the wizard User Settings creates various user-specific objects.
4.1.2 Import Subjects and Application Login Principals
Creating large numbers of subjects/principals by hand can be quite a tedious job. If you prepare a text file containing the appropriate information in the file format as outlined below, the Root administrator (admin-Root) can use the operation Actions > Import Login Principals to create Subjects and Application Login Principals automatically.
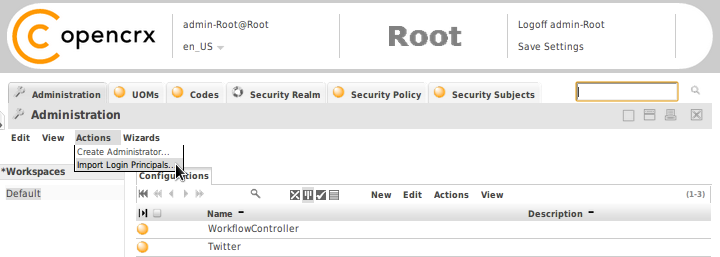
Figure 18: Operation Actions > Import Login Principals (admin-Root)
Listing 1: File Format Subjects and Application Login Principals
Subject;<subject
name>;<subject description>
Principal;<principal
name>;<principal description>;<subject name>;<groups>
Listing 2: Example File Subjects and Application Login Principals
Subject;joe;Doe,
Joe
Subject;mark;Ferguson, Mark
Subject;peter;Lagerfeld,
Peter
Principal;joe;Doe,
Joe;joe;Users,Administrators
Principal;mark;Ferguson,
Mark;mark;Users
Principal;peter;Lagerfeld, Peter;peter;Users
4.1.3 Import Users
Similarly to importing Subjects and Application Login Principals from a file you can also import Users from a file. If you prepare a text file containing the appropriate information in the file format as outlined below, the Segment administrator (admin-<SegmentName>) can use the operation Actions > Import Users to create Users automatically.
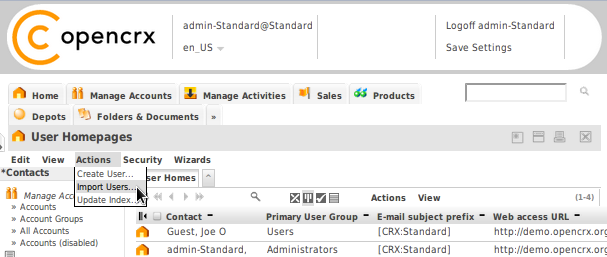
Figure 19: Operation Actions > Import Users (admin-Standard)
Listing 3: File Format Users
User;<principal>;<account alias>;<account full name>;<primary group>;<password>[;group [, group] ]
|
Parameter |
Description |
|
<principal> |
required, name of principal |
|
<account alias> |
at least one value per user must be provided, i.e. either the alias name of the contact, or then the full name |
|
<account full name> |
|
|
<primary group> |
optional, default is <principal>.Group |
|
<password> |
required, clear text value |
|
group |
optional, the user is made a member of each provided principal group |
Please note that a “-” value (a dash without the quotes) means empty in the context of a user file. Example: if you don't want to explicitly define a primary group, you can just put a dash and the importer will create the default primary group <principal>.Group for the respective user.
Listing 4: Example File Users
User;joe;JD;Doe,
Joe;Users;2%jOd.IT;MGMT,SALES
User;mark;Fergi;Ferguson,
Mark;Users;maFe&.3-;MGMT
User;peter;-;Lagerfeld,
Peter;-;PlF*;ReGaL;SALES
|
|
Contacts are not created automatically; existing Contacts are first searched by <account alias>. If no matching account alias is found, Contacts are search by <account full name>. If still no matching account is found, the UserHome is not created. Users are only imported/created if the referenced Principals exist. |
4.2 Disable/Deactivate Users
There are various ways of disabling/deactivating users. To fully understand your options it is helpful if you are familiar with the openCRX Login Procedure.
4.2.1 Disable Users at the level Tomcat /Application Server
Depending on the configuration of your application server you can disable users at that level. For example, if you rely on file-based realms, you can simply remove users from the file tomcat-users.xml (with Apache Tomcat) or users.properties (with JBoss) to prevent access to openCRX. If you block access at the level Tomcat / application server such users are locked out from accessing any application and any openCRX segment. However, as the servlet container's login procedure is not entirely controlled by openCRX you might have to consult the documentation of your respective servlet container (e.g. Tomcat or JBoss) or ask your administrator for details.
4.2.2 Disable Users at the level openCRX
The segment administrator (e.g. admin-Standard) can prevent a user from accessing a particular openCRX segment by either disabling the respective Segment Login Principal or by deleting it altogether. Disabling is the preferred option to prevent access temporarily. If a user has multiple Segment Login Principals you must disable all of them to prevent access to the openCRX application.
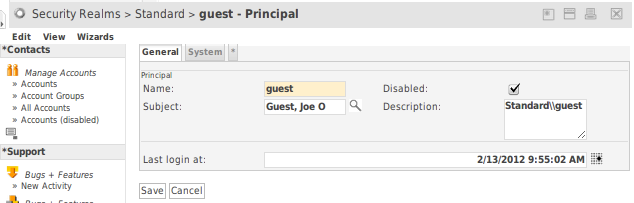
Figure 20: Disabling of Segment Login Principal guest by admin-Standard
|
|
You should not delete a particular Subject as long as it is referenced by any Principal. Otherwise you'll end up with “dangling” Subject references. |
5 Deployment Scenarios
openCRX supports a multitude of deployment scenarios.
5.1 Typical Deployment Scenarios
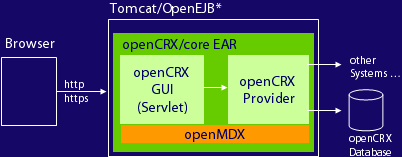
The following table lists some of the pros and cons of the most common openCRX deployment scenarios. Please note that the list is by no means complete:
|
3-Tier with Tomcat/OpenEJB |
Figure 21: 3-Tier with Apache Tomcat / OpenEJB |
|
|
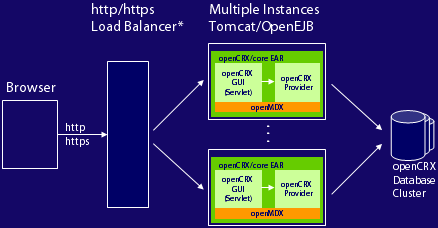
4-Tier with Tomcat/OpenEJB |
Figure 22: 4-Tier with multiple Tomcat / OpenEJB instances |
|
|
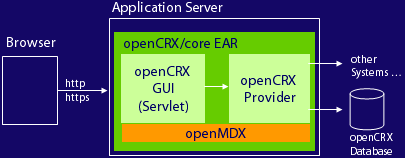
3-Tier with AppServer |
Figure 23: 3-Tier with J2EE-compliant Application Server |
|
|
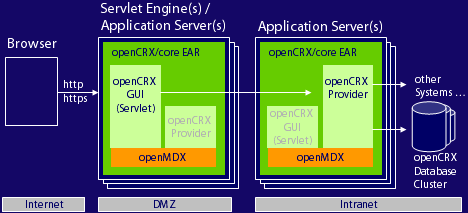
4-Tier with Clusters |
Figure 24: 4-Tier with Clustered Application and DB Servers |
|
5.2 Multi Entity Deployment Scenarios
The open source MDA platform openMDX supports a multitude of deployment scenarios and persistency configurations. The most common multi entity deployment scenarios are discussed in the following sections.
5.2.1 Multiple Data Segments in a single DB
The setup “Multiple Data Segments in a single DB” provides adequate security for many use cases and is relatively easy to manage. As all the data is stored in a single database, however, security configuration mistakes (e.g. principals linked to the wrong subject, etc.) might lead to situations where a user is granted access to the data of a particular company/client that should not be accessible (please note that human error is the real root cause here, not a malfunction of openCRX). Furthermore, this setup is not recommended if users can get direct access to the database, e.g. with third party reporting tools as those tools typically bypass the openCRX API (and hence openCRX security)!
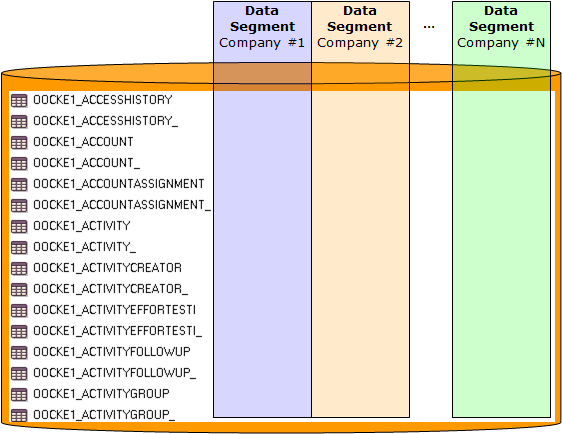
Figure 25: Multiple Data Segments in a single DB
Detailed instructions on how you can create and configure new segments are provided in the installation guide for Tomat 6.
5.2.2 Multiple DBs
The highest level of security is provided by setting up a dedicated database for each entity so that data sets of the various entities are physically separated:

Figure 26: Dedicated DB for each Entity
5.3 openCRX Custom Applications
Information about openCRX custom projects is available from the openCRX wiki, e.g. http://sourceforge.net/p/opencrx/wiki/Sdk210.CustomProject/
6 Workflow Controller and Servlets
With the Workflow Controller the openCRX Root administrator (admin-Root) can enable/disable various servlets (configured in web.xml) included in the openCRX distribution. This chapter gives an overview over the currently available servlets and explains how to start/stop them.
You can access the Workflow Controller by navigating to the URL
http://127.0.0.1:8080/opencrx-core-CRX/WorkflowController
or starting the Workflow Controller Wizard as shown in the figure below:
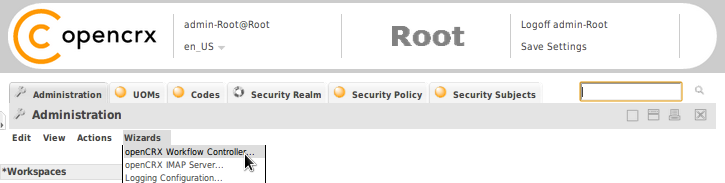
Figure 27: Accessing the openCRX Workflow Controller
|
|
You should connect to the Workflow Controller with http. If you use SSL-secured connections to start/stop servlets you must ensure that your server's certificate is available in cacerts. |
The following
figure shows the Workflow Controller of openCRX

Figure 28:
openCRX
|
|
Please note that access is granted to the openCRX Root administrator (admin-Root) only. Hence, if you see the openCRX login screen instead of the Workflow Controller you must first login as Root administrator. Also, ensure that openCRX is properly initialized before you connect to the Workflow Controller. |
You can manually start (stop) servlets that are managed by the Workflow Controller by clicking on “Turn On” (“Turn Off”). Please note that you can control servlets of each segment individually. For example, if you created a segment “OtherSegment” in addition to the segment “Standard” you can start/stop servlets of the segment “OtherSegment” without interfering with the servlets of the segment “Standard”.
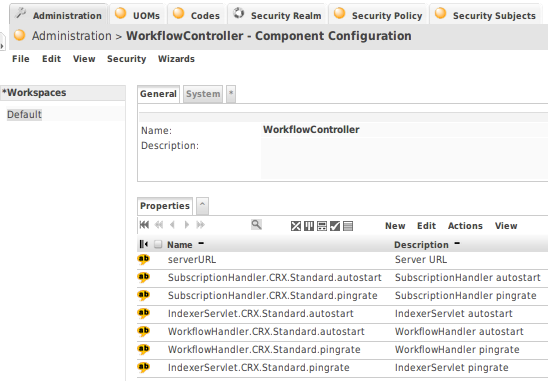
6.1 Workflow Controller Configuration
In addition to configuring the Startup option of the Workflow Controller you can also configure various options related to the servlets managed by the Workflow Controller. The configuration of the Workflow Controller is available to the openCRX Root administrator (admin-Root) by navigating to the tab [Administration] and then clicking on the icon of the WorkflowController:
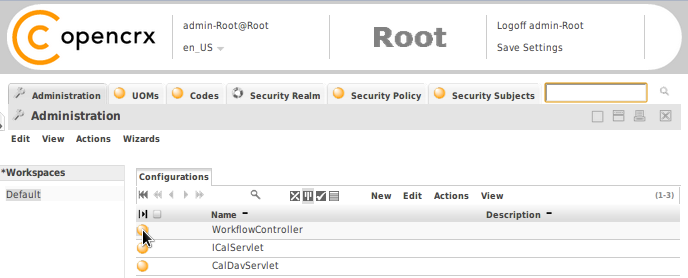
Figure 30: openCRX Administration – WorkflowController
In case you create the WorkflowController configuration manually, please note that both name and qualifier are equal to the string WorkflowController.
6.1.1 Startup Configuration in web.xml
You can start the Workflow Controller manually by navigating to the URL
http://127.0.0.1:8080/opencrx-core-CRX/WorkflowController
or starting the Workflow Controller Wizard. However, it is also possible to start the Workflow Controller automatically by activating the corresponding option in the file web.xml:
Listing 5: web.xml – auto startup of the Workflow Controller
<!-- WorkflowController -->
<servlet id="WorkflowController">
<servlet-name>WorkflowController</servlet-name>
<servlet-class>org.opencrx.kernel.workflow.servlet.WorkflowControllerServlet</servlet-class>
...
<!-- activate if WorkflowController should be initialized at startup-->
<load-on-startup>10</load-on-startup>
</servlet>
|
|
With the value of load-on-startup (10 above) you can control the order of starting up servlets in case there is more than one servlet. |
6.1.2 ServerURL
Adapt the value of serverURL to your environment:
Figure 31: Workflow Controller Configuration – serverURL
6.1.3 Handler pingrate and autostart
Use pingrate to define the interval (in minutes) between successive calls of the respective handler and autostart (true/false):
Figure 32: Workflow Controller Configuration – pingrate and autostart
6.2 Servlet IndexerServlet
The openCRX IndexerServlet updates index entries (used for keyword/index based search) by indexing all objects which do not have an IndexEntry newer than the modification date of the object. The IndexerServlet creates an index by invoking the operation updateIndex() on the object to be indexed.
|
|
Please note that indexing can put some heavy load on your database server. Hence, you might consider turning off (or at least lowering the frequency of calling) the IndexerServlet during busy hours. If you are looking for a way to define advanced schedules for calling the openCRX indexer you might consider cURL in combination with a scheduler provided by your operating system (e.g. Scheduled Tasks on Windows, cron on Linux). With curl, calling the indexer boils down to calling curl with the appropriate URL as a parameter. The following example shows how to call the indexer for the provider CRX and the segment Standard: curl "http://localhost:8080/opencrx-core-CRX/IndexerServlet/execute?provider=CRX&segment=Standard"
|
6.3 Servlet SubscriptionHandler
The openCRX SubscriptionHandler is the backbone of the openCRX Subscribe / Notify Services. The Subscription Handler does not require any configuration by the openCRX administrator other than setting the pingrate and autostart options, i.e. it is designed to work “out of the box”.
Turning on the SubscriptionHandler of a particular segment is required if you want that segment to provide Alerts, E-mail Notifications, witter Updates (see chapter 12.1 Twitter) and XMPP (Jabber) Messages to its Users. The polling frequency can be set by the Root administrator (see Figure 32: Workflow Controller Configuration – pingrate and autostart).
The SubscriptionHandler checks openCRX audit entries on a regular basis and – if matching Subscriptions exist – executes the Workflow Process referenced by the Subscription using Userhome.executeWorkflow().
Userhome.executeWorkflow() – implemented by the openCRX plugin – creates an entry in Userhome.wfProcessInstance (accessible through the grid Workflow Process Instances). Synchronous workflows are executed immediately, asynchronous workflows are left alone (the Servlet WorkflowHandler is specialized in dealing with asynchronous workflows – see below for details).
6.4 Servlet DocumentScannerServlet
The DocumentScannerServlet scans a file system directory and its subdirs for files and maps them to openCRX Documents and DocumentFolders. The DocumentScannerServlet is configured in the file web.xml as follows:
Listing 6: DocumentScannerServlet – init-param for WorkflowController
...
<!--
init-param for WorkflowController
-->
<init-param>
<param-name>path[3]</param-name>
<param-value>/DocumentScannerServlet</param-value>
</init-param>
...
Listing 7: DocumentScannerServlet – Servlet Declaration
...
<!--
DocumentScannerServlet
-->
<servlet id="DocumentScannerServlet">
<servlet-name>DocumentScannerServlet</servlet-name>
<servlet-class>org.opencrx.application.document.DocumentScannerServlet</servlet-class>
</servlet>
...
Listing 8: DocumentScannerServlet – Mapping
...
<servlet-mapping>
<servlet-name>DocumentScannerServlet</servlet-name>
<url-pattern>/DocumentScannerServlet/*</url-pattern>
</servlet-mapping>
...
The servlet can be configured as admin-Root by adding entries to the WorkflowControll configuration (see chapter 6.1 Workflow Controller Configuration). The following options are supported:
scanDir: directory to be scanned for documents
urlPrefix: Document revisions are created of type ResourceIdentifier. The url of the resource identifier is set to urlPrefix + current directory name within scanDir + document name
groups: List of principal groups. owningGroup of all created objects is set to the specified list of principal groups
upload: if set to true, successfully uploaded documents are removed from the directory
All options are multi-valued, i.e. can optionally have an index suffix [0]..[9]. All options must be prefixed with {Provider name}.{Segment name}., e.g. CRX.Standard.scanDir or MyProvider.MySegment.urlPrefix.
The openCRX administrator can set the pingrate and autostart options; alternatively, you can call it servlet with cron/cUrl.
6.5 Servlet WorkflowHandler
The openCRX WorkflowHandler is responsible for executing WfProcessInstances based on asynchronous WfProcesses like:
org.opencrx.mail.workflow.ExportMailWorkflow
org.opencrx.mail.workflow.SendMailNotificationWorkflow
org.opencrx.mail.workflow.SendMailWorkflow
The execution frequency can be set by the Root administrator (see Figure 32: Workflow Controller Configuration – pingrate and autostart).
|
|
Please note that the WorkflowHandler is required for outbound E-Mail Services. |
The WorkflowHandler executes Workflow Process Instances that have not been executed yet.

|
|
All WfProcesses with undefined/unknown runtime length should be defined as asynchronous. This is particularly true for WfProcesses that might block. The default setup ensures that blocking WfProcesses cannot block openCRX. |
6.6 Servlet MailImporterServlet
A sample configuration (which you need to adapt to you own
environment) of the MailImporterServlet is contained in
TOMCAT_HOME/apps/opencrx-core-CRX/opencrx-core-CRX/WEB-INF/web.xml
You also need a ComponentConfiguration named MailImporterServlet. The following configuration options (String Properties) are supported:
<provider>.<segment>.mailServiceName
<provider>.<segment>.deleteImportedMessages
<provider>.<segment>.mailbox
A sample ComponentConfiguration looks as follows:
|
Name |
Description |
String value |
|
CRX.Standard.mailServiceName |
Mail service name in web.xml |
/mail/provider/CRX |
|
CRX.Standard.deleteImportedMessages |
Delete imported messages |
false |
|
CRX.Standard.mailbox |
Mailbox name |
INBOX |
To activate the servlet, you also need to add the relevant entries to the WorkflowController (see chapter 6.1 Workflow Controller Configuration).
6.7 Trouble Shooting Servlets
All the openCRX servlets controlled by the Workflow Controller log their actions to the server log file (e.g. TOMCAT_HOME\log\catalina.<date>.log). The following log file extract shows, for example, that the three Servlets IndexerServlet, SubscriptionHandler, and WorkflowHandler seem to be working fine:
Listing 9: Servlets managed by Workflow Controller log to server.log
20:25:18,388
INFO [STDOUT] Tue Mar 04 20:25:18 CET 2008: Indexer
CRX/Standard
20:27:18,400 INFO [STDOUT] Tue Mar 04 20:27:18 CET
2008: SubscriptionHandler CRX/Standard
20:27:18,400 INFO
[STDOUT] Tue Mar 04 20:27:18 CET 2008: WorkflowHandler CRX/Standard
openCRX Exceptions (like NullPointers, etc.), however, are still logged to the application log file as configured during the installation.
It is always worth checking whether the Workflow Handlers actually are active; they must be started by the Root administrator. You can find out by connecting to the Workflow Controller (see Figure 28: openCRX 2.10.0 Workflow Controller).
|
|
After restarting the application server all servlets managed by the WorkflowController are inactive, i.e. the Root Administrator must explicitly turn them on again (if desired) unless the respective servlet's autostart option is set to true in the WorkflowController's configuration and the WorkflowController's Startup option is set to true in the file web.xml. The servlets do not automatically resume the state they were in before the application server was shut down. |
7 Subscribe / Notify Services
openCRX features a powerful event subscription and notification service:
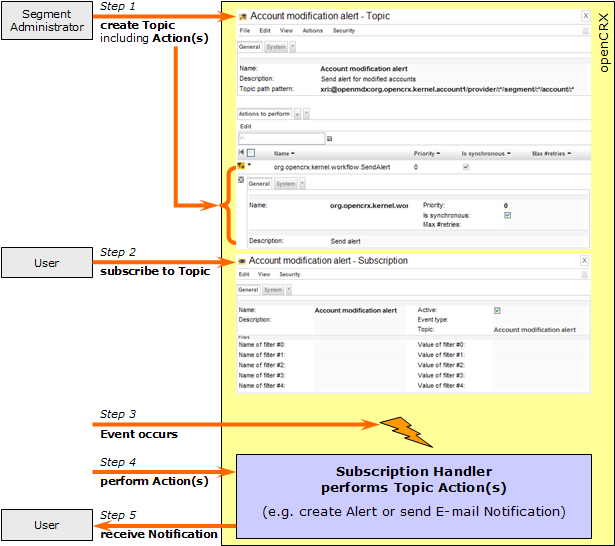
Figure 34: Event and Notification Service
Once a topic is created, openCRX users can subscribe to it. Users manage their subscriptions individually on their UserHomes (with the Wizard UserSettings or by editing their subscriptions manually). If a topic has subscribed users and a monitored event occurs then the predefined actions are performed. If the action is set to – for example – creating an alert for subscribed users, then each subscribed user will receive an alert on the UserHome.
|
|
Please note that event and notification services depend on the Servlet SubscriptionHandler, i.e. you must turn on the openCRX Subscription Handler for the respective segment with the Workflow Controller, otherwise Topic Actions are not executed, i.e. no Alerts will be created and E mail Notifications will not be delivered. |
|
|
Furthermore, outbound E-Mail Services must be configured (see chapter 8.1 Install and Configure Mail Resource and E-Mail Services) and you must activate the Workflow Handler (see chapter 6.5 Servlet WorkflowHandler) to receive E-Mail Notifications. |
The openCRX distribution includes quite a few default topics (see Figure 35: Standard Topics included in the openCRX distribution) to get you started:
Topic Account Modifications sends an alert to subscribed users whenever an account is modified.
Topic Activity Follow Up Modifications sends an alert to subscribed users whenever a Follow Up of an Activity is modified.
Topic Alert Modifications sends an e-mail notification to subscribed users – assuming outbound e-mail services are configured correctly – whenever an Alert is created/modified.
|
|
Please note that newly created Segments do neither contain Workflow Processes nor Topics (i.e. the respective grids are empty). Both Workflow Processes and Topics can be created by the segment administrator with the wizard Segment Setup. |
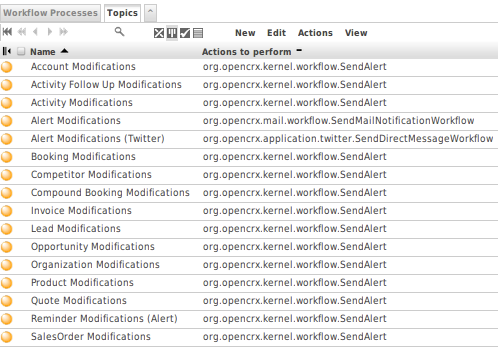
Figure 35: Standard Topics included in the openCRX distribution
Users can easily custom-tailor their subscriptions with filters and by selecting event types like Object Creation, Object Replacement, and Object Removal.
7.1 Example Subscription – Account Modifications
In this example we will create a subscription to the standard Topic Account Modifications for the user “guest”.
Login as guest, and execute the operation Edit > User Settings to start the respective wizard. Check both “Is Active” and “Creation” as shown below:
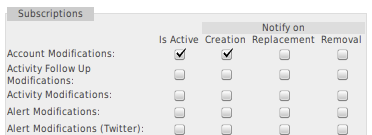
Figure 36: Create a new Subscription
Click the button [Save] to store your settings.
|
|
Please note that the Root administrator must start the Subscription Handler – otherwise you will not get any Alerts/Notifications. |
7.2 Example Subscription – Activity Assignment Changes
With the following steps you can create a subscription to activity assignment changes:
navigate to your Userhome and create a new Subscription
populate the fields as follows:
Name: Activities assigned to me
Description: (any description you like)
Active: checked
Event type: (leave empty)
Topic: select Activity Modifications
Name of filter #0: assignedTo
Value of filter #0: copy the Identity of the respective user's homepagesave your subscription
To locate the identity of a user's homepage, you can navigate to the respective homepage and inspect the tab [System]. The pattern is as follows:
xri://@openmdx*org.opencrx.kernel.home1/provider/<providerName>/segment/<SegmentName>/userHome/<principal>
e.g.
xri://@openmdx*org.opencrx.kernel.home1/provider/CRX/segment/Standard/userHome/guest
7.3 Example Subscription with Filtering
In combination with openCRX security the subscription filter feature enables you to provide highly specific subscriptions. Imagine the following situation: there are 2 Activity Trackers DivisionA:ProjectX and DivisionA:ProjectY and some of your users are interested in receiving notifications related to activities of ProjectX only, whereas some users want to receive notifications related to activities of ProjectY only. A third group of users wants to receive notifications from both projects. Such a situation could be handled as follows:
create a PrincipalGroups DivisionA.ProjectX and DivisionA.ProjectY
assign PrincipalGroup DivisionA.ProjectX to ActivityTracker DivisionA:ProjectX; like this new activities assigned to this Tracker will also be assigned the PrincipalGroup DivisionA.ProjectX
assign PrincipalGroup DivisionA.ProjectY to ActivityTracker DivisionA:ProjectY; like this new activities assigned to this Tracker will also be assigned the PrincipalGroup DivisionA.ProjectY
an Activity Modification subscription of a user wanting notifications related to ProjectX and ProjectY would look as follows:
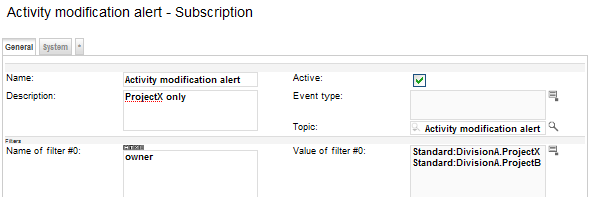
Figure 37: Create a Subscription with Filters
Enter the name of the attribute (owner in our example) into the name field and then enter the value(s) to match into the value field (in our case Standard:DivisionA.ProjectX and Standard:DivisionA.ProjectY)
|
|
Multiple values of a named filter are combined with OR. Multiple named filters are combined with AND. |
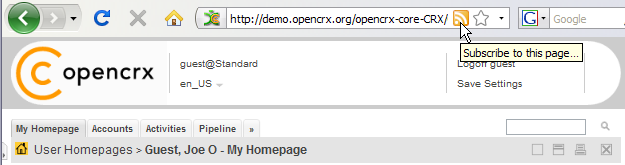
7.4 RSS Feeds
New alerts are also available as RSS feeds. Users can subscribe to their news feed directly from their homepage:
7.5 Trouble Shooting Notification Services
The following table lists some of the common issues and how to fix them:
|
Problem |
Solution |
|---|---|
|
The grids Workflow Processes and/or Topics are empty. |
|
|
I started the Subscription Handler but I never receive any Alerts / Notifications |
|
|
I receive Alerts triggered by my Subscriptions but no Notification E mails |
|
8 E-mail Services
Please note that we have no intention to duplicate mail server (MTA) or mail client (MUA) functionality in openCRX as there are lots of excellent products available (Open Source and commercial). It is our goal, however, that openCRX integrates with all the major products that adhere to the major standards and support standard protocols like SMTP, POP3, IMAP, etc. This ensures that you can continue to use your favorite mail server (qmail, postfix, Zimbra, etc.) and your favorite mail client (Thunderbird, Outlook, etc.).
|
|
Installation of JavaMail is required if you want to make use of E-mail Services (see chapter 8.1.1 Installation of JavaMail). |
The following figure shows the possible flows of
mail messages between openCRX, mail server, and mail client as it is
supported with openCRX
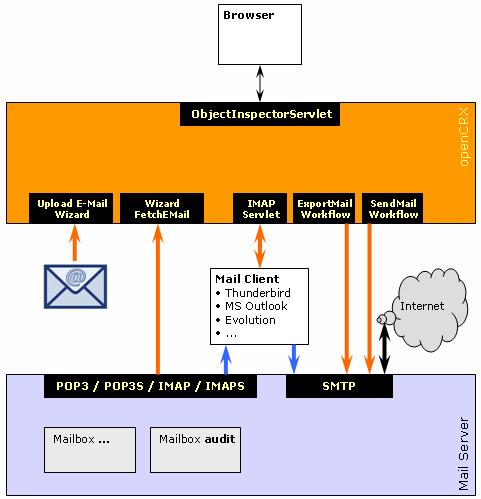
Figure 38: Flow of e-mail messages between openCRX, MTA and MUA
In this chapter we will first guide you through the required installation and configuration steps before we discuss various important use cases.
8.1 Install and Configure Mail Resource and E-Mail Services
The following chapters explain how to install JavaMail and how to configure the Java mail service and various in- and outbound E mail services.
|
|
Please note that E-Mail Services depend on JavaMail (i.e. JavaMail must be installed) and outbound E-Mail Services depend on the Servlet WorkflowHandler of the respective segment being turned on. |
8.1.1 Installation of JavaMail
Detailed installation instructions are provided at the JavaMail home:
http://java.sun.com/products/javamail/FAQ.html
And here is the short version:
Download JavaMail (at least version 1.4.3) from http://java.sun.com/products/javamail/downloads/index.html
Put the file mail.jar into the directory TOMCAT_HOME\lib
8.1.2 Mail Resource for openCRX on Apache Tomcat
8.1.2.1 Add resource definition(s) to openejb.xml / tomee.xml
Open the file TOMCAT_HOME\conf\openejb.xml (with TomEE v1.0 it is called tomee.xml) and add (or modify) the mail resource definition. Typically you would add one (smtp) mail resource definition per provider for outgoing mail and one mail resource definition for each segment that requires the MailImporterServlet. Below are some sample files which you can use as a starting point (adapt the highlighted strings to your own environment):
Listing 10: File openejb.xml/tomee.xml – mail resource outgoing mail
...
<Resource id="mail/provider/CRX"
type="javax.mail.Session">
mail.transport.protocol smtp
mail.smtp.user crx_mail_user
mail.smtp.password crx_mail_user_password
mail.smtp.starttls.enable true
mail.smtp.ssl.trust *
mail.smtp.auth true
mail.smtp.host mail_server_name_or_ip_address
mail.smtp.port 25
mail.from noreply@opencrx.org
mail.debug
true
</Resource>
...
Please note that the above mail resource definition for provider “CRX” will apply to all segments (including “Standard”) of that provider.
|
|
Make sure that you set mail.from to a reasonable value as this value might be used in outgoing mails (see also chapter 8.2.2 Outgoing E-mail's FROM value). |
|
|
If you set the option mail.smtp.ssl.trust to “*” then any smtp server will be trusted, even if you didn't import its certificate into your keystore. It is probably a good idea to replace * with the name of your mail server, e.g. mysmtp.mydomain.com. |
The following mail resource definitions apply to the segment “Standard” (of the provider “CRX”) and show default configurations for the various mail protocols supported by mail.jar (pop3, pop3s, imap and imaps):
Listing 11:File openejb/tomee.xml – mail resource incoming mail POP3
<Resource id="mail/CRX_Standard" type="javax.mail.Session">
mail.store.protocol pop3
mail.pop3s.host mail_server_name_or_ip_address
mail.pop3s.port 110
mail.pop3s.auth true
mail.pop3s.user crx_mail_user
mail.pop3s.password crx_mail_user_password
mail.debug true
</Resource>
Listing 12:File openejb/tomee.xml – mail resource incoming mail POP3S
<Resource id="mail/CRX_Standard"
type="javax.mail.Session">
mail.store.protocol pop3s
mail.pop3s.host mail_server_name_or_ip_address
mail.pop3s.port 995
mail.pop3s.auth true
mail.pop3s.user crx_mail_user
mail.pop3s.password crx_mail_user_password
mail.debug
true
</Resource>
Listing 13: File openejb/tomee.xml – mail resource incoming mail IMAP
<Resource id="mail/CRX_Standard"
type="javax.mail.Session">
mail.store.protocol imap
mail.pop3s.host mail_server_name_or_ip_address
mail.pop3s.port 143
mail.pop3s.auth true
mail.pop3s.user crx_mail_user
mail.pop3s.password crx_mail_user_password
mail.debug
true
</Resource>
Listing 14:File openejb/tomee.xml – mail resource incoming mail IMAPS
<Resource id="mail/CRX_Standard"
type="javax.mail.Session">
mail.store.protocol imaps
mail.pop3s.host mail_server_name_or_ip_address
mail.pop3s.port 993
mail.pop3s.auth true
mail.pop3s.user crx_mail_user
mail.pop3s.password crx_mail_user_password
mail.debug true
</Resource>
Additional information about configuration options of JavaMail is available from the JavaMail home: http://www.oracle.com/technetwork/java/faq-135477.html
8.1.2.2 Mail Resource in web.xml
In the file web.xml in the directory <Tomcat Install Dir>\apps\opencrx-core-CRX\opencrx-core-CRX\WEB-INF you must uncomment the following section to activate outgoing mail:
Listing 15: Uncomment mail resource definition (outgoing mail) in web.xml
...
<!-- Wizards, Workflows (e.g. MailWorkflow), etc. can use mail resources.
Configure a mail resource for each used mail resource.
-->
<resource-ref id="mail_opencrx_CRX">
<res-ref-name>mail/provider/CRX</res-ref-name>
<res-type>javax.mail.Session</res-type>
<res-auth>Container</res-auth>
</resource-ref>
...
|
|
Please note that the res-ref-name must match the id of the respective mail resource definition in the file openejb.xml.(tomee.xml since TomEE v1.0). |
The following steps are only required if you want to activate incoming mail (i.e. MailImporterServlet) for a particular segment (e.g. “Standard”):
add mail resource definition to web.xml:
Listing 16: add mail resource definition (incoming mail) in web.xml
...
<!-- incoming mail for provider CRX segment Standard
-->
<resource-ref id="mail_opencrx_CRX_Standard">
<res-ref-name>mail/CRX_Standard</res-ref-name>
<res-type>javax.mail.Session</res-type>
<res-auth>Container</res-auth>
</resource-ref>
...
add a path entry for the MailImporterServlet to the WorkflowController section in web.xml:
Listing 17: add path name of MailImporterServlet to web.xml
...
<!-- WorkflowController
-->
<servlet id="WorkflowController">
<servlet-name>WorkflowController</servlet-name>
<servlet-class>org.opencrx.kernel.workflow.servlet.WorkflowControllerServlet</servlet-class>
...
<init-param>
<param-name>path[3]</param-name>
<param-value>/MailImporterServlet</param-value>
</init-param>
<!-- activate if WorkflowController should be initialized at startup -->
<load-on-startup>10</load-on-startup>
</servlet>
...
add the class name of the MailImporterServlet to web.xml:
Listing 18: add class name of MailImporterServlet to web.xml
...
<!-- IndexerServlet -->
<servlet
id="IndexerServlet">
<servlet-name>IndexerServlet</servlet-name>
<servlet-class>org.opencrx.kernel.workflow.servlet.IndexerServlet</servlet-class>
</servlet>
<!-- MailImporterServlet -->
<servlet id="MailImporterServlet">
<servlet-name>MailImporterServlet</servlet-name>
<servlet-class>org.opencrx.application.mail.importer.MailImporterServlet</servlet-class>
</servlet>
...
add the servlet mapping of the MailImporterServlet to web.xml:
Listing 19: add servlet mapping of MailImporterServlet to web.xml
...
<servlet-mapping>
<servlet-name>IndexerServlet</servlet-name>
<url-pattern>/IndexerServlet/*</url-pattern>
</servlet-mapping>
<servlet-mapping>
<servlet-name>MailImporterServlet</servlet-name>
<url-pattern>/MailImporterServlet/*</url-pattern>
</servlet-mapping>
...
|
|
See also chapter 6.6 Servlet MailImporterServlet for important information about the MailImoprterServlet. |
Restart Tomcat for these changes to become active. Please note that additional steps are required to fully configure the MailImporterServlet (see chapter 8.3.4 Inbound E-mail with MailImporterServlet).
|
|
If you want to enable TLS/SSL connections to your mail server (smtp, pop3s, imaps) you must either set the value of mail.smtp.ssl.trust in openejb.xml (tomee.xml) or you must import the mail server's public key into the file cacerts of your JRE: Listing 20: Importing certificate into keystore cacerts keytool -keystore cacerts -import -storepass changeit -file mailserver.cer
|
8.2 Outbound E-mail
8.2.1 Outbound E-mail Configuration
openCRX users can configure e-mail accounts on their homepage indicating where they would like to receive e-mail notifications (e.g. generated by subscriptions):
Click on Home and select the grid Tab Service Accounts (you might have to click on [>>] to expand the hidden grid tabs).
Next you click on the creator menu New > E-Mail Account to create a new E-mail Account:

Figure 39: Create a new E-Mail Account – step 1
Now you can configure your E-Mail Account for outbound e-mail service:
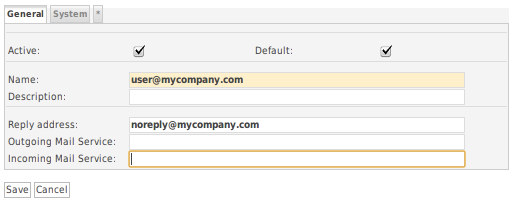
Figure 40: Create a new E-Mail Account – step 2
Name: enter your e-mail address
Reply address: is also used for the From field (leave empty to use the value of the segment admin's E-Mail Account)
Default: check if this is your default e-mail address (notifications will only be sent to your default e-mail address)
Outgoing Mail Service: leave empty (unless the default configuration does not suit you; the default name of the mail service is /mail/provider/<provider> )
Incoming Mail Service: leave empty (unless the default configuration does not suit you; the default name of the mail service is /mail/<provider>_<segment> )
The various fields have the following meanings:
-
If a user does not define the name of the mail service in his E-Mail Account settings the default name /mail/provider/<provider>/segment/<segment> is used; if there is no resource with this name the fallback name /mail/provider/<provider> is used (and if this name does not exist either, then an error is logged).
Click the button
 to commit the new E-Mail Account. The grid Service
Accounts contains an entry for the new E-Mail Account:
to commit the new E-Mail Account. The grid Service
Accounts contains an entry for the new E-Mail Account:
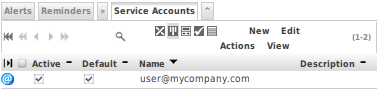
Figure 41: Create a new E-Mail Account – step 3
On your Homepage you can provide additional information related to E Mail Notifications:

Figure 42: E-mail subject prefix and Web access URL
E-mail subject prefix: enter a string that might help you identify or filter e-mails from your openCRX server (optional, i.e. you can also leave this empty) – the entered string is prepended to the subject line of generated e-mails.
Web access URL: enter the URL of the openCRX instance at hand, e.g. http://opencrx.yourdomain.com/opencrx-core-CRX; if entered correctly, generated e-mails will contain URLs that allow you to connect to your openCRX server with a single click.
The meaning of the two fields is as follows:
You can easily test your e-mail settings if you create a subscription for Account Modifications (see Example Subscription – Account Modifications) and then work through the following steps:
create a new account (e.g. a new contact)
navigate to your Homepage and check whether you actually received an alert related to the newly created account
next click on the Grid Tab Pending / Completed Workflows on your homepage (unhide it by clicking on [>>] if it is not visible)
there should be (at least) two entries (you might have to sort the column Started on to locate recent entries):
org.opencrx.kernel.workflow.SendAlert (which generated the Alert)
org.opencrx.mail.workflow.SendMailNotificationWorkflow (which was responsible for sending the E-mail Notification)
click on the icon of the respective grid icon to inspect the corresponding Workflow Process object
the grid Action Log Entries contains the message body of the e-mail that was sent or an error message if the workflow failed (please note that even if you see a "timeout" error message the e-mail might have been sent; timeouts are typically caused by e-mail servers with high latency – try sending out notifications through a mail server that is responsive).
8.2.2 Outgoing E-mail's FROM value
The openCRX Workflow Handler uses the mail.from value in the file openejb.xml / tomee.xml (see chapter 8.1.2.1 Add resource definition(s) to openejb.xml / tomee.xml).
If mail is sent as an openCRX user, the FROM value of outgoing e-mails is determined as follows:
if the user has configured an E-Mail Account for outbound e-mail service and the value of Reply Address is set (see chapter 8.2.1 Outbound E-mail Configuration, Figure 40: Create a new E-Mail Account – step 2), then this value is used; otherwise
if the segment administrator has configured an E-Mail Account for outbound e-mail service and the value of Reply Address is set, then this value is used; otherwise
if the mail.from value in the file openejb.xml / tomee.xml (see chapter 8.1.2.1 Add resource definition(s) to openejb.xml / tomee.xml) is set, then this value is used; otherwise
the value noreply@localhost is used
|
|
Please note that many mail servers reject incoming mails if the hostname contained in an e-mail's FROM value cannot be resolved. (and FROM: noreply@localhost is very likely to cause delivery issues). Hence, ensure that at least the value in openejb.xml / tomee.xml makes sense. |
8.2.3 Export E-mails
Please refer to chapter 9.5 Mailstore / IMAP.
8.2.4 Send E-mails directly from openCRX
Any openCRX E-Mail Activity can be sent as e-mail directly from openCRX:
Figure 43: Send E-Mail from openCRX – Overview
The idea behind this functionality is less that you will use openCRX as a mail client (MUA), rather the SendMailWorkflow is an important element of the openCRX campaign management functionality. E-Mail Activities of type “E Mails” are controlled by the Activity Process E-mail Process. Send E-Mail Activities to all recipients by executing the operation Actions > Follow Up and then selecting the Transition Send as mail as shown below:
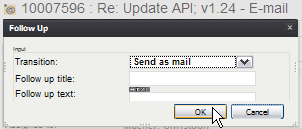
Figure 44: Send E-Mail from openCRX with Actions > Follow Up
|
|
Please note that the transition “Send as mail” is only available after the Transition “Assign” has been executed. |
|
|
Media attached to E-Mail Activities are sent as e-mail attachments. |
8.2.5 Send E-mails as Attachments to your Mail Client
Any openCRX E-Mail Activity can be sent to your mail client as an attachment. The idea behind this functionality is that you might want to put some finishing touches on an e-mail before you actually send it from your mail client (MUA):
Figure 45: Send E-Mail as Attachment from openCRX – Overview
E-Mail Activities of type “E-Mails” are managed by the standard Activity Process E mail Process, i.e. they can be exported to the user's default mail account by executing the operation Actions > Follow Up and then selecting the Transition Export as mail attachment:
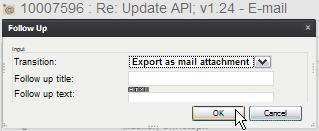
Figure 46: Export E-Mail from openCRX with Actions > Follow Up
|
|
Please note that the transition “Export as mail attachment” is only available after the Transition “Assign” has been executed. Exported messages are sent as attachments to the user's default mail address. See Outbound E-mail Configuration for details. |
|
|
Media attached to E-Mail Activities are sent as e-mail attachments. |
8.2.6 Send E-mails to Fax-/SMS-Gateways
The SendMailWorkflow supports mail gateways if you set the attribute gateway of the respective e-mail activity. The gateway address is used for addresses which are not of type EmailAddress. For example, in the case of a phone number, the address is converted to an e-mail address as follows:
take the address (e.g. phoneNumberFull in case of phone numbers)
remove any characters other than digits and letters
convert “+” (plus sign) to “_” (underscore)
append domain part of gateway address
Example: if the domain address of an e-mail activity is set to the email address noreply@fax-gateway.opencrx.org, the the phone number +41 (44) 111-2233 is converted to the email address _41441112233@fax-gateway.opencrx.org.
This conversion feature allows you to mix e-mail addresses and phone numbers in member lists of address groups. Depending on the recipient's type of addresss the SendMailWorkflow will either send an e-mail to the listed e mail address as is (e-mail address) or first convert the recipient's phone number to an e-mail address so that the resulting e-mail can be handled by your fax-/sms-gateway.
|
|
If you are looking for reliable fax software, you might want to look into Hylafax+ http://hylafax.sourceforge.net/ (Linux only). |
8.3 Inbound E-mail
Instead of offering platform-specific plugins for a multitude of mail clients like MS Outlook, MS Outlook Express, Thunderbird, Eudora, Elm, etc. openCRX features a platform-neutral IMAP adapter. The advantages are obvious:
works with any IMAP client, or doesn't even require a mail client at all
no installation of plugins required, i.e. you can get this to work on your company's laptop regardless of how “hardened” the system is
supports single message import and bulk import
imports headers, body, and attachments
automatically creates links to sender and recipient(s) if the respective e mail addresses are present in openCRX
In addition to the IMAP adapter there is also the possibility to import e-mails (previously saved as eml files) with a wizard (see Inbound E-mail with Wizard Upload E-Mail) or with the MailImporterServlet (see Inbound E-mail with MailImporterServlet).
8.3.1 Inbound E-mail with IMAP Adapter
The openCRX IMAP adapter is well-suited to import e-mails from your mail client (MUA) into openCRX. Importing an e-mail into openCRX is as easy as dragging/dropping it on an openCRX IMAP folder in your mail client.
|
|
Please refer to chapter 9.5 Mailstore / IMAP for information on how to setup/configure the openCRX IMAP adapter and your mail client. |
Assuming you have configured your mail client to connect to the openCRX IMAP adapter and subscribed to the relevant folders (openCRX Activity Groups) you can import an e-mail message into openCRX as follows:
in your e-mail client (e.g. Thunderbird, Outlook, ...) drag/drop the mail to be imported to the desired openCRX IMAP folder (must be a folder with a related activity creator that can actually create e-mail activities)
|
|
If you move an e-mail message from a non-openCRX IMAP folder to an openCRX IMAP folder and the target folder does not have a valid E-Mail Activity Creator defined, openCRX will not be able to create an EMailActivitiy in that folder. Due to the move operation the message is deleted from the source folder and your e mail message is lost. Hence, it is good practice to copy (and not move) e-mails to openCRX IMAP folders. Only after verifying that the EMailActivitiy was actually created by openCRX in the target folder should you delete (if necessary) the message from the source folder. |
openCRX will either create a new EMailActivity or update an already existing EMailActivity with links to sender and recipients
|
|
Since openCRX v2.9.1, unknown e-mail addresses are created as composites of the segment administrator, e.g. admin-Standard.
|
The IMAP adapter features some advanced import functionality that helps you import mail messages and automatically link them with new or already existing activities including creation of follow ups. This functionality is quite powerful in the context of e-mail based support and incident management. Let's look at a simple example:
you receive an e-mail asking for help with one of the gadgets you sell:
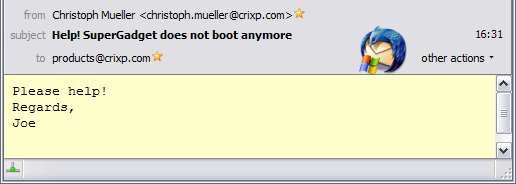
create a new incident in your openCRX support system:
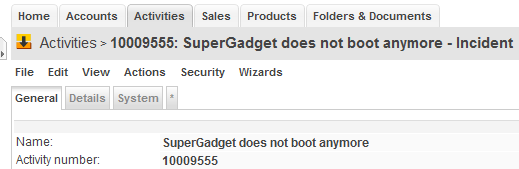
reply to the support e-mail and add #<activity number> to the subject line (where <activity number> is the activity number of the newly created incident, e.g. 10009555 in our example):
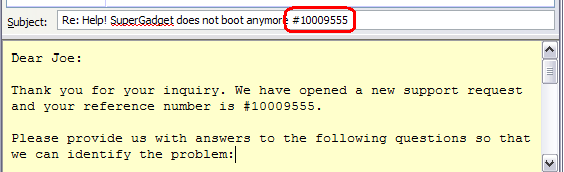
once you've sent your reply message you can import it (with drag/drop) into the appropriate openCRX IMAP folder; the IMAP adapter will do the following:
create a new EMailActivity corresponding to your reply message complete with attachments and links to sender/recipient
link the existing incident #10009555 with the newly imported reply message (i.e. EMailActivity) and then add the message body of the reply message as a follow up to the incident #10009555:
If you import all the e-mails related to this support case you will have the complete history of your exchange with the client available as follow ups in your incident #10009555.
If you prefer, the IMAP adapter can even create new activities upon importing e-mails. All you have to do is provide the necessary information in the subject line of wrapper message. You can build a wrapper message by creating a new e-mail message and then adding the e-mail(s) to be imported as attachments; the subject line of the wrapper message is interpreted by the IMAP adapter.
If the subject line starts with "> " the message is treated as wrapper message. All attachments are treated as mime messages which are imported instead of the message itself. The subject line of the wrapper message has the following form:
> @<email creator name> [#<activity creator name or activity#>] <subject>
|
|
Separate e-mail creator name, activity creator/numer and subject with at least 2 space characters to make sure the parser can correctly identify the information provided. |
Example subject lines:
> @E-mails #10009555 log file with exception
> @E-mails #GadgetASupport does not boot
> @E-mails #10009555 log file with exception
> @E-mails #10009555 log file with exception
This allows the user to specify the email creator and an optional activity creator or an activity number. If an activity creator is specified, an activity is created (name = subject, detailed description = body) and the imported email(s) are linked with this activity using linkToAndFollowUp(). If an activity number is specified than the imported email(s) are simply linked with this activity using linkToAndFollowUp().
8.3.2 Inbound E-mail with Wizard Upload E-Mail
If you only want to import the occasional e-mail message you can save such messages as eml files (Thunderbird) or msg files (Outlook) and import them with the Wizard Upload E-Mail as follows:
navigate to any ActivityCreator that supports creation of E-mail Activities (i.e. Activities of type E-Mail), e.g. [Activities] > [Activity Creators] and then select the creator E-Mails
start the wizard Upload E-Mail
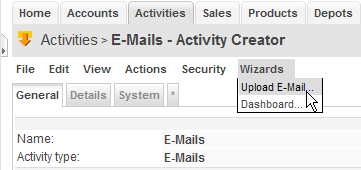
choose the eml/msg file containing the e-mail to be imported and then click the button [Save]
if the import of the e-mail is successful you will be taken to the imported e-mail automatically
The wizard also supports imports with a wrapper message with the same functionality as the IMAP adapter if you launch it from the tab [Activities] (see chapter 8.3.1 Inbound E-mail with IMAP Adapter).
|
|
MSG-Files (produced by MS Outlook) sometimes do not contain SMTP-addresses, but rather they contain X.500-addresses. If the respective X.500-address is assigned to an account in openCRX that also has an SMTP-address, then the wizard automatically converts the address to the SMTP-address. In all other cases the wizard asks you to enter the SMTP-address that should be used as a mapping target:
|
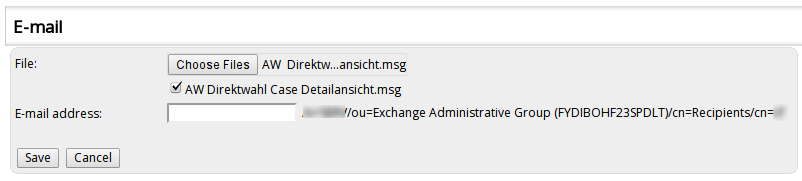
8.3.3 Inbound E-mail with Wizard FetchEMail.jsp
|
The wizard FetchEMail.jsp can retrieve e-mails from a mail store interactively; supported are the standard protocols pop3, pop3s, imap and imaps. You can call the wizard from the Activity Segment or any Activity Creator. |
|
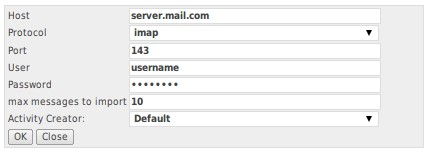
The following parameters can be set:
|
Host |
IP address or
host name of openCRX Server |
|
Protocol |
choose from imap, imaps, pop3, pop3s |
|
Port |
default ports: 143/imap, 993/imaps, 110/pop3, 995/pop3s |
|
User |
user name to access mailstore |
|
Password |
password to access mailstore |
|
Max Messages |
maximum number of messages to retrieve |
|
Activity Creator |
reference to
activity creator for new e-mail activity |
Alternatively, you can automate importing of inbound e-mail by setting up a cron job and have curl call the wizard WizardInvoker.jsp with the appropriate parameters, e.g.
curl
"http://127.0.0.1:8080/opencrx-core-CRX/WizardInvoker.jsp?
wizard=/wizards/en_US/FetchEMail.jsp&provider=CRX&segment=Standard
&xri=xri://@openmdx*org.opencrx.kernel.activity1/provider/CRX/segment/Standard
&user=admin-Standard&password=pw_crx¶_0=command=ok.button
¶_1=host=mail.mycompany.com¶_2=protocol=imap¶_3=port=143
¶_4=user=joe@opencrx.org¶_5=password=joespw¶_6=messageCount=10
¶_7=activityCreatorXri=xri://@openmdx*org.opencrx.kernel.activity1/provider/CRX/
segment/Standard/activityCreator/LASV1EAOIR1EO2O0JQG1L4NMI"
&> /dev/null
Please note that the above command is on a single line (formatting was added for readability purposes only). Also, you have to adapt the parameters of the above call to your environment.
8.3.4 Inbound E-mail with MailImporterServlet
The following figure shows an overview of how you can import e-mails from your mail client (MUA) into openCRX:
Figure 47: Import E-Mails from Mail Client
The whole setup is quite straightforward; in a first step you configure the MailImporterServlet so that it fetches e-mails from a mailbox, e.g. named “import”. Optionally, you can create a custom-tailored Activity Creator to handle imported E-mails exactly the way you like, but in most cases the provided Default E-mail Creator is sufficient. To import an e mail message from your mail client into openCRX, you create a new message to be sent to your importer mailbox, e.g. by entering import@company.com into the TO field of the new message. Optionally you can specify the name of the Activity Creator in the Subject of the new message. Next you attach the message(s) to be imported to that new message (yes, you can attach multiple e-mail messages and if those messages contain attachments themselves they will also be imported) and send it off. Once delivered to the appropriate mailbox (called “import” in our example) the MailImporterServlet will fetch it from there and then import the messages attached to that envelope message.
This process works for messages in any of your mail client's folders, e.g. Inbox, Outbox, Sent, Trash, etc.
See chapters 8.1.2.1 (Add resource definition(s) to openejb.xml / tomee.xml) and 8.1.2.2 (Mail Resource in web.xml) for details on activating/configuring the MailImporterServlet the MailImporterServlet. With the following steps you can configure the MailImporterServlet:
log in as openCRX Root administrator (admin-Root)
start the wizard openCRX Workflow Controller:
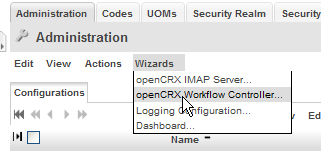
start the MailImporterServlet (click on the respective “Turn on”); alternatively you can also enter the following URL into your browser to trigger the MailImporterServlet:
http://<server>:<port>/opencrx-core-CRX/MailImporterServlet/execute?provider=CRX&segment=Standardwith the first invocation the MailImporterServlet will automatically create a new Component Configuration name MailImporterServlet (login as admin-Root and navigate to [Administration] > [Configurations])
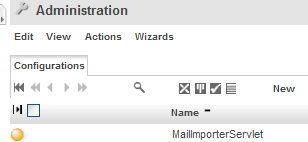
navigate to this automatically created Component Configuration and create a new String Property with the name
<provider>.<segment>.mailServiceName
and the value
mail/<provider>_segment
For example, create a new String property (as shown below) with name CRX.Standard.mailServiceName and value mail/CRX_Standard: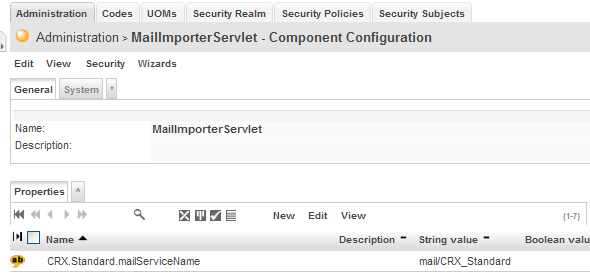
-
There is no need to delete default entries as they are ignored as soon there exists an entry with the same name without the suffix “.Default”.
Example:
Once you created the property CRX.Standard.mailServiceName the property CRX.Standard.mailServiceName.Default will be ignored.
Test your settings by sending an e-mail to the account specified in the steps above (import@company.com). Attach the message to be imported to this “envelope” e-mail (please note that the attached e-mail only is imported by the MailImporterServlet):
Figure 48: Envelope E-Mail with attached E-Mail to be imported
|
|
Please note that neither Subject nor message body should be empty. Use the subject to pass the name of the Activity Tracker you want the imported e-mail to be assigned to (by default imported e-mails are assigned to the Activity Tracker E-Mails). |
Once the Workflow Controller triggers the MailImporterServlet you will see the debug output of the servlet on the console (or Tomcat's catalina.log):
Listing 21: Debug Output of MailImporterServlet
18:42:57,810 INFO [STDOUT] DEBUG: setDebug: JavaMail version
1.3.3
18:42:57,826 INFO [STDOUT] DEBUG POP3: connecting to host
"mail.company.com", port 995, isSSL true
18:42:58,654
INFO [STDOUT] S: +OK Dovecot ready.
18:42:58,654 INFO [STDOUT]
C: USER xxxxxxxx
18:42:58,670 INFO [STDOUT] S: +OK
18:42:58,670
INFO [STDOUT] C: PASS xxxxxxxx
18:42:58,701 INFO [STDOUT] S:
+OK Logged in.
18:42:58,717 INFO [STDOUT] C: STAT
18:42:58,748
INFO [STDOUT] S: +OK 1 3204
18:42:58,748 INFO [STDOUT] C:
NOOP
18:42:58,779 INFO [STDOUT] S: +OK
18:42:58,842 INFO
[STDOUT] C: TOP 1 0
18:42:58,889 INFO [STDOUT] S: +OK
...
If the MailImporterServlet successfully imported your test mail it will be attached to the Activity Tracker E-Mails. Navigate to Activities > Activity Trackers and then click on the icon of E-Mails:
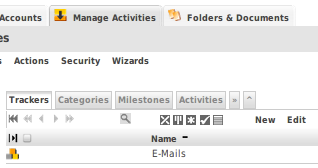
Figure 49: Activity Tracker E-Mail is created automatically
By default, all imported e-mails are attached to the Activity Tracker E Mails – you should also see the successfully imported test mail in the grid Activities
Navigate to the newly imported e-mail to load it into the Inspector.
The mail importer will automatically link imported e-mails with corresponding objects (if they exist in openCRX) and create various additional useful objects:
e-mail address of sender --> Sender
e-mail addresses of recipients --> Recipients
e-mail headers --> Notes
e-mail attachments --> Media
|
|
openCRX includes an Activity Creator Default E-mail Creator and an Activity Tracker E-Mails. The latter is referenced in the grid Activity Groups of the former:
Figure 50: Activity Creator Default E-mail Creator By default, the MailImporterServlet applies this Activity Creator to newly imported e-mails (which is the reason why they are shown in the grid Activities of the Activity Tracker E-Mails). You can easily change the contents of the grid Activity Groups so that newly imported e-mails will be attached to different Activity Tracker(s). It is also possible to create additional Activity Creators with different behavior (just make sure that these Activity Creators create Activities of type E-Mails). With the the subject line of your envelope e-mail you can indicate which Activity Creator should be used to import your e-mail. If you omit the subject line the Default E mail Creator is used. |
|
|
Once the MailImporterServlet works as desired you can switch off the debugging output in the respective resource definition of the file openejb.xml /tomee.xml (see chapter 8.1.2.1 Add resource definition(s) to openejb.xml / tomee.xml). |
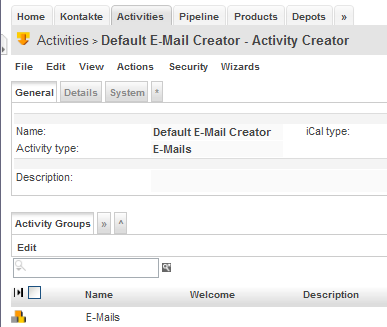
8.4 Use openCRX as an E-mail Archive/Audit Tool
openCRX can easily keep track of all your e-mail traffic, inbound and/or outbound.
The following figure shows a configuration where the mail server puts a copy of each received message (inbound traffic) and all sent messages (outbound traffic) into the mailbox audit; configuring such audit accounts can easily be done with most Mail Transport Agents (MTAs) like qmail, postfix, etc. With the appropriate configuration (see Inbound E-mail), the MailImporterServlet can import all messages from that audit mailbox and attach it to an Activity Tracker of your choice:
Figure 51: E-Mail Audit – import all inbound/outbound e-mail messages
8.5 Trouble Shooting E-mail Services
The following table lists some of the common issues and how to fix them:
|
Problem |
Solution |
||
|---|---|---|---|
|
openCRX does not initiate TLS session with mail server |
It seems that JavaMail sometimes does not (even try to) establish a TLS session when connecting to a mail server (smtp) if the certificate of the mail server has not been imported into the keystore (e.g. cacerts). If the mail server requires TLS for authentication (e.g. SASL) and authentication is required to relay messages such failure to establish a TLS session will prevent openCRX from properly sending outbound mail.
Listing 22: Importing Certificate cd
$JAVA_HOME/lib/security Replace <dom> with the domain of the mail server (e.g. mail.company.com) and <name> with the name of the certificate file.
As a quick fix you can also try to set the following option in openejb.xml / tomee.xml: mail.smtp.ssl.trust * If you know the name of your mail server, you
should replace “*” by that name, e.g. |
||
|
I receive Alerts triggered by my Subscriptions but no Notification E mails |
|
9 Cloud Services
openCRX features the following cloud services:
|
Type of Service |
Standard |
Service Provider |
|
Contacts |
openCRX/core (native provider ldap) |
|
|
openCRX/core (native provider vcard) |
||
|
CardDAV |
openCRX/core (native provider carddav) |
|
|
openCRX/core (native provider airsync) |
||
|
Calendar |
openCRX/core (native provider ical) |
|
|
iCalendar (ICS) |
openCRX/core (native provider ical) |
|
|
openCRX/core (native provider caldav) |
||
|
openCRX/core (native provider airsync) |
||
|
|
openCRX/core (native provider imap) |
|
|
|
openCRX/core (native provider airsync) |
|
|
Documents |
WebDAV |
openCRX/core (native provider webdav) |
|
News/Messages |
openCRX/core (native provider news) |
|
|
|
XMPP (Jabber) |
openCRX/core (Smack) |
For information about over-the-air (OTA) synchronization of PDAs, mobile phones, pads, etc. with openCRX please refer to chapter 10 openCRX AirSync Server (ActiveSync compatible).
9.1 Directory Service / LDAP
openCRX provides LDAP Server functionality (get more information about LDAP or read what Wikipedia has to say about LDAP). In a nutshell this means that you can use any LDAP client to connect to openCRX and view openCRX accounts. openCRX LDAP supports SSL. Here is how to connect:
|
Host |
IP address or host name of openCRX Server |
|
Port |
1389 (note that the LDAP standard port is 389); if your LDAP client supports SSL (Thunderbird does, MS Outlook does not), you can enable SSL for increased privacy/protection. With SSL enabled you might want to change the port from 1389 to 1689 |
|
BaseDN |
ou=filter/[filter name],ou=Persons |
|
BindDN |
<principal>@<segment name> |
9.1.1 Configuring the openCRX LDAP Port
The openCRX LDAP
port is by default set to 1389 (to avoid conflicts with other LDAP
daemons listening on the LDAP standard port 389). You can change
this configuration in the file web.xml
located in
opencrx-groupware-CRX.ear\opencrx-ldap-CRX.war\WEB-INF\
Look for the param-name port.
If you build your own EARs you can change the openCRX LDAP port in your project's file build.properties (ldap.listenPort) or directly in your build.xml.
9.1.2 Enabling SSL Support for LDAP
With the following steps you can enable SSL support for LDAP:
Create cert and key with OpenSSL (e.g. server.key, server.crt)
Convert cert and key to PEM format using OpenSSL:
Key: openssl rsa -in server.key -out server-key.pem -outform PEM
Cert: openssl x509 -in server.crt -out server-cert.pem -outform PEM
Use a Java Keytool which allows you to a) create a keystore, b) import a certificate, c) import a private key. The following tools allow you to easily manage Java keystores:
KeyTool IUI: http://yellowcat1.free.fr/keytool_iui.html
Add the following init-param tags to the web.xml of the LDAPServlet (but don't forget to adapt the values according to your environment):
Listing 23: init-param tags required to enable LDAP SSL
...
<init-param>
<param-name>sslKeystoreFile</param-name>
<param-value>/var/ssl/keystore.jks</param-value>
</init-param>
<init-param>
<param-name>sslKeystoreType</param-name>
<param-value>JKS</param-value>
</init-param>
<init-param>
<param-name>sslKeystorePass</param-name>
<param-value>changeit</param-value>
</init-param>
<init-param>
<param-name>sslKeyPass</param-name>
<param-value>changeit</param-value>
</init-param>
...
to avoid confusion, you might also want to change the port from 1389 (LDAP for openCRX) to 1689 (LDAPS for openCRX) – see chapter 9.1.1 Configuring the openCRX LDAP Port for information on how to do that.
9.1.3 LDAP Configuration of Thunderbird
The following steps are required to configure Thunderbird 3 for LDAP:
start Thunderbird and select the menu Tools > Options
select Composition and select the tab Addressing
check Directory Server and click on the button Edit Directories
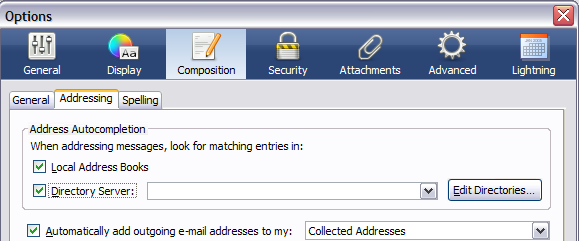
Figure 52: Thunderbird LDAP Configuration
in the dialog window LDAP Directory Servers click on the button Add
populate the Directory Server Properties dialog as follows (the example entries are assuming the openCRX Server is at localhost, the provider is CRX and the Segment is Standard, connecting with Username guest):
-
Field
Entry
Example
Name
any name you like
local-CRX.Standard [All Accounts]
Hostname
host name or IP address
localhost
Base DN
ou=filter/[filter name],ou=Persons
ou=filter/All Accounts,ou=Persons
Port number
1389
1389
Bind DN
<principal>@<segment name>
guest@Standard
click OK to accept
9.1.4 LDAP Configuration of MS Outlook
The following steps are required to configure MS Outlook 2007 for LDAP:
start Outlook and select the menu Tools > Account Settings
click on the tab Address Books
populate the Add/Change E-mail Account dialog as follows (assuming the openCRX Server is at localhost, connecting with Username guest):
-
Server Name
localhost
This server...
check “This server requires me to log on”
User Name
<principal>@<segment name>, e.g. guest@Standard
Password
<enter your openCRX password for user guest>
click on the button More Settings and select the tab Connection
enter a display name (of your choice) and verify that port is set to 1389
select the tab Search
in the field group Search Base click on Custom and populate as follows:
-
Custom
ou=filter/All Accounts,ou=Persons
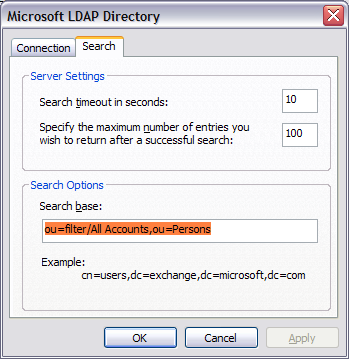
Figure 53: MS Outlook LDAP Configuration
click OK, Next, Finish, and Close to conclude the configuration
9.2 openCRX vcard Servlet
The openCRX vcard servlet does for accounts what the openCRX ical servlet does for activities: it makes them available to third-party clients who access the openCRX server with the http protocol.
9.2.1 Account Selectors
openCRX can map sets of accounts to a vcard file (a sequence of vcards). The resulting vcard file can be imported and/or processed by vcard-enabled clients like Outlook, Thunderbird, etc. At this time, account filters are the only supported account selectors. Account filters support reading and updating, but not creating of accounts (R=read, U=update):
|
Set of Accounts |
RUC |
vCard Selector |
|
Account Filter |
RU |
accounts?id=<provider>/<segment>/filter/<account filter name>&type=vcf |
VCF Selector Examples:
accounts?id=CRX/Standard/filter/All+Accounts&type=vcf
accounts?id=CRX/Standard/filter/Accounts+with+missing+or+broken+vCard&type=vcf
|
|
Use the openCRX Wizard “Connection Helper” to generate valid VCF Selectors. You can start the wizard from your homepage:
Choose the resource role “Contact” and the selector type “Saved Search - Accounts” and then select the desired saved search:
|
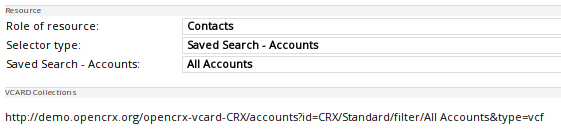
9.2.1.1 Connecting MS Outlook to the openCRX vcard servlet
Detailed instructions on how to connect MS Outlook are available from http://www.opencrx.org/opencrx/2.4/Outlook_ICS_VCF_adapter.htm
9.2.1.2 Connecting Thunderbird to the openCRX vcard servlet
A Thunderbird add-on (supporting TB3 and newer) is available that enables you to map Thunderbird address books to openCRX account selectors:
http://www.opencrx.org/opencrx/2.10/Thunderbird_Contacts_Add-on.htm
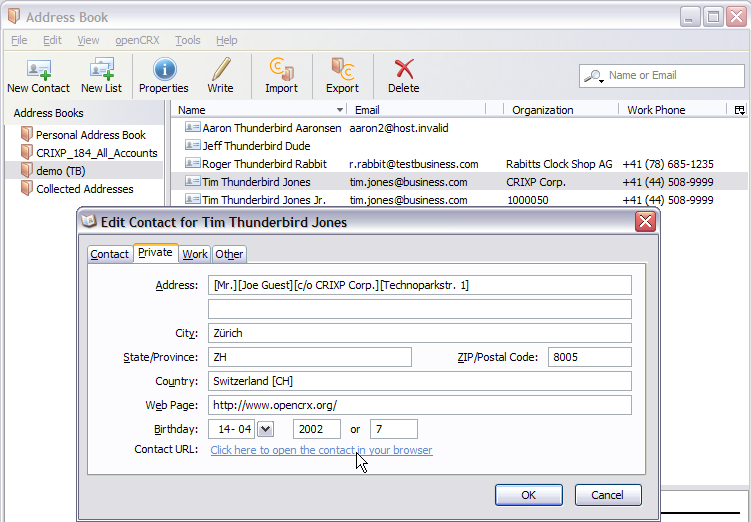
9.3 openCRX carddav Servlet
openCRX provides CardDAV Server functionality (get more information about CardDAV from Wikipedia or check out the RFC).
Once a user has created a Card Profile he/she can connect to openCRX with any CardDAV client to retrieve/manage contacts.
See http://www.opencrx.org/faq.htm#CardDAVClients for a list of clients tested with openCRX.
9.4 Calendaring
9.4.1 Calendar as a Set of Activities
openCRX supports a wide range of types of activities, including E-Mails, Tasks, Meetings, Phone Calls, etc. Even though all activities are kept in a flat structure (think of a box containing activities), openCRX offers a multitude of ways to structure, filter, and group activities:
activities can be assigned to activity groups, which enables you to group them by Tracker, Category, and Milestone
activities can be filtered with predefined filters (e.g. activities filtered to a user's homepage, activities filtered by resource) and user-defined ActivityFilters (either at a global level or at the level of an activity group)
To fully understand the power of this approach, consider a large project X (e.g. building a power plant) with millions and millions of activities. With openCRX, a project is typically mapped to an activity tracker (e.g. all activities of project X are assigned to the activity tracker Project X). As a large project is often times structured, i.e. broken down into subprojects, milestones, etc., let us assume that the respective subset of activities related to a milestone of Project X is assigned to an activity group Milestone 2. With openCRX, it's a single click and you can browse all the activities assigned to Milestone 2, or you can view all these activities in a calendar application like Sunbird or MS Outlook:

Figure 54: openCRX Activity Groups / openCRX Activity Filters
It goes without saying that different users have different needs. It is also quite natural that the needs change over time. With openCRX, it is easy to deliver as there are virtually unlimited possibilities to slice and dice the universe of activities. For example, instead of pulling a set of activities based on their assignment to activity groups, there are many use cases where one would like to define a filter to define a subset of activities. On the one hand, openCRX features lots of default filters, on the other hand, there are powerful tools to define custom filters virtually any way you like. For example: an auditor might be interested in all activities involving a particular subcontractor, another user could be interested in browsing through all the meetings related to Project X. Hence, in the context of calendaring it helps if you think of a calendar as a set of activities, nothing more and nothing less.
9.4.2 Calendar Selectors (ICS and CalDAV)
openCRX can map each of the above-mentioned set of activities to a calendar. Depending on the mapping, the resulting calendar can be presented in various formats, e.g. ICS calendar, Free Busy calendar, XML file, Timeline, etc. Some typical ICS calendar selectors are listed below (R=read, U=update, C=create):
|
Set of Activities |
RUC |
ICS Calendar Selector |
|
Tracker |
RUC |
activities?id=<provider>/<segment>/tracker/<name>&type=ics |
|
\__ Filtered |
RUC |
activities?id=<provider>/<segment>/tracker/<name>/filter/<filter name>&type=ics |
|
Category |
RUC |
activities?id=<provider>/<segment>/category/<name>&type=ics |
|
\__ Filtered |
RUC |
activities?id=<provider>/<segment>/category/<name>/filter/<filter name>&type=ics |
|
Milestone |
RUC |
activities?id=<provider>/<segment>/milestone/<name>&type=ics |
|
\__ Filtered |
RUC |
activities?id=<provider>/<segment>/milestone/<name>/filter/<filter name>&type=ics |
|
Global Filter |
RU |
activities?id=<provider>/<segment>/globalfilter/<activity filter name>&type=ics |
|
Homepage |
RU |
activities?id=<provider>/<segment>/userhome/<home qualifier>&type=ics |
|
Resource |
RU |
activities?id=<provider>/<segment>/resource/<resource name>&type=ics |
|
Birthdays |
R |
bdays?id=<provider>/<segment>/filter/<account filter name>&type=ics |
|
|
Use the openCRX Wizard “Connection Helper” from your Homepage to generate valid Calendar Selectors:
Choose the option “Calendar” and then make your selections:
|

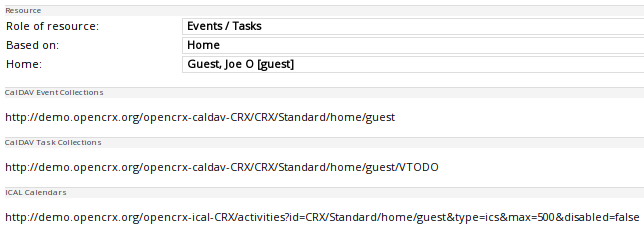
CalDAV calendar selectors look as follows (R=read, U=update, C=create):
|
Set of Activities |
RUC |
CalDAV Calendar Selector |
|
Tracker |
RUC |
<provider>/<segment>/tracker/<name> |
|
\__ Filtered |
RUC |
<provider>/<segment>/tracker/<name>/filter/<filter name> |
|
Category |
RUC |
<provider>/<segment>/category/<name> |
|
\__ Filtered |
RUC |
<provider>/<segment>/category/<name>/filter/<filter name> |
|
Milestone |
RUC |
<provider>/<segment>/milestone/<name> |
|
\__ Filtered |
RUC |
<provider>/<segment>/milestone/<name>/filter/<filter name> |
|
Global Filter |
RU |
<provider>/<segment>/globalfilter/<activity filter name> |
|
Homepage |
RU |
<provider>/<segment>/userhome/<home qualifier> |
|
Resource |
RU |
<provider>/<segment>/resource/<resource name> |
|
|
CalDAV calendar selectors return either only VEVENT items or only VTODO items – it is not possible for a CalDAV collection (by design) to contain both types at the same time. By default, openCRX returns VEVENT items, if you want to get VTODO items, you can append the suffix “/VTODO” to the above CalDAV calendar selectors. Example:
Also note that this behavior of CalDAV calendar selectors is different from the behavior of ICS calendar selectors. The latter can return both types of items, i.e. VEVENT and VTODO, as a reply to the same request, whereas the CalDAV calendar selector can only return either VEVENT or VTODO (by design of the CalDAV protocol, i.e. this is not a choice made by the openCRX developers). One of the consequences is that if you work with CalDAV you need to define 2 calendars per selector with clients like Sunbird or Lightning (one calendar for VEVENT and one for VTODO), whereas you only need to define 1 calendar if you work with ICS (because it contains both VEVENT and VTODO items). |
|
|
Use the openCRX Wizard “Connection Helper” from your Homepage to generate valid Calendar Selectors:
|
The wizard can also build URLs for CalDAV calendar collections (iPhone, etc.):
|
Set of Calendars |
RUC |
CalDAV Calendar Collection Selector |
|
Collection |
RUC |
<provider>/<segment>/user/<principal name>/profile/<profile name> |
Example: http://demo.opencrx.org/opencrx-caldav-CRX/CRX/Standard/user/guest/profile/MyCals
|
|
By default, at most 500 activities (VEVENT or VTODO) are returned per request by the ical (caldav) servlet. You can increase that limit by (as admin-Root) creating component configurations with name and qualifier ICalServlet (CalDavServlet, respectively) and then adding a String property named maxActivities with the desired value, e.g. 5000 as shown below:
|
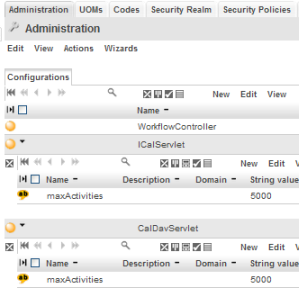
9.4.3 ActivityTracker/-Creators <username>~Private
Each openCRX user has a private Activity Tracker <username>~Private (e.g. guest~Private for the user named guest) and several private Activity Creators:
<username>~Private (to create Incidents)
<username>~Private E-Mails (to create E-Mail Activities)
<username>~Private Meetings (to create Meetings)
<username>~Private Tasks (to create Tasks)
|
|
Activities created with one of the above Activity Creators are automatically assigned to the respective user's Activity Tracker <username>~Private and security is set such that only the respective user can read/write such activities. |
See also chapter Error: Reference source not found Error: Reference source not found for information on how to manage privacy at the event-level.
9.4.4 Mapping of Activities to Calendar Events and Tasks
Both the openCRX ical servlet and the openCRX caldav servlet map openCRX activities to calendar events (VEVENT) and tasks (VTODO) as follows based on the openCRX activity class and the iCal type at hand:
|
openCRX Activity Class |
iCal Type |
Mapped to |
|
* (any) |
VEVENT |
VEVENT |
|
* (any) |
VTODO |
VTODO |
|
Incident |
Automatic |
VEVENT |
|
Meeting |
Automatic |
VEVENT |
|
Sales Visit |
Automatic |
VEVENT |
|
Task |
Automatic |
VTODO |
|
Phone Call |
Automatic |
VEVENT |
|
|
Automatic |
VEVENT |
|
Mailing |
Automatic |
VEVENT |
|
Absence |
Automatic |
VEVENT |
|
External Activity |
Automatic |
VEVENT |
|
|
The openCRX AirSync Adapter uses a different mapping (see chapter 10.2 Mapping of openCRX Objects to AirSync Objects for details). |
Hence, all openCRX activities correspond to either calendar events (VEVENT) or tasks (VTODO). An openCRX activitiy's iCal representation is stored in the iCal attribute:
Figure 55: An openCRX activity's iCal representation
In the openCRX standard GUI the same activity is presented as follows:
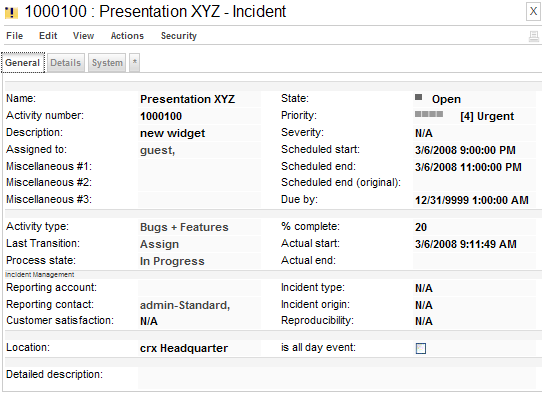
Figure 56: An openCRX activity in the standard GUI
9.4.4.1 Conversions between VEVENT and VTODO
Many calendar applications differentiate between events (entries in a calendar with well-defined start and end date) and tasks or to-dos (entries in a task list with a well-defined due date). openCRX also supports this distinction and can even convert activities from VEVENT to VTODO and vice versa without loss of information. To convert an openCRX activity from one type to the other, edit the activity and change the value of the iCal type dropdown:
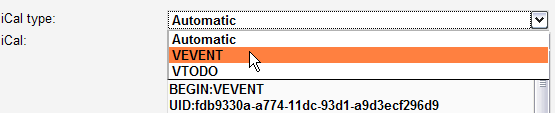
Figure 57: iCalendar conversion between VEVENT and VTODO
9.4.5 Calendaring / Free Busy
Free Busy is part of the iCalendar standard (RFC 2445) for calendar data exchange (see also Wikipedia). Many calendar clients rely on this information for group scheduling. openCRX can derive free busy information on-the-fly from the respective activities; as most clients do not support authentication the default configuration of the openCRX ical servlet does not require authentication to retrieve Free Busy information. However, the principal guest must exist (but you can disable the login):
Free Busy URL (without authentication, requires openCRX principal guest):
http://<crxServer>:<Port>/opencrx-ical-<Provider>/freebusy
?id=<Provider>/<Segment>/<Calendar
Selector>
Example:
http://localhost:8080/opencrx-ical-CRX/freebusy?id=CRX/Standard/userhome/guest
Please note that free busy information is provided by the openCRX server in a read-only fashion (i.e. free busy clients cannot update such information).
|
|
Instead of the user name you can also provide the e-mail of the respective user, for example http://localhost:8080/opencrx-ical-CRX/freebusy?id=CRX/Standard/userhome/guest@opencrx.org |
|
|
If you prefer authentication for Free Busy clients you can add the url-pattern /freebusy to the web-resource-collection (in the file web.xml of the ical servlet). |
openCRX calculates/derives the free busy information for each activity on the fly based on the following algorithm:
If the requesting user has at least one resource assignment with workingUnitPercentage > 0 then TRANSP=OPAQUE, otherwise TRANSP=TRANSPARENT.
TRANSP is managed by the CalDAV, ICS and FREEBUSY servlets. The attribute TRANSP TRANSP is mapped to the activity's assigned resources.
See http://www.opencrx.org/faq.htm#FreeBusyClients for a list of clients tested with openCRX.
9.4.5.1 Free Busy Configuration of Thunderbird/Lightning
Thunderbird supports free busy if the following add-ons are installed:
For detailed information on how to configure Thunderbird's Free/Busy add-on, please refer to the information provided by the respective developer. With version 2.0 of this add-on one can specify a pattern for both e-mail addresses and URLs to retrieve the free busy data from:
Example:
e-mail
address pattern: *@opencrx.org
URL
pattern:
http://demo.opencrx.org/opencrx-ical-CRX/freebusy?id=CRX/Standard/userhome/*
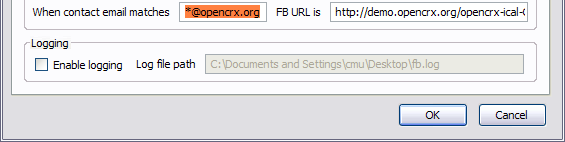
Figure 58: Configuration of Thunderbird's FreeBusy Add-on
Once the Free/Busy add-on is configured, it will retrieve free busy information directly from your openCRX server whenever you invite attendees:
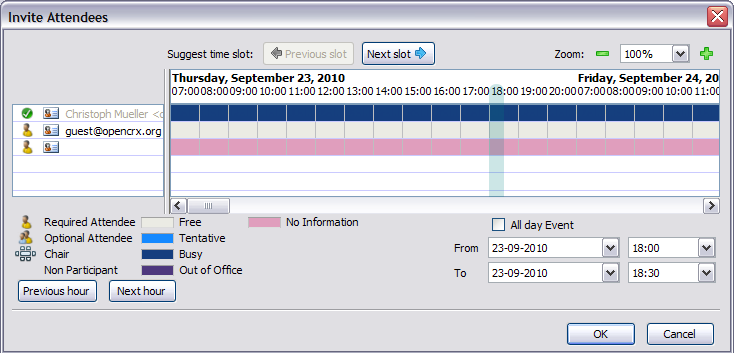
Figure 59: Inviting Attendees with Thunderbird using free busy information
9.4.5.2 Free Busy Configuration of MS Outlook
See http://support.microsoft.com/kb/291621. Please note that Outlook does not support SSL with free busy.
9.4.5.3 Free Busy Information as an ICS calendar
It is also possible to view the free busy information in the form of an ICS calendar. This may be useful for users who frequently plan events on behalf of another user without access to the full calendar of that person. Given a free busy URL you simply add &type=ics to retrieve the respective ICS calendar:
Free Busy URL as an ICS calendar:
http://<crxServer>:<Port>/opencrx-ical-<Provider>/freebusy
?id=<Provider>/<Segment>/<Calendar
Selector>&type=ics
Example:
http://localhost:8080/opencrx-ical-CRX/freebusy?id=CRX/Standard/userhome/guest&type=ics
The free busy ICS calendar is read-only and the title of events is set to ***, description and location are not available for privacy reasons.
9.4.6 Calendaring / iCalendar (ICS)
iCalendar is implemented/supported by a large number of products (see RFC 2445 or Wikipedia for information about the iCalendar standard, sometimes referred to as “iCal”). openCRX can derive iCalendar information on-the-fly from the respective activities. iCal clients must authenticate to read and/or write iCalendar data.
ICS URL (with authentication):
http://<crxServer>:<Port>/opencrx-ical-<Provider>/activities
?id=<Provider>/<Segment>/<Calendar
Selector>&type=ics
Example:
http://localhost:8080/opencrx-ical-CRX/activities?id=CRX/Standard/tracker/main&type=ics
|
|
See chapter 9.4.2 Calendar Selectors (ICS and CalDAV) for information on how to construct calendaring URLs. |
|
|
Please note that calendars without “C” (create) in the table provided in chapter 9.4.2 Calendar Selectors (ICS and CalDAV) do not support creation of new events/tasks with external ICS clients. The reason being that without a well-defined ActivityCreator associated with the respective calendar selector it is not possible to create an activity and assign it to the appropriate activity groups. |
While the mapping of most of openCRX's activity attributes to iCal attributes is obvious, the following hints might still be helpful:
VEVENT:
Activity.disabled==true --> STATUS:CANCELLED
Activity.percentComplete==0 --> STATUS:TENTATIVE
percentComplete>0 --> STATUS:CONFIRMED
VTODO:
Activity.disabled==true --> STATUS:CANCELLED
Activity.percentComplete==0 --> STATUS:NEEDS-ACTION
Activity.percentComplete>0 --> STATUS:IN-PROCESS
Activity.percentComplete==100 --> STATUS:COMPLETED
Please note that Activity.percentComplete cannot be changed upon import of a vCard as openCRX activities are managed by activity processes. Hence, changing the status of an activity outside of openCRX does not change the status of this activity in openCRX (even if it is reimported).
9.4.6.1 ICS Configuration of Thunderbird/Lightning and Sunbird
Thunderbird with the Lightning add-on (or Sunbird, the stand-alone client) is a fully-fledged calendar client. Creating a remote calendar (hosted on your openCRX server) is rather straightforward:
start Thunderbird/Lightning or Sunbird
select the menu File > New Calendar
in the dialog window Create New Calendar you select On the Network
then you select iCalendar (ICS)
enter an ICS URL into the field Location;
example: the user guest would connect to this openCRX homepage with the URL http://127.0.0.1:8080/opencrx-ical-CRX/activities?id=CRX/Standard/userhome/guest&type=ics
See chapter 9.4.2 Calendar Selectors (ICS and CalDAV) for information on ICS URLsgive your calendar a name and pick a color of your choice
That's it. You are connected to openCRX:
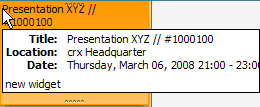
Thunderbird/Lightning and Sunbird require a life connection to openCRX (i.e. no support for offline viewing/editing) unless you enable the experimental Cache of Ligthning/Sunbird.
9.4.6.2 ICS Configuration of MS Outlook
Out of the box Redmond's “flagship” MS Outlook does not offer you much choice with ICS calendars. You are stuck with one of the following 2 options:
Published Calendars
are local calendars published to a remote location, but there is no sync with that remote calendar (i.e. changes to the remote calendar will never automatically make it back into your Outlook)Internet Calendar Subscription
These calendars are striclty read-only in Outlook, i.e. not very useful...
Not to leave you out in the rain, we put together a bunch of VBA scripts that teach your Outlook a few new tricks. The scripts and detailed instructions for both MS Outlook 2003 and MS Outlook 2007 are available from http://www.opencrx.org/opencrx/2.4/Outlook_ICS_VCF_adapter.htm

9.4.6.3 ICS Configuration of Zimbra
Zimbra (v7.1) does not offer you much choice with remote ICS calendars. It is possible to subscribe to a remote calendar, but in read-only mode and https does not seem to be supported; furthermore, only a minimal set of iCal attributes is actually visible in the Zimbra calendar. Nevertheless, here is how to subscribe:
connect to your Zimbra server and login
click on the tab [Calendar]
click the button [New Calendar] and then populate the dialog as follows:
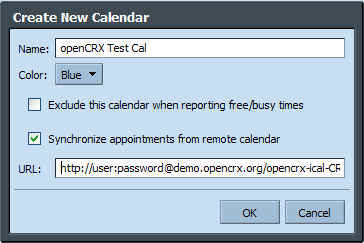
-

Please note that the ICS URL in the field URL must also include your openCRX user name and password because Zimbra does not really manage your remote credentials.
9.4.6.4 ICS Configuration of iPhone
With iPhone OS3.0+ you can connect to any remote ICS calendar (read-only) as follows:
on your iPhone home screen, tap the icon Settings
tap on Mail, Contacts, Calendars
tap on Add Account...
tap on Other
tap on Add Subscribed Calendar
enter or paste the ICS URL into the field Server
tap [Next] to verify the account information
If you get a message “Cannot Connect Using SSL” tap [No] to move on to the next screen where you can enter the connection details.
verify/complete your subscription information as follows:
Name
Value / Description
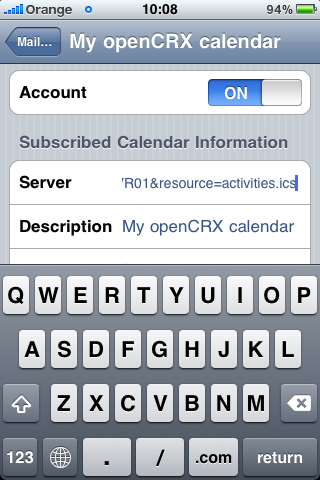
Server
verify the ICS URL
Description
any text you like
(default is the ICS URL)Username
your openCRX user name
Password
your openCRX password
Use SSL
if you use SSL, set to [ON],
otherwise [OFF]Remove Alarms
as you prefer
tap [Next]
if you use SSL in combination with a self-signed certificate, you will get a message Unable to Verify Certificate --> tap Accept
if everything works out, you can tap Save to store the settings and your calendar will be available in the Calendar App from the iPhone's home screen
|
|
This ICS calendar feature is particularly useful to connect your iPhone to a birthday calendar generated by openCRX (use the wizard “Connection Helper” to calculate the URL (server name respectively) for any desired Account Filter:
|
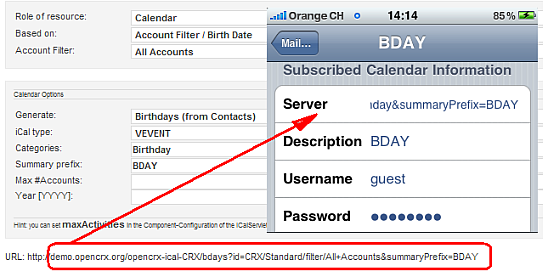
9.4.6.5 Deleting Events
The openCRX ICS Adapter does not support deleting events (because deleting objects is typically not an acceptable operation in an enterprise environment). openCRX does support disabling of objects, however. If there is a need to disable events directly from your ICS Client, here is how to do it:
Assuming you have a remote calendar CAL with the URL <U> defined in your ICS client, define a new remote calendar CAL-trash with the URL <U>&disabled=true (i.e. append the string “&disabled=true” to the URL); the name of the calendar is not important, we just call it “CAL-trash” to indicate that it contains disabled activities.
example:
existing calendar CAL (showing only events that are not disabled) with the URL
http://127.0.0.1:8080/opencrx-ical-CRX/activities?id=CRX/Standard/userhome/guest&type=ics
the URL of the calendar CAL-trash showing events that are disabled is
http://127.0.0.1:8080/opencrx-ical-CRX/activities?id=CRX/Standard/userhome/guest&type=ics&disabled=trueto delete an event of your calendar CAL, move the event from the calendar CAL to the calendar CAL-trash
9.4.6.6 iCalender Guard Event
If you retrieve an iCalender from the openCRX ICS Adapter, the very first event is a so-called Guard Event:
the Guard Event is always the first event delivered by the ICS Adapter
the attribute SUMMARY corresponds to the Calendar-ID (UID of the Guard Event)
the attribute DTSTART is set to 19000101T000000Z
The openCRX ICS Adapter supports the creation of new events/tasks as long as a calendar's Guard Event is posted to the adapter together with the new event/task. The openCRX ICS Adapter also verifies the UID of the Guard Event.
9.4.7 Calendaring / CalDAV
CalDAV is implemented/supported by a growing number of products (see http://caldav.calconnect.org/ or Wikipedia for information about the CalDAV standard). openCRX is a fully-fledged CalDAV server; the functionality is implemented by a native CalDAV servlet. CalDAV clients must authenticate to read and/or write CalDAV data.
CalDAV URL for individual calendar:
http://<crxServer>:<Port>/opencrx-caldav-<Provider>/<Provider>/<Segment>/<Calendar Selector>
Example:
http://localhost:8080/opencrx-caldav-CRX/CRX/Standard/tracker/main
CalDAV URL for CalDAV calendar collection:
http://<crxServer>:<Port>/opencrx-caldav-<Provider>/<Provider>/ <Segment>/user/<principal name>/profile/<Calendar Profile>
Example:
http://localhost:8080/opencrx-caldav-CRX/CRX/Standard/user/guest/profile/MyCals
|
|
See chapter 9.4.2 Calendar Selectors (ICS and CalDAV) for information on how to construct calendaring URLs. The easiest way to construct CalDAV URLs is to use the openCRX Wizard “Connection Helper” from your Homepage. |
|
|
Please note that calendars without “C” (create) in the table provided in chapter 9.4.2 Calendar Selectors (ICS and CalDAV) do not support creation of new events/tasks with external CalDAV clients. The reason being that without a well-defined ActivityCreator associated with the respective calendar selector it is not possible to create an activity and assign it to the appropriate activity groups. In the case of calendar collections/profiles, it depends on the feed whether the respective calendar supports activity creation or not. If openCRX can determine a well-defined ActivityCreator, activity creation is supported, otherwise not. |
|
|
Beware of CalDAV clients that do not provide feedback if a write operation did not succeed (the iPhone is unfortunately not very user-friendly in that respect). If you create a new event (or change an existing one) with your CalDAV client and the write operation does not succeed, you might still see your new event (or the changes to the existing event respectively) in your CalDAV client but such data is not available on the server! |
9.4.7.1 CalDAV Collections
Some CalDAV clients (e.g. Apple's iPhone, CalDAV-Sync for Android) support CalDAV collections. With openCRX you can define CalDAV collections as follows:
navigate to a user's homepage
click on the tab [Sync Profiles] and select New > Calendar Profile:
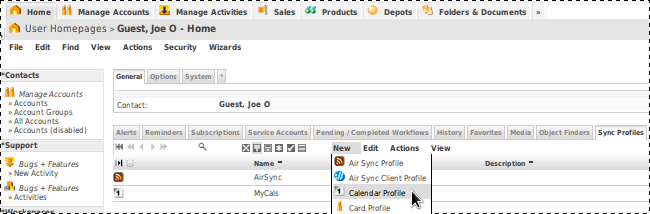
enter at least a name for your new collection, e.g. MyCals, and then click [Save]
navigate to this new calendar profile and then add the desired feed(s), e.g. an Activity Tracker or an Activity Filter, as follows:
select New > Activity Group Calendar Feed as shown below:
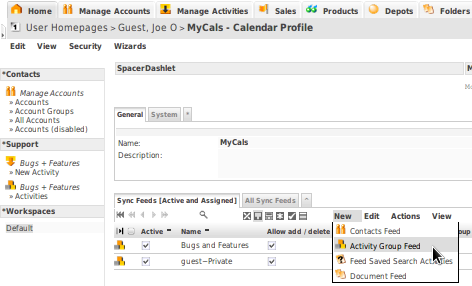
select an activity group and enter at least a name for this feed and mark it as active (some CalDAV clients support coloring, i.e. you can optionally also enter color information):
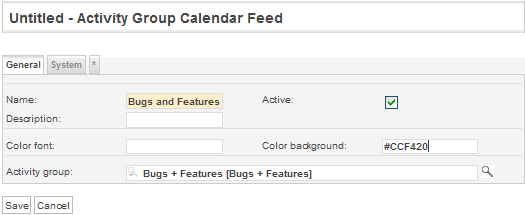
click [Save]
optionally, add more feeds (you can also add additional feeds later)
9.4.7.2 CalDAV Configuration of Thunderbird/Lightning and Sunbird
Thunderbird 10.x with the Lightning add-on (at least version 1.2.1) is a fully-fledged calendar client. Creating a remote calendar (hosted on your openCRX server) is rather straightforward:
start Thunderbird/Lightning
select the menu File > New Calendar
in the dialog window Create New Calendar you select On the Network
then you select CalDAV
enter a CalDAV URL into the field Location;
example: the user guest would connect to this openCRX homepage with the URL http://127.0.0.1:8080/opencrx-caldav-CRX/CRX/Standard/userhome/guest
See chapter 9.4.2 Calendar Selectors (ICS and CalDAV) for information on CalDAV URLs
Note: Lightning does not support CalDAV Collections, i.e. you must create a new Lightning calendar for each openCRX calendar...give your calendar a name and pick a color of your choice
that's it – you are connected to openCRX
9.4.7.3 CalDAV Configuration of MS Outlook
MS Outlook does not support CalDAV. There are third-party extensions you might want to try. Some of them are listed at http://wiki.davical.org/w/CalDAV_Clients/Outlook.
See also http://www.opencrx.org/opencrx/2.4/Outlook_ICS_VCF_adapter.htm
9.4.7.4 CalDAV Configuration of iPhone (OS3.0+, iOS4+, iOS5+)
Connect to any openCRX calendar collection as follows with your iPhone:
connect to openCRX and navigate to the desired calendar collection
start the wizard Connection Helper: AirSync / Calendar / vCard from your openCRX homepage:
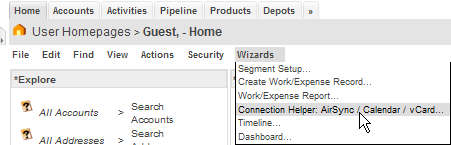
this wizard “calculates” the CalDAV URL required to connect:
copy the above URL (you'll need to paste it later)
on your iPhone home screen, tap the icon Settings
|
|
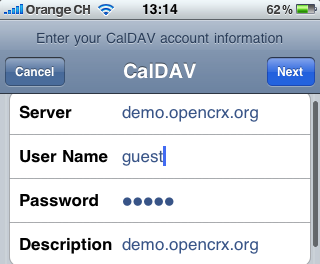
-
If you get a message “Cannot Connect Using SSL” tap [No] to move on to the next screen where you can enter the connection details.
verify/complete your subscription information as follows:
Name
Value / Description
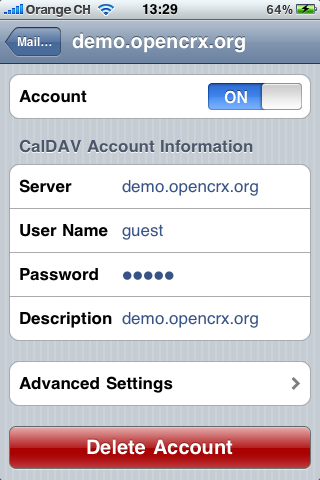
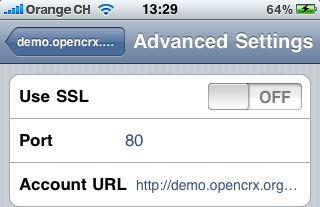
Server
verify the server name
User Name
your openCRX user name
Password
your openCRX password
Description
any text you like
Use SSL
if you use SSL, set to [ON],
otherwise [OFF]Port
port number (Tomcat)
Account URL
the CalDAV URL
if you use SSL in combination with a self-signed certificate, you will get a message Unable to Verify Certificate --> tap Accept
if everything works out, you can tap Save to store the settings and your calendar will be available in the Calendar App from the iPhone's home screen
|
|
Unfortunately, neiter iPhone OS3.0+ nor iOS 4.0+ supports Tasks over CalDAV, i.e. you will only see openCRX Activities of type VEVENT in your iPhone calendar. Tasks are supported since iOS5. |
9.4.7.5 CalDAV Configuration of Android devices
Android does not support CalDAV out of the box, but there are applications available from the Android Market (search for “CalDAV” in the Android Market to locate them). We have tested “CalDAV-Sync” and it works reliably. It even supports CalDAV collections, so it's fairly easy to configure (see 9.4.7.1 CalDAV Collections for more information).
9.4.7.6 Deleting Events
The CalDAV protocol supports deletion of events/tasks. openCRX honors such requests, although the respective activity is disabled and not deleted. If you absolutely want to delete an activity you can do so with the openCRX standard GUI.
9.4.8 Calendaring / Timeline
Timeline is an extremely interesting DHTML-based AJAX widget for visualizing time-based events. It is like Google Maps for time-based information. A live example is available at http://www.simile-widgets.org/timeline/
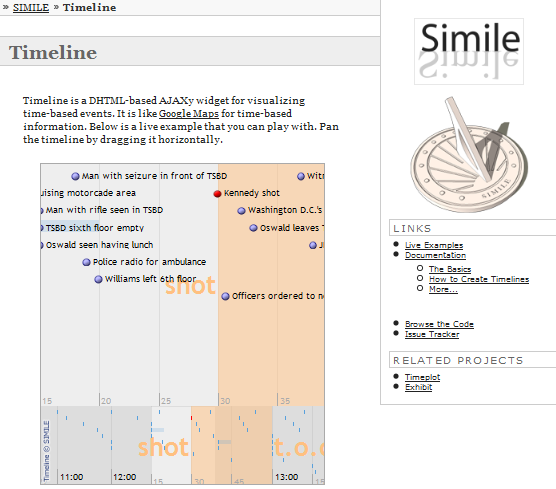
Figure 60: Timeline visualizes time-based events
CrxObjects with sets of activities (e.g. Userhome, Activity Groups, Activity Filters, etc.) typically feature the wizard Timeline. Simply call that wizard to construct a timeline to visualize activities right in your browser:
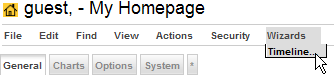
9.5 Mailstore / IMAP
Instead of offering platform specific plugins for a multitude of mail clients like MS Outlook, MS Outlook Express, Thunderbird, Evolution, Eudora, Elm, etc. openCRX features a platform neutral IMAP adapter (get more information about IMAP or read what Wikipedia is saying about IMAP). The advantages of such a standardized IMAP adapter are:
works with any IMAP client (including your favorite one)
no clumsy installation of plugins, i.e. you can get this to work on your company's laptop regardless of how “hardened” and locked down the system is
supports single message import and bulk import
imports headers, body, and attachments
automatically creates references to sender and recipient(s) if the respective e mail addresses are present in openCRX
In a nutshell this means that you can use any IMAP client to connect to openCRX and view openCRX EMailActivities. openCRX activity groups are mapped to IMAP folders. The folders contain openCRX EMailActivities.
Viewing/exporting of EmailActivities is always possible, creating/updating of EmailActivities requires that an E-Mail Activity Creator is defined for the respective Activity Group, and deleting of EmailActivities is not supported. Please refer to chapter 8.3.1 Inbound E-mail with IMAP Adapter for details.
|
|
If you move an e-mail message from a non-openCRX IMAP folder to an openCRX IMAP folder and the target folder does not have a valid E-Mail Activity Creator defined, openCRX will not be able to create an EMailActivitiy in that folder. Due to the move operation the message is deleted from the source folder and your e mail message is lost. Hence, it is good practice to copy (and not move) e-mails to openCRX IMAP folders. Only after verifying that the EMailActivitiy was actually created by openCRX in the target folder should you delete (if necessary) the message from the source folder. |
|
|
E-mail addresses should be unique! If you import e-mails into openCRX with the IMAP Adapter, openCRX tries to match sender and recipients based on e-mail addresses. For obvious reasons, this will produce unexpected (if not undesired) results if e-mail addresses in openCRX are not unique. You can test your openCRX database for duplicate e-mail addresses with the following query: SELECT email_address, count(*) |
|
|
Since openCRX v2.9.1, unknown e-mail addresses are created as composites of the segment administrator, e.g. admin-Standard.
|
The following information is required to connect an IMAP client to openCRX:
|
Host |
IP address or host name of openCRX
Server |
|
Port |
1143 (note that the IMAP standard port is 143) |
|
User name |
<login principal name>@<Segment> |
|
Password |
principal's openCRX password |
|
|
The openCRX IMAP adapter supports SSL. It is probably a good idea to make use of that feature and connect your IMAP client securely to openCRX. See chapter 9.5.3 Enabling SSL Support for IMAP for more information. |
9.5.1 Configuring the openCRX IMAP Port
The openCRX IMAP port is by default set to 1143
(to avoid conflicts with other IMAP daemons listening on the IMAP
standard port 143). You can change this configuration in the file
web.xml
located in the directory
opencrx-core-CRX\opencrx-imap-CRX\WEB-INF\
Look for the the param-name port.
If you build your own EARs you can change the openCRX LDAP port in your project's file build.properties (imap.listenPort) or directly in your build.xml.
9.5.2 Configuring the IMAP Maildir Cache
For increased performance the openCRX IMAP Adapter works with a cache. The location of this cache, the so-called Maildir, can be set as a JAVA_OPTS.
|
|
You can reset the cache by deleting it. The openCRX IMAP Adapter will recreate the cache automatically. |
9.5.2.1 Maildir Configuration with Apache Tomcat
Add the option -Dorg.opencrx.maildir="%CATALINA_HOME%\maildir" to the JAVA_OPTS in your Tomcat start batch file (e.g. tomcat.bat, run.sh, etc.).
9.5.3 Enabling SSL Support for IMAP
With the following steps you can enable SSL support for IMAP:
Create cert and key with OpenSSL (e.g. server.key, server.crt)
Convert cert and key to PEM format using OpenSSL:
Key: openssl rsa -in server.key -out server-key.pem -outform PEM
Cert: openssl x509 -in server.crt -out server-cert.pem -outform PEM
Use a Java Keytool which allows you to a) create a keystore, b) import a certificate, c) import a private key. The following tools allow you to easily manage Java keystores:
KeyTool IUI: http://yellowcat1.free.fr/keytool_iui.html
Add the following init-param tags to the web.xml of the IMAPServlet (but don't forget to adapt the values according to your environment):
Listing 24: init-param tags required to enable IMAP SSL
...
<init-param>
<param-name>sslKeystoreFile</param-name>
<param-value>/var/ssl/keystore.jks</param-value>
</init-param>
<init-param>
<param-name>sslKeystoreType</param-name>
<param-value>JKS</param-value>
</init-param>
<init-param>
<param-name>sslKeystorePass</param-name>
<param-value>changeit</param-value>
</init-param>
<init-param>
<param-name>sslKeyPass</param-name>
<param-value>changeit</param-value>
</init-param>
...
to avoid confusion, you might also want to change the port from 1143 (IMAP for openCRX) to 1443 (IMAPS for openCRX) – see chapter 9.5.1 Configuring the openCRX IMAP Port for information on how to do that.
9.5.4 IMAP Configuration of Thunderbird
The following information is required to configure an IMAP account:
|
Email account |
<login
principal name>@<Segment> |
|
Password |
openCRX password of the respective principal |
|
Your name |
<login
principal name>@<Segment> |
|
Email Address |
your
e-mail address |
|
Type of server |
IMAP |
|
Incoming
Server |
name
or IP address of your openCRX server |
|
Port |
1143 |
|
Incoming User Name |
<login
principal name>@<Segment> |

Figure 61: Thunderbird IMAP Configuration
|
|
If you move an e-mail message from a non-openCRX IMAP folder to an openCRX IMAP folder and the target folder does not have a valid E-Mail Activity Creator defined, openCRX will not be able to create an EMailActivitiy in that folder. Due to the move operation the message is deleted from the source folder in your IMAP client and your e-mail message will be lost. Hence, it is good practice to copy (and not move) e-mails to openCRX IMAP folders. Only after verifying that the EMailActivitiy was actually created by openCRX in the target folder should you delete (if necessary) the message from the source folder. |
9.5.5 IMAP Configuration of MS Outlook
The following steps are required to configure MS Outlook 2007 for LDAP:
|
Email
account |
<login
principal name>@<Segment> |
|
Password |
openCRX password of the respective principal |
|
Your Name |
<login
principal name>@<Segment> |
|
E-mail Address |
your
e-mail address |
|
Account type |
IMAP |
|
Incoming
mail server |
name
or IP address of your openCRX server |
|
Incoming Port |
1143 |
|
Incoming User Name |
<login
principal name>@<Segment> |
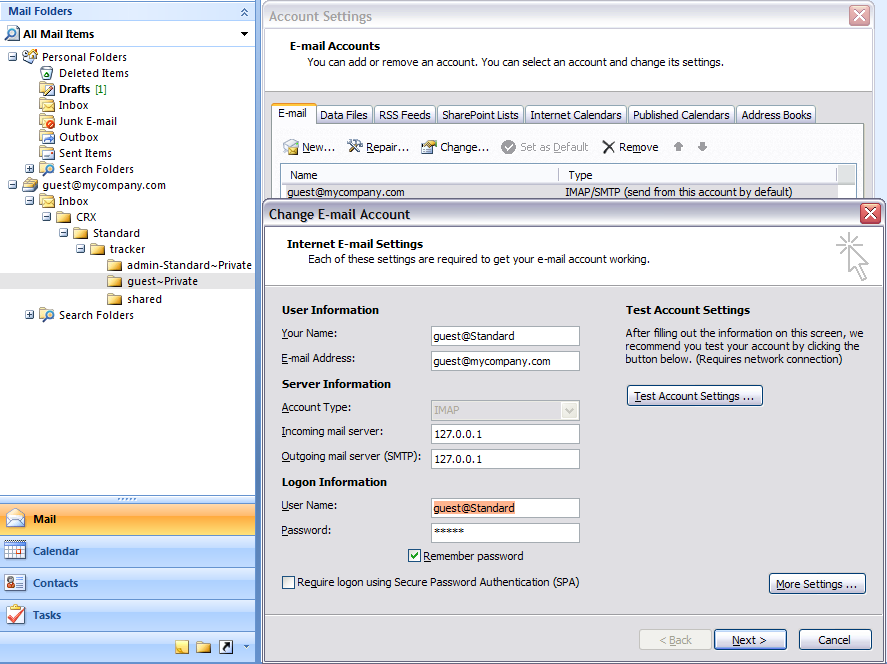
Figure 62: MS Outlook IMAP Configuration
10 openCRX AirSync Server (ActiveSync compatible)
openCRX AirSync allows you to connect your ActiveSync-enabled PDAs and mobile phones (e.g. Apple's iPhone, Android-based devices, RIM's BlackBerry, Windows Mobile devices, etc.) with openCRX to synchronize e-mails, contacts, events and tasks, including push functionality:
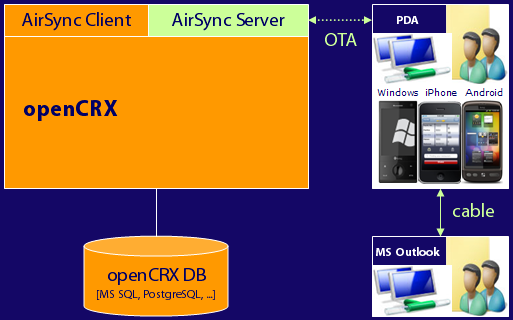
Figure 63: openCRX AirSync Server – Over The Air (OTA) Synchronization
|
|
Even though openCRX AirSync aims to be compatible with Microsoft's ActiveSync (see what Wikipedia has to say about ActiveSync), we are probably not quite there. Feel free to provide feedback, good or bad. |
10.1 Configuring the AirSync Directory
The openCRX AirSync Adapter stores information about the “Folders to be monitored” in a directory on the server (one .ser file per ActiveSync client). The location of this AirSync directory can be set as a JAVA_OPTS (e.g. in a batch file like tomcat.bat, run.bat, run.sh, etc.):
Listing 25: Set org.opencrx.airsyncdir for Apache Tomcat
...
set JAVA_OPTS=%JAVA_OPTS%
-Dorg.opencrx.airsyncdir="%CATALINA_HOME%\airsyncdir"
...
|
|
If the content of the AirSync directory gets lost, ActiveSync clients must renew the ping information (which recreates the respective .ser file). The iPhone, for example, does this if you enter/exit the respective Exchange Account settings. |
10.2 Mapping of openCRX Objects to AirSync Objects
The openCRX AirSync servlet maps openCRX objects to ActiveSync objects (Contacts, Events, Tasks, Mails) as follows based on the openCRX object class and additional information at hand:
|
openCRX Object Class |
Additional Requirement(s) |
Mapped to |
R=read |
|
AccountGroup |
referenced by ContactsFeed |
Contact Folder |
|
|
ActivityGroup
|
referenced
by CalendarFeed and with |
Calendar Folder |
|
|
referenced
by CalendarFeed and with |
Task Folder |
|
|
|
referenced
by CalendarFeed and with |
E-Mail Folder |
|
|
|
ActivityFilter |
referenced by CalendarFeed |
Calendar
Folder |
|
|
Account |
referenced
by member of AccountGroup |
Contact |
RUC |
|
Meeting |
assigned
to ActivityGroup |
Event |
RUC |
|
Incident, SalesVisit, PhoneCall, Mailing, Absence, ExternalActivity |
assigned
to ActivityGroup |
Event |
RU |
|
Task |
assigned
to ActivityGroup |
Task |
RUC |
|
EMailActivity |
assigned
to ActivityGroup |
|
RUC |
|
Meeting, Incident, SalesVisit, PhoneCall, Mailing, Absence, ExternalActivity |
filtered
by ActivityFilter |
Event |
RU |
|
Task |
filtered
by ActivityFilter |
Task |
RU |
|
EMailActivity |
filtered
by ActivityFilter |
|
RU |
|
|
The openCRX ical and caldav Adapters use a different mapping for activities (see chapter 9.4.4 Mapping of Activities to Calendar Events and Tasks for details). |
|
|
Creation of openCRX objects by an ActiveSync client requires that there is no ambiguity about the object class of the openCRX object to create and in the case of Activities an ActivityCreator must exist. That's the reason why it is not possible to create openCRX incidents or sales visits (Events are always mapped to openCRX Meetings). |
10.3 A User's AirSync Profile
10.3.1 Creation of a User's AirSync Profile
openCRX users can create a personal AirSync profile as follows:
login and start the wizard Edit > User Settings from your homepage:
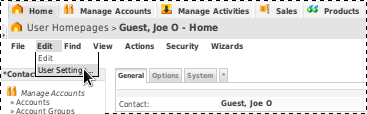
click the button [Apply] – the wizard will create a SyncProfile named AirSync; you can verify this by clicking [Cancel] in the wizard and then navigating to the Grid [Sync Profiles] of your homepage:
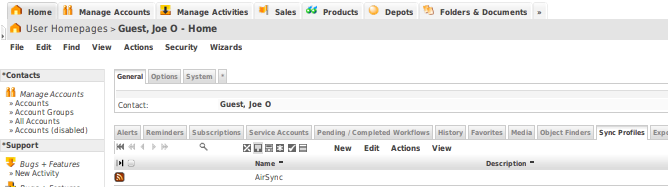
navigate to the AirSync profile – the wizard User Settings created two Sync Feeds, a Calendar Feed and a Contacts Feed (both named with your username):
|
|
If the name of a feed does not end with the string “~Private” such a feed is considered a “user created” feed for ActiveSync purposes. Depending on your phone (or the implementation of the respective ActiveSync client) you will not be able to synchronize such feeds. Hence, if synchronizing with your device does not work, ensure that your feeds name ends with “~Private”. |
|
|
If you prefer device-specific profiles, you can create such profiles by naming them “AirSync~<Device ID>”. Examples: AirSync~HTCAnd922379b0, AirSync~Appl88922G1B3NA Note: Stock Android (up to and including ICS) does not support device-specific profiles because the Android code is broken (during the signup negotiation a bad device id is sent to the server...). |
10.3.2 Creating/Configuring an AirSync Calendar Feed
openCRX users have a private Activity Tracker <username>~Private (e.g. guest~Private for the user named guest) and several private Activity Creators:
<username>~Private (to create Incidents)
<username>~Private E-Mails (to create E-Mail Activities)
<username>~Private Meetings (to create Meetings)
<username>~Private Tasks (to create Tasks)
|
|
If the name of a feed does not end with “~Private” such a feed is considered a “user created” feed for ActiveSync purposes. Depending on your phone (or the implementation of the respective ActiveSync client) you will not be able to synchronize such feeds. |
Activities created with one of the above Activity Creators are automatically assigned to the respective user's Activity Tracker <username>~Private and security is set such that only the respective user can read/write such activities.
If you only need one private “calendar” to manage your activities, the wizard User Settings does all the work for you, i.e. there is nothing more to configure.
You can, however, add more calendar feeds (activity group calendar feeds or activity filter calendar feeds) to your AirSync profile just as you would add calendar feeds to a calendar profile (see chapter 9.4.7.1 CalDAV Collections).
10.3.3 Creating/Configuring an AirSync Contacts Feed
openCRX users have a private Account Group called <username>~Private (e.g. guest~Private for the user named guest). Any openCRX Account that is a referenced by a member of this Account Group is synchronized through your AirSync Contacts Feed. Think of a Contacts Feed as an Address Book.
The private Account Group created by the wizard “User Settings” is empty initially, i.e. there are no members defined. You can add members to your private Account Group as follows:
navigate to your private Account Group, e.g. guest~Private (or any other Account Group referenced in the Contacts Feed you want to configure)
start the wizard Wizard > Manage Members:
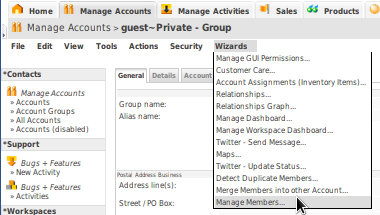
the wizard Manage Members allows you to select Accounts to be added (or removed) as members from various predefined sets:
all accounts (* Accounts)
members of the respective Account Group (Member)
filtered accounts of any Account Filter (Account Filter name)
in addition, you can also restrict the choice to Contacts, Legal Entities, Groups, or Unspecified Accounts only:
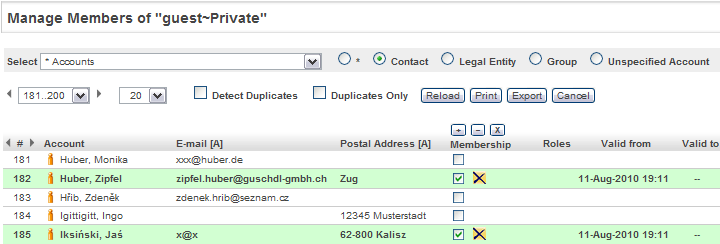
you can add individual accounts as members (click the respective checkbox) or all the accounts that are visible on the current page (click the button [+] followed by [OK]; similarly you can disable (or delete) members individually or all members that are visible on the current page
the wizard can also detect duplicates based on the following criteria (check the respective option to enable duplicate detection): a particular e-mail address is shared by more than one account or more than one member references a particular account:
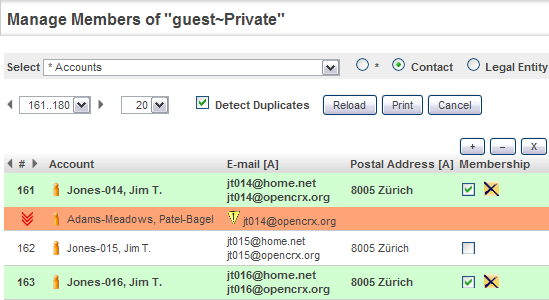
once you're done with adding the desired accounts as members to your Account Group you can leave the wizard – in the grid [Members] you should see all the active members pointing to accounts that you will be able to synchronize with your AirSync Contacts Feed:
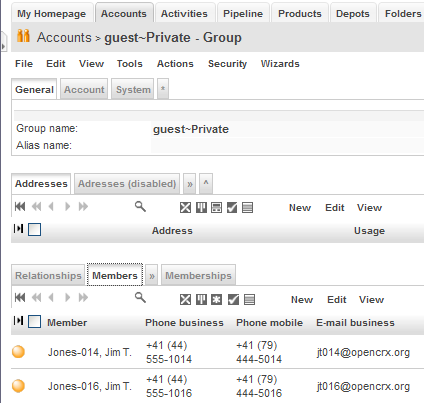
|
|
Seeing an account (and being able to retrieve it through AirSync) does not imply that you can also update such an account. Whether you have update access to a particular account depends on the security settings of the respective account. Please note that certain ActiveSync clients do not notify the user when an update fails (the iPhone, for example, does not tell you that an update request failed). |
|
|
Deleting an account through AirSync does not really delete the account in openCRX, only the respective member of your Account Group (referenced in the respective Contacts Feed) is disabled. If required, you can reactive such a member, e.g. with the wizard Manage Members. |
|
|
Please note that accounts in your private AirSync Contacts Feed are not necessarily private. Whether other openCRX users can see, update and delete such accounts depends on the security settings of the respective account. |
10.3.4 Configuration of AirSync E-Mail
openCRX users have a private Activity Tracker called <username>~Private (e.g. guest~Private for the user named guest). E-Mail Activities assigned to this Activity Tracker will be synchronized with a corresponding E-Mail folder <username> – Mails (e.g. guest – Mails) in your ActiveSync client.
Furthermore, all the alerts on your homepage are mapped to E-Mails that are also synchronized with an E-Mail folder named <username> – Alerts (e.g. guest – Alerts):
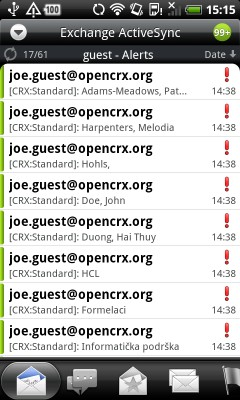
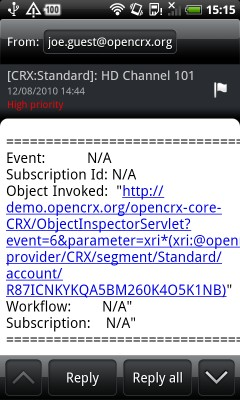
10.3.5 AirSync Security – Deleting Data on Devices
Some devices (like the iPhone, for example) feature built-in security (e.g. deletion of data if the pin or access codes is not entered correctly) and it is also possible to force deletion of data on the device as soon as the device synchronizes with openCRX. All you have to do is to deactivate all the Sync Feeds of the respective device-specific AirSync Profile (see the tip at the end of chapter 10.3.1 Creation of a User's AirSync Profile for details on how to create a device-specific profile).
|
|
Unfortunately, as long as the device does not connect to openCRX there is not much that openCRX can do to force deletion of the data on the device... |
10.4 Connecting ActiveSync Clients to an AirSync Profile
In principle, any ActiveSync client should be able to connect to an openCRX AirSync Profile. The following clients have been tested and confirmed to work:
iPhone (iOS 3.0+, iOS4.0+, iOS5+)
HTC Desire (Android 2.2 - Froyo)
Google Nexus S (Android 4.0.3 – ICS)
10.4.1 iPhone (iOS 3.0+, iOS4.0+, iOS5+)
Steps to configure your iPhone to connect to an openCRX AirSync Profile:
|
|
Please note that with iOS3.0+ the number of Exchange Accounts is limited to 1, i.e. if you want to connect to more than 1 account you need to upgrade your iPhone to iOS4 (or Jail Break your iOS3). |
10.4.1.1 Setting up an Exchange Account on the iPhone
connect to openCRX and login
start the wizard Connection Helper: AirSync / Calendar / vCard from your openCRX homepage:
let the wizard “calculate” server and domain of your AirSync profile:
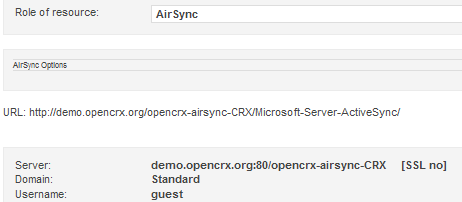
copy the server info (you'll need to paste it later)
on your iPhone home screen, tap the icon Settings
|
|
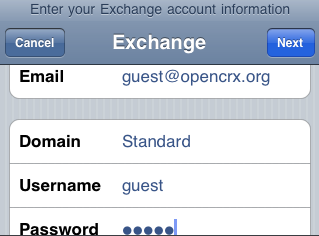
-
If you get a message “Cannot Connect Using SSL” tap [No] to move on to the next screen where you can enter the connection details.
verify/complete your subscription information (enter or copy the server info as calculated by the wizard “Connection Helper”) as follows:
Name
Value / Description
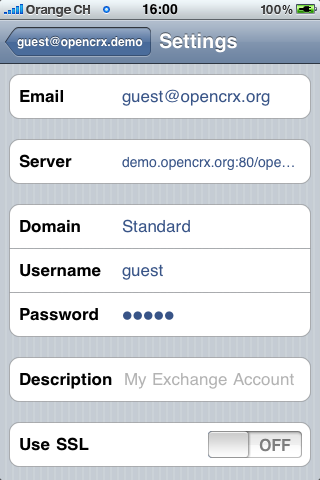
Email
your (openCRX) e-mail
Server
server info as calculated by the wizard “Connection Helper”, e.g.
demo.opencrx.org:80/opencrx-airsync-CRXDomain
openCRX domain as calculated by the wizard “Connection Helper”, e.g. Standard
User Name
your openCRX user name
Password
your openCRX password
Description
leave this empty (and let the iPhone calculate it)
Use SSL
if you use SSL, set to [ON],
otherwise [OFF]if you use SSL in combination with a self-signed certificate, you will get a message Unable to Verify Certificate --> tap Accept
if everything works out, you can tap Save to store the settings
10.4.1.2 Setting up Synchronization for Contacts
|
|
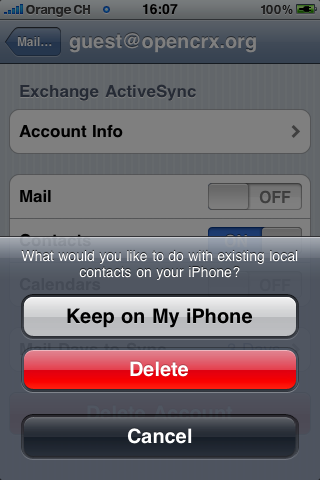
|
|
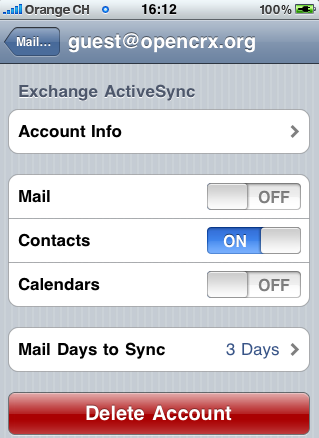
Search in the Global Address List is not implemented yet as of openCRX v2.9.1 |
|
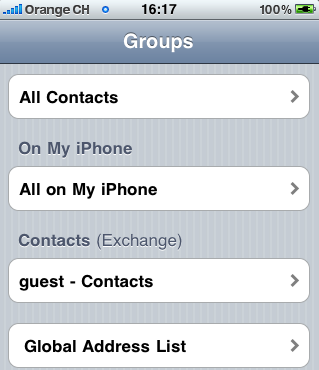
|
|

|
|
You can synchronize multiple iPhone Contact Groups by defining multiple AirSync Contacts Feeds in openCRX (each of them will be mapped to an iPhone Contacts Group). |
|
|
openCRX address information supports multiple lines (separated by EOL or CR LF) – the iPhone maps this to two consecutive blanks (i.e. a blank immediately followed by another blank). |
|
|
If you don't have update rights in openCRX for a particular openCRX account, you will not be able to update this contact with the iPhone either. Unfortunately, the iPhone does not tell you about failed update requests (the update fails “silently”), i.e. make sure that your updates actually make it to openCRX before spend too much time correcting data... |
10.4.1.3 Setting up Synchronization for Calendars
|
|
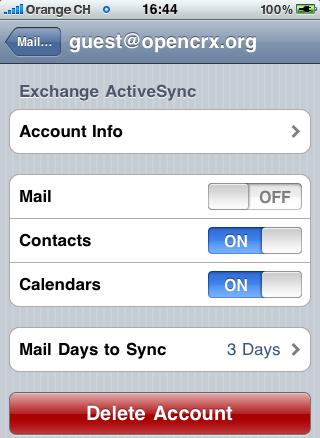
|
|
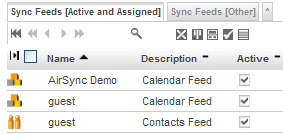
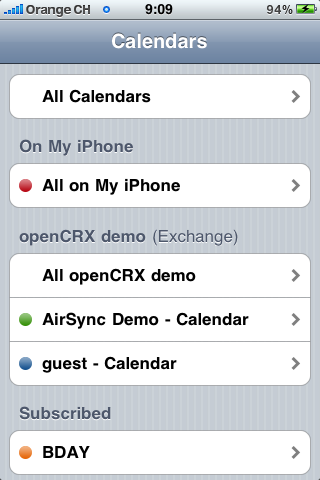
|
|
Neither iPhone OS 3.0+ nor iOS4.0+ synchronizes tasks through Exchange Account settings, i.e. you will see Events only (see also chapter 10.2 Mapping of openCRX Objects to AirSync Objects). |
|
|
If your Calendar Feed references an Activity Group without a corresponding Activity Creator for the required activity type (you can verify this by navigating to the Activity Group and checking the grid [Activity Creators]) you will not see a calendar corresponding to your Calendar Feed. See also 10.2 Mapping of openCRX Objects to AirSync Objects). |
10.4.1.4 Setting up Synchronization for Mail
|
|
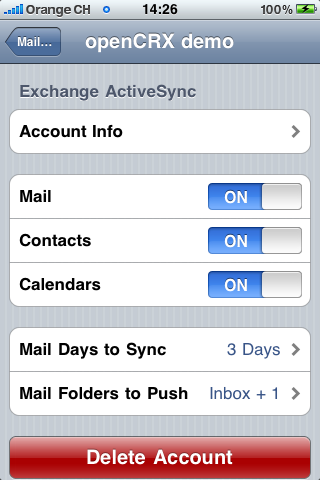
|
|
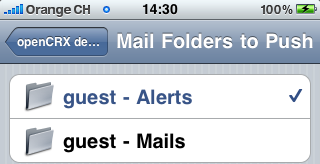
|
|
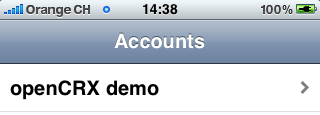
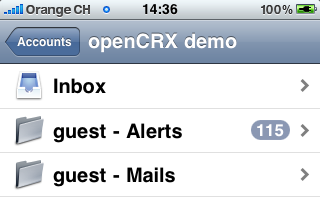
|
|
E-Mails sent through this account will be created in openCRX if an appropriate Activity Creator for E-Mails is available. By default, the user's private E-Mail Activity Creator <username>~E-Mails will be used. |
10.4.2 HTC Desire (Android 2.2 - Froyo)
Here are the steps to configure your HTC Desire to connect to an openCRX AirSync Profile:
|
|
Please note that the HTC mail client can only handle 1 Exchange account even though Android could actually handle multiple accounts. If you installed the plain vanilla Google mail client for Android 2.2, you will run into another problem: the server field does not accept URLs with port numbers or special characters like '/', i.e. you must front openCRX with an Apache server so that Android can connect to openCRX with a simple URL like demo.opencrx.org. |
10.4.2.1 Setting up an Exchange Account on the HTC Desire
connect to openCRX and login
start the wizard Connection Helper: AirSync / Calendar / vCard from your openCRX homepage:
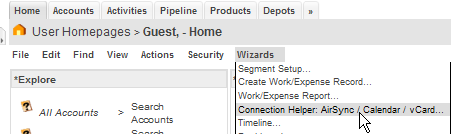
let the wizard “calculate” server and domain of your AirSync profile:
copy the server address (you'll need to paste it later)
on your HTC Desire, tap the [MENU] button and select Settings
|
|
|
|
|
|
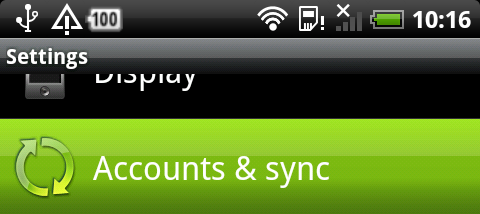
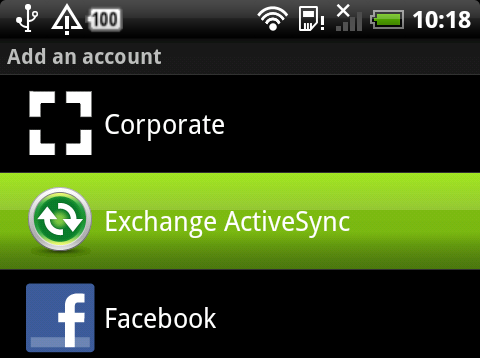
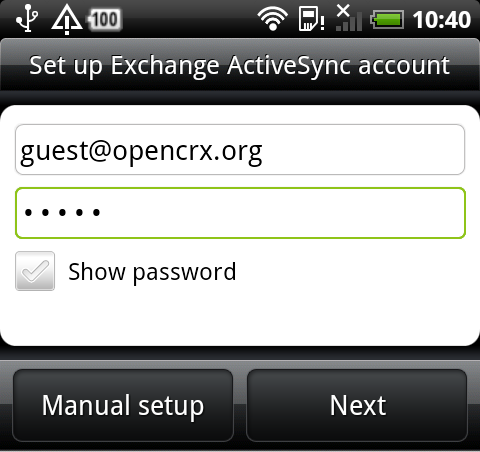
verify/complete your account information (enter or copy the server info as calculated by the wizard “Connection Helper”) as follows and then tap [Next] to continue:
-
Name
Value / Description
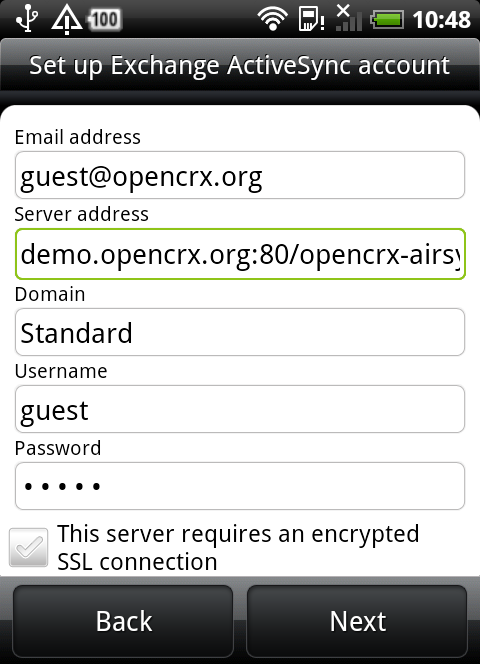
Email
your (openCRX) e-mail
Server
server info as calculated by the wizard “Connection Helper”, e.g.
demo.opencrx.org:80/opencrx-airsync-CRXDomain
openCRX domain as calculated by the wizard “Connection Helper”, e.g. Standard
User Name
your openCRX user name
Password
your openCRX password
Use SSL
if you use SSL, check it
|
|
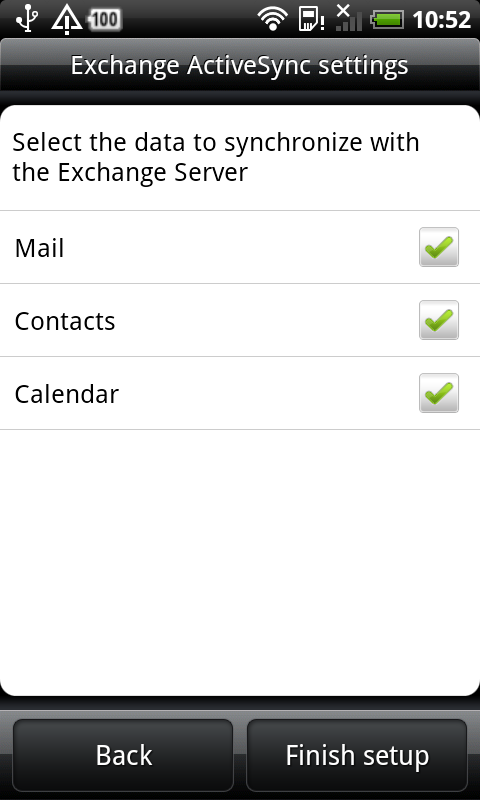
10.4.2.2 Setting up Synchronization
on your HTC Desire, tap the [MENU] button and select Settings
|
|
|
|
|
|
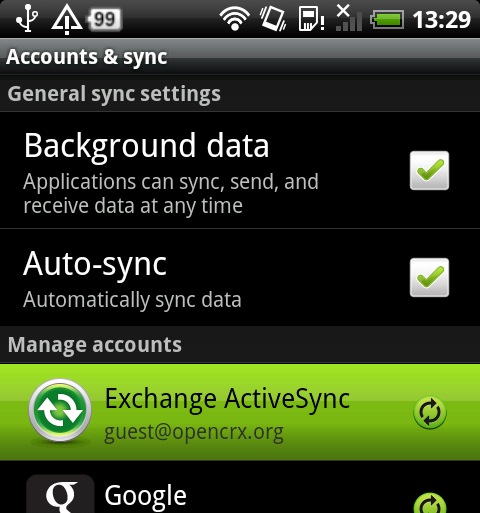
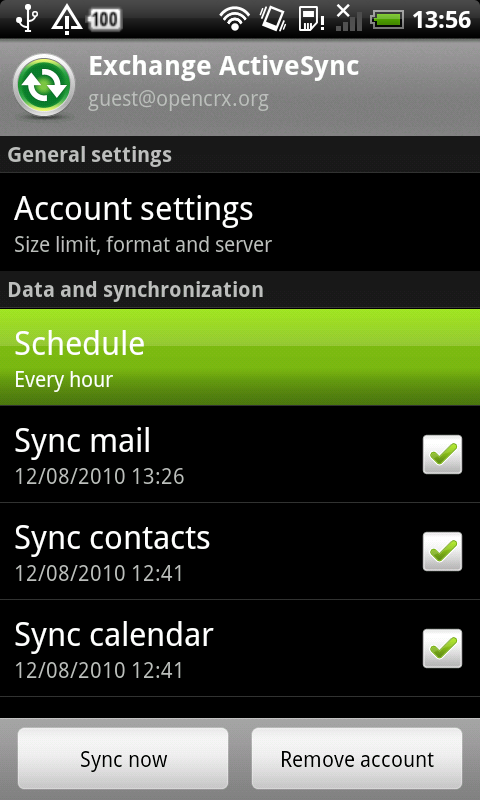
|
|
HTC Desire supports push for the folder Inbox only (which is not mapped to openCRX). Hence, you might as well save the battery and disable push until Android/HTC get their act together. |
|
|
Search in the Global Address List is not implemented yet as of openCRX v2.9.1 |
|
|
HTC Desire / Android 2.2 do not support synchronization of tasks through Exchange Account settings. Hence, you will only be able to see Events. |
|
|
If your Calendar Feed references an Activity Group without a corresponding Activity Creator for the required activity type (you can verify this by navigating to the Activity Group and checking the grid [Activity Creators]) you will not see a calendar corresponding to your Calendar Feed. See also 10.2 Mapping of openCRX Objects to AirSync Objects). |
|
|
E-Mails sent through this account will be created in openCRX if an appropriate Activity Creator for E-Mails is available. By default, the user's private E-Mail Activity Creator <username>~E-Mails will be used. |
10.4.3 Google Nexus S (Android 4.0.3 – ICS)
Here are the steps to configure your Google Nexus S to connect to an openCRX AirSync Profile:
|
|
The stock Android ActiveSync client is quite limited: the server field does not accept URLs with port numbers or special characters like '/', i.e. you must front openCRX with an Apache server so that Android can connect to openCRX with a simple URL like airsync.opencrx.org. In your Apache config file (httpd.conf) you can do something like this: Listing 26: Apache config file httpd.conf / fronting Tomat <VirtualHost
*:80>
|
10.4.3.1 Setting up an Exchange Account on the Google Nexus S
|
|
|
|
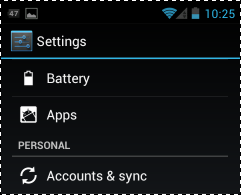
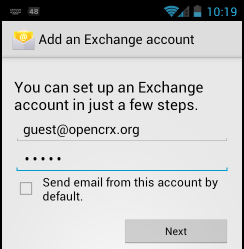
verify/complete your account information as follows and then tap [Next] to continue:
-
Name
Value / Description
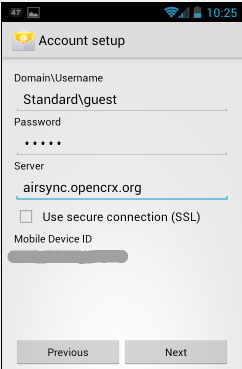
Domain
openCRX domain as calculated by the wizard “Connection Helper”,
e.g. StandardUser Name
your openCRX user name, e.g. guest
Password
your openCRX password
Server
name (or IP address) of the fronting Apache server,
e.g. airsync.opencrx.orgUse SSL
if you use SSL, check it
if you use SSL in combination with a self-signed certificate, you will get a warning --> accept the certificate
|
|
|
|
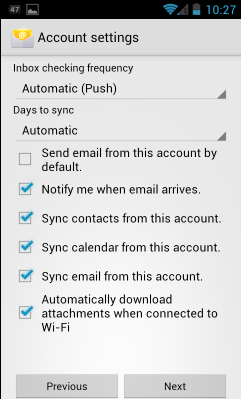
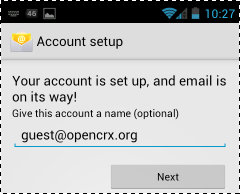
|
|
Google Nexus S supports push for the folder Inbox only (which is not mapped to openCRX). Hence, you might as well save the battery and disable push until Google get their act together. |
|
|
Search in the Global Address List is not implemented yet as of openCRX v2.9.1 |
|
|
Google Nexus S / Android 4.0.3 do not support synchronization of tasks through Exchange Account settings. Hence, you will only be able to see Events. |
|
|
If your Calendar Feed references an Activity Group without a corresponding Activity Creator for the required activity type (you can verify this by navigating to the Activity Group and checking the grid [Activity Creators]) you will not see a calendar corresponding to your Calendar Feed. See also 10.2 Mapping of openCRX Objects to AirSync Objects). |
|
|
E-Mails sent through this account will be created in openCRX if an appropriate Activity Creator for E-Mails is available. By default, the user's private E-Mail Activity Creator <username>~E-Mails will be used. |
11 openCRX AirSync Client (ActiveSync compatible)
The openCRX AirSync Client enables backend-synchronization of contacts and calendars between openCRX and MS Exchange. Thus, MS Outlook and PDAs connecting to MS Exchange get easy access to contacts and calendars that are managed in openCRX, without the need to install any additional software or changing the configuration:
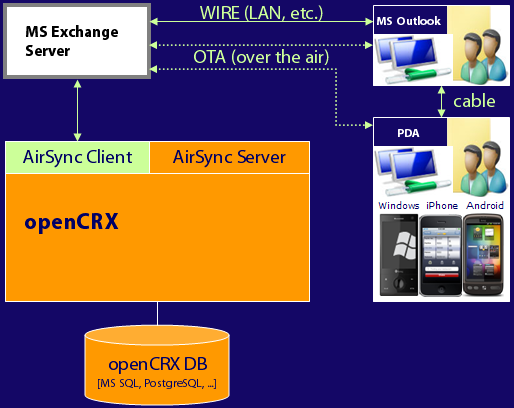
Figure 64: openCRX AirSync Client – backend-sync with Exchange
|
|
Even though openCRX AirSync aims to be compatible with Microsoft's ActiveSync (see what Wikipedia has to say about ActiveSync), we are probably not quite there (we have tested with MS Exchange 2003 and MS Exchange 2007), so feel free to provide feedback, good or bad. |
|
|
Due to the fact that Microsoft prevents the creation of E-Mails on the Exchange server through ActiveSync (unless you want to actually send e-mail) it is not possible to really synchronize e-mails between MS Exchange and openCRX. We recommend IMAP to access openCRX E-Mails (see chapter 9.5 Mailstore / IMAP for more information). |
11.1 AirSync Client Profile
Each MS Exchange account that should be synchronized with openCRX requires an AirSync Client Profile.
11.1.1 Creation of an AirSync Client Profile
openCRX users can create an AirSync Client profile as follows:
navigate to Home > Sync Profiles; select New > Air Sync Client Profile:
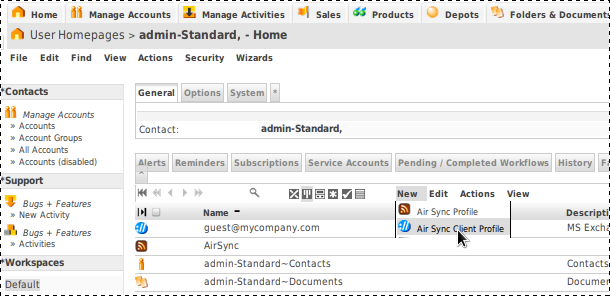
populate the fields as shown below (name and description are for informational purposes only, but Server URL, Username, Password and Domain must be adapted to your own environment):
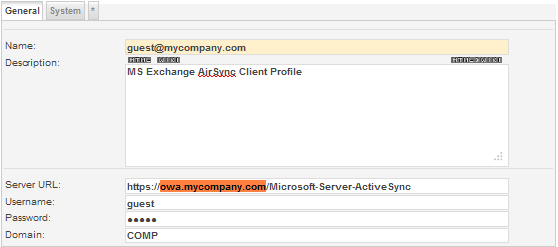
|
|
The string Microsoft-Server-ActiveSync is fixed (referring to a virtual directory on the Exchange server). |
|
|
If you intend to use SSL to secure the connection to your Exchange server you must import the server's certificate into the keystore.
Listing 27: Importing Certificate cd
$JAVA_HOME/lib/security Replace <dom> with the name and domain of the mail server (e.g. owa.my.company.com) and <name> with the name of the certificate file. |
11.1.2 ActiveSync Provisioning
ActiveySync Provisioning (see
http://msdn.microsoft.com/en-us/library/dd299443(v=EXCHG.80).aspx)
specifies an XML-based format to communicate security policy
settings to client devices (in this case openCRX, acting as an
ActiveySync client). Depending on the settings/configuration of your
account on the MS Exchange server you might have to run the
provisioning wizard to enable synchronization. You can fetch the
provisioning information from the MS Exchange server by navigating
to your AirSync Client Profile and running the wizard AirSync
– Provision: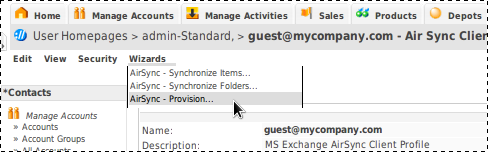
11.1.3 Synchronizing Folders
You can retrieve a list of all the synchronizable folders, converted to openCRX Sync Feeds, from the MS Exchange Server by navigating to your AirSync Client Profile and running the wizard AirSync – Synchronize Folders. Sync Feeds created by this wizard are initially set to inactive and the reference to Account group (for Contact Feeds), Activity group (for Activity Group Feeds) or Activity filter (for Activity Filter Feeds) respectively are not set. You will find such feeds in the tab [All Sync Feeds].
11.1.3.1 Prepare your MS Exchange Account
In principle you can synchronize any Exchange folder with openCRX. It might make sense, however, to create a set of special folders, i.e. prepare your Exchange account as follows (use your own openCRX username instead of guest):
start MS Outlook (and connect to your Exchange server)
create a folder for Mail and Post Items named openCRX:
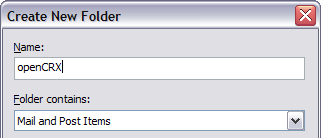
select the folder openCRX and then create a subfolder for Contact Items named Contacts (guest~Private):
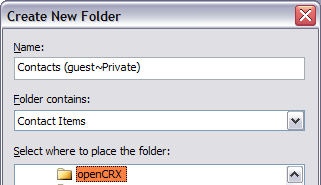
similarly you create the folder Tasks (guest~Private) for Task Items: and the folder Calendar (guest~Private) for Calendar Items
your folder openCRX should now contain three subfolders, Calendar (guest~Private), Contacts (guest~Private) and Tasks (guest~Private) as follows:
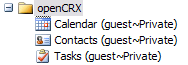
synchronize Outlook with your MS Exchange server so that these new folders are available on the server as well before you proceed
11.1.3.2 Retrieve Synchronizable Folders / Sync Feeds
Now that your Exchange account is prepared you can navigate to your AirSync Client Profile and run the wizard AirSync – Synchronize Folders to retrieve the Sync Feeds:
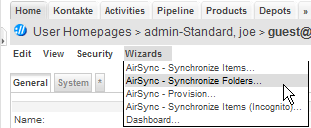
In the tab [All Sync Feeds] you should now see various Sync Feeds including the following ones corresponding to the folders you created with MS Outlook:
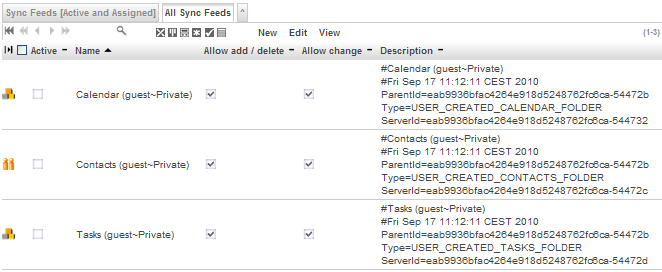
11.1.3.3 Synchronization with MS Exchange Contact Folders
In order to configure synchronization between an MS Exchange contact folder and an openCRX Account Group (see also 10.2 Mapping of openCRX Objects to AirSync Objects) follow these steps:
navigate to the Contacts Feed corresponding to the desired MS Exchange Contact Folder; the folder name is contained in the description of the Sync Feed, usually on the first line, e.g. #Contacts (guest~Private)
change to edit mode
set Active to true and set the reference for the Account Group (use the auto-completer or the lookup inspector)
optionally you can allow/prevent adding/removing/changing contacts
save your changes
With the next execution of the wizard Synchronizing Items the synchronization will be initiated.
11.1.3.4 Synchronization with MS Exchange Calendar Folders
In order to configure synchronization between an MS Exchange calendar folder and an openCRX Activity Group (see also 10.2 Mapping of openCRX Objects to AirSync Objects) follow these steps:
navigate to the Activity Group Feed corresponding to the desired MS Exchange Calendar Folder; the folder name is contained in the description of the Sync Feed, usually on the first line, e.g. #Calendar (guest~Private)
change to edit mode
set Active to true and set the reference for the Activity Group (use the auto-completer or the lookup inspector)
optionally you can allow/prevent adding/removing/changing activities
save your changes
In case you want to synchronize with an openCRX Activity Filter instead of an openCRX Activity Group, follow these steps:
navigate to the Activity Group Feed corresponding to the desired MS Exchange Calendar Folder; the folder name is contained in the description of the Sync Feed, usually on the first line, e.g. #Calendar (guest~Private)
change to edit mode and copy the content of the field description into your clipboard
click [Cancel] to leave edit mode and navigate one level higher to the Air Sync Client Profile
select New > Activity Filter Feed as shown below:
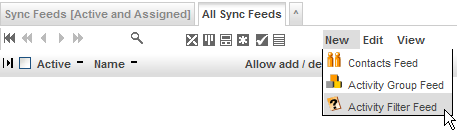
paste the description from the clipboard to the field description and then enter a name for this feed (you can use the same name that was used for the Activity Filter Group if you wish)
set Active to true and set the reference for the Activity Group (use the auto-completer or the lookup inspector)
optionally you can allow/prevent adding/removing/changing activities
save this newly created feed
delete the Activity Group Feed that was created by the wizard AirSync – Synchronize Folders
With the next execution of the wizard Synchronizing Items the synchronization will be initiated.
11.1.3.5 Synchronization with MS Exchange Task Folders
In order to configure synchronization between an MS Exchange task folder folder and an openCRX Activity Group or an openCRX Activity Filter (see also 10.2 Mapping of openCRX Objects to AirSync Objects) follow these steps:
navigate to the Activity Group Feed corresponding to the desired MS Exchange Calendar Folder; the folder name is contained in the description of the Sync Feed, usually on the first line, e.g. #Tasks (guest~Private)
change to edit mode
set Active to true and set the reference for the Activity Group (use the auto-completer or the lookup inspector)
optionally you can allow/prevent adding/removing/changing activities
save your changes
In case you want to synchronize with an openCRX Activity Filter instead of an openCRX Activity Group, follow these steps:
navigate to the Activity Group Feed corresponding to the desired MS Exchange Calendar Folder; the folder name is contained in the description of the Sync Feed, usually on the first line, e.g. #Calendar (guest~Private)
change to edit mode and copy the content of the field description into your clipboard
click [Cancel] to leave edit mode and navigate one level higher to the Air Sync Client Profile
select New > Activity Filter Feed as shown below:
paste the description from the clipboard to the field description and then enter a name for this feed (you can use the same name that was used for the Activity Filter Group if you wish)
set Active to true and set the reference for the Activity Group (use the auto-completer or the lookup inspector)
optionally you can allow/prevent adding/removing/changing activities
save this newly created feed
delete the Activity Group Feed that was created by the wizard AirSync – Synchronize Folders
With the next execution of the wizard Synchronizing Items the synchronization will be initiated.
11.1.3.6 Synchronization with MS Exchange E-Mail Folders
MS Exchange servers do not support pushing e-Mails from an ActiveSync client to a folder on the MS Exchange server (which is one of the reasons why you cannot store draft e-mails written on your iPhone to the MS Exchange server, for example). The only way to transfer e-mails from an ActiveSync client to an MS Exchange server is by actually sending the e-mail (which is not exactly what you want in order to synchronize).
On an experimental basis the import of e-mails from MS Exchange into openCRX using AirSync is implemented, but we actually recommend the use of the openCRX IMAP Adapter (see 9.5 Mailstore / IMAP for more information).
11.1.4 Synchronizing Items
The wizard AirSync – Synchronize Items synchronizes active Sync Feeds. Please note that per sync call up to 50 items are synchronized per feed, i.e. you might have to call this wizard multiple times for a full synchronization if there are a lot of changes.
11.1.5 Resync – Clear all items of a feed on server
Increasing the value of a feed's Generation by 1 leads to the removal of all items of that feed on the MS Exchange server. The wizard Resync – Clear all items on the server automates this task.
11.1.6 Resync – Replace all items of a feed on server
Increasing the value of a feed's Generation by 1 and setting the value of a feed's SyncKey.Client to 0 leads to the replacement of all items of that feed on the MS Exchange server followed by the removal of items on the MS Exchange server that are no longer included in the feed. The wizard Resync – Replace all items on the server automates this task.
11.1.7 Automating Synchronization
One way of automating synchronization is by setting up a cron job and have curl call the wizard WizardInvoker.jsp with the appropriate parameters, e.g.
curl
"http://localhost:8080/opencrx-core-CRX/WizardInvoker.jsp
?wizard=/wizards/en_US/AirSyncSyncWizard.jsp&provider=CRX
&segment=Standard&xri=xri://@openmdx*org.opencrx.kernel.home1/
provider/OB/segment/Standard/userHome/guest/syncProfile/
9QF54GOKYPT5RD77B0UAW34NB&user=guest&password=guest"
&> /dev/null
12 Social Media
12.1 Twitter
openCRX features to support/connect to Twitter:
OAuth (see http://oauth.net/ for more information)
Support for consumer key and consumer secret; a wizard to create access token and access key. The openCRX implementation is based on the library twitter4j (see http://twitter4j.org for more information).
Wizards to send direct messages and status updates
Workflow to send alert notifications via Twitter
12.1.1 Register with Twitter
Before openCRX can invoke the Twitter API, you need to register your instance of openCRX at http://twitter.com/oauth_clients/new to acquire a consumer key and a consumer secret. Register your openCRX instance as follows:
Application Name: name of your openCRX instance, e.g. 'openCRX of MyCompany'
Application Website: the URL users can access the openCRX instance, e.g. https://crm.mycompany.com/opencrx-core-CRX
Application Type: Client
Default Access type: Read/Write
Use Twitter for login: false
If registration is successful you should get a 'Consumer Key' and a 'Consumer Secret' for your application.
Login as admin-Root and navigate to Administration > Configuration.
Create a new component configuration with
Name: Twitter
Qualifier: Twitter
Navigate to the newly created component configuration and add the following string properties:
CRX.OAuth.ConsumerKey: Twitter consumer key
CRX.OAuth.ConsumerSecret: Twitter consumer secret
Logout (Users are now able to setup Twitter accounts).
|
|
NOTE: segment-specific tokens are configured using the pattern
|
12.1.2 Create Twitter Account
Login as user, e.g. guest
Twitter accounts are configured on a user's home in the tab [Service Accounts]. A Twitter account is created as follows:
Name: Twitter user display name
Active: true
Default: true
Invoke the wizard 'Twitter - Create access token'. The wizard shows an URL and a field to enter a PIN code. Open the URL in a new browser window. This redirects you to Twitter asking to grant access for the openCRX instance. If you grant access a PIN code will be displayed. Enter the PIN code and click OK. If all goes well, the fields 'Access token key' and 'Access token secret' are set now.
12.1.3 Using openCRX Wizards
On most objects the following two wizards are available:
Twitter – Send Message
This wizard allows to send a message to a list of Twitter users. In addition the message text is attached as note and if you are invoking the wizard on an activity a follow up is created. Note that the message is only visible to the recipients.
Twitter – Update Status
This wizard allows to for one of the configured Twitter accounts. Status updates are visible to all followers of the selected Twitter account.
12.1.4 Using the SendDirectMessageWorkflow
The SendDirectMessageWorkflow works much the same way as the SendMailNotificationWorkflow. However, instead of sending an e-mail to the user in case of alert updates, the alert title including a tiny url pointing to the underlying openCRX object is sent as direct message to the default Twitter account of the subscribing user. The SegmentSetupWizard (can be executed by the segment administrator, e.g. admin-Standard) creates the required entries for the workflow and topic. Users simply need to subscribe to the topic Alert Modifications (Twitter).
13 openCRX is a REST Service (Web Service)
The openCRX REST servlet allows easy 3rd party integration with openCRX. The full functionality of the openCRX API can be accessed via REST requests, i.e. you can use openCRX as a REST Service.
See http://code.google.com/p/rest-client/ for a REST client.
Sample REST requests are available from
http://www.opencrx.org/opencrx/2.3/new.htm#REST
You might also want to look at the following Wiki page:
https://sourceforge.net/apps/trac/opencrx/wiki/Sdk210.Rest
14 Data Import/Export
There are many ways of importing data (from other systems into openCRX) and exporting data (from openCRX to other systems). Generally speaking, there is no best way of doing imports/exports because depending on how much weight you put on the pros and cons of the various methods you may come to a different conclusion. Some issues to consider are:
one-time import/export vs. multiple imports/exports
file-based/batched vs. connection-based/real-time
allow manual process steps vs. fully automated
...
In this chapter we will cover some of the basic options you can choose from, but there are obviously other (and sometimes better) options to consider.
|
|
While it may be tempting to connect to the openCRX database for “quick and dirty” imports/exports, you should really consider using the openCRX API. On the one hand, importers/exporters accessing the database directly are bypassing openCRX security (this is actually more of a warning than a tip...). On the other hand, the openCRX database schema is subject to change (whereas the API is stable). |
14.1 Importing Data into openCRX
The task of importing data is handled by importers. In principle, you can import almost anything into openCRX, it’s really only a matter of writing an appropriate importer.
|
|
You must ensure that (legal) values are assigned to all mandatory (i.e. non-optional) attributes of openCRX objects created/updated during the import; in particular, all code attributes are mandatory! |
The Open Source distribution of openCRX includes importers for vCard (see Importing vCard Files)and iCalendar files (see Error: Reference source not found) in addition to the XML importer.
14.2 Importing XML Files
You can import virtually any data into openCRX as long as you provide it in the form of schema-compliant XML files. The openCRX schema files can be found in the file opencrx-kernel.jar (unzip and look for xmi subdirectories). Alternatively, you can export example objects as XML files and look at the produced XML files (although the generated XML file also contains all the derived and optional attributes; hence, you will have to prune the generated XML file before you can use it as a template).
Some of the configuration information and data provided with openCRX are also provided in the form of XML files and imported during system setup (e.g. units of measurement are loaded from opencrx-core-CRX\opencrx-core-CRX\WEB-INF\config\data\ Root\101_uoms.xml).
An XML import from a third party system might typically involve the following steps:
Figure 65: XML import from 3rd party system – overview
You can import schema-compliant XML files with the following methods:
Interactive / on-demand
Navigate to your user home and execute the operation File > Import:
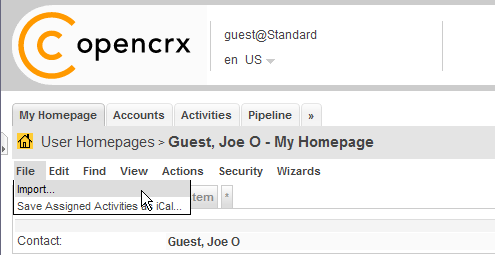
Figure 66: Interactive import of XML Files
Click on the button
 and navigate to XML file to be imported. Next you click OK to to
start the import. Please note that this method is very suitable for
small XML files and on-the-fly imports. If you are dealing
with larger XML files, however, you should consider the bulk import
described below.
and navigate to XML file to be imported. Next you click OK to to
start the import. Please note that this method is very suitable for
small XML files and on-the-fly imports. If you are dealing
with larger XML files, however, you should consider the bulk import
described below.Bulk Import
Use the bulk import for large XML files or if you need to import multiple XML files in an automated fashion. Put your XML file(s) into the following directory (you might have to expand the EAR file to do so):
opencrx-core-CRX\opencrx-core-CRX\WEB-INF\config\data\<SegmentName>
where <SegmentName> can be Root, Standard, or whatever your Segment is named.
Next you login as openCRX Root administrator (admin-Root) and execute the operation View > Reload. Click Yes to start the operation.
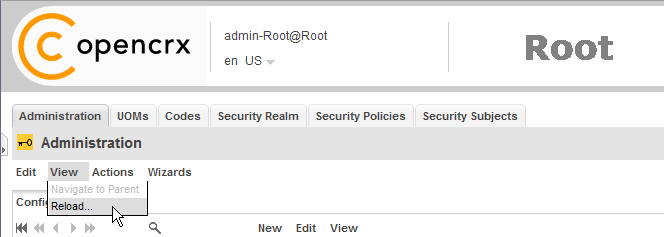
Figure 67: Interactive import of XML Files
-
Once the import is started you can close the browser, i.e. there is no need to keep the session alive until the import is completed. Some information regarding the progress of the import is written to the console.
In case you have data dependencies between/among your XML files (e.g. some files contain Contact data while others contain address data which is composite to Contact data) you should make sure that parent data are imported before child data gets imported. This should be relatively easy to achieve as XML files are imported in alphabetical order.
14.2.1 Importing Excel Files ( openCRX Accounts)
You can directly import Excel Sheets that contain field names in the first row and then data in the rows 2, 3, .... An example sheet is shown below:
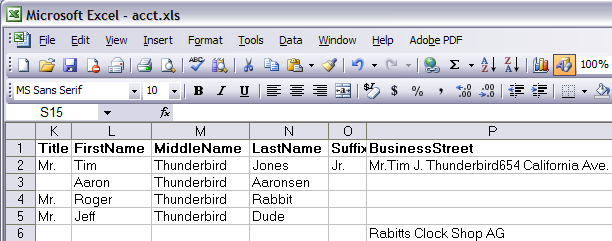
Figure 68: Import Accounts from Excel Sheet – Sample Excel Sheet
The following field attributes are supported by the importer wizard:
|
Field Name |
openCRX Attribute / Description |
|
XRI |
(optionally) provide XRI of openCRX account to be updated; if there is no match with an existing account, a new one will be created |
|
DTYPE |
(optionally) provide the type of openCRX account; acceptable values are: CONTACT, LEGALENTITY, GROUP, and UNSPECIFIEDACCOUNT |
|
TITLE |
mapped to Contact.salutationCode (if the text can be located as a code value), otherwise mapped to Contact.salutation |
|
SALUTATION |
mapped to Contact.salutation (a text field) |
|
FIRSTNAME |
Contact.firstName |
|
MIDDLENAME |
Contact.middleName |
|
LASTNAME |
Contact.lastName |
|
ALIASNAME |
Contact.aliasName |
|
NICKNAME |
Contact.nickName |
|
SUFFIX |
Contact.suffix |
|
COMPANY |
depending
on the type of imported Account, the value is mapped to one of
the following attributes: |
|
JOBTITLE |
Contact.jobTitle |
|
DEPARTMENT |
Contact.department |
|
BIRTHDAY |
Contact.birthdate the
following formats are recognized: |
|
HOMEPHONE |
Account.PhoneNumber.fullNumber (with usage = home) |
|
HOMEPHONE2 |
Account.PhoneNumber.fullNumber (with usage = other) |
|
HOMEFAX |
Account.PhoneNumber.fullNumber (with usage = fax home) |
|
HOMEADDRESSLINE |
Account.PostalAddress.postalAddressLine (usage = home) |
|
HOMESTREET |
Account.PostalAddress.postalStreet (usage = home) |
|
HOMECITY |
Account.PostalAddress.postalCity (usage = home) |
|
HOMEPOSTALCODE |
Account.PostalAddress.postalCode (usage = home) |
|
HOMESTATE |
Account.PostalAddress.postalState (usage = home) |
|
HOMECOUNTRY
or |
Account.PostalAddress.postalCountry (usage = home) |
|
BUSINESSPHONE |
Account.PhoneNumber.fullNumber (with usage = business) |
|
BUSINESSPHONE2 |
Account.PhoneNumber.fullNumber (with usage = other) |
|
BUSINESSFAX |
Account.PhoneNumber.fullNumber (with usage = fax business) |
|
BUSINESSADDRESSLINE |
Account.PostalAddress.postalAddressLine (usage = business) |
|
BUSINESSSTREET |
Account.PostalAddress.postalStreet (usage = business) |
|
BUSINESSCITY |
Account.PostalAddress.postalCity (usage = business) |
|
BUSINESSPOSTALCODE |
Account.PostalAddress.postalCode (usage = business) |
|
BUSINESSSTATE |
Account.PostalAddress.postalState (usage = business) |
|
BUSINESSCOUNTRY
or |
Account.PostalAddress.postalCountry (usage = business) |
|
MOBILEPHONE |
Account.PhoneNumber.fullNumber (usage = mobile) |
|
EMAILADDRESS |
Account.EMailAddress.emailAddress (usage = business) |
|
EMAIL2ADDRESS |
Account.EMailAddress.emailAddress (usage = home) |
|
EMAIL3ADDRESS |
Account.EMailAddress.emailAddress (usage = other) |
|
X500ADDRESS |
Account.EMailAddress.emailAddress (usage = N/A, type X.500) |
|
WEBPAGE |
Account.WebAddress.webUrl (usage = business) |
|
ASSISTANTSNAME |
if a matching account with full name equal to ASSISTANTSNAME is found, then the matching account is made a member of the imported account; furthermore, ASSISTANTSNAMEROLE is mapped to Member.memberRole |
|
MANAGERSNAME |
if a matching account with full name equal to MANAGERSNAME is found, then the imported account is made a member of the matching account; furthermore, MANAGERSROLE is mapped to Member.memberRole |
|
BUSINESSTYPE |
Account.businessType you can provide a list of business types (each business type on a separate line) – see drop down / code table for valid values |
|
NOTES |
Account.description |
|
MEMBEROF |
if a matching account with full name equal to MEMBEROF is found, then the imported account is made a member of the matching account; furthermore, MEMBERROLE is mapped to Member.memberRole (you can provide a semicolon-separated list of member roles (e.g. founder;owner;Board of Directors) note: with this powerful feature you can establish relationships between accounts right at the time of importing accounts |
|
MEMBERROLE |
Member.memberRole (see MEMBEROF for more details) |
|
CATEGORIES |
Account.category you can provide a semicolon-separated list of categories (e.g. Business;Birthday;Xmas) and the importer will add all missing items to the list of categories contained in Account.category |
|
NOTE_TITLE |
creates or updates (if a note with the given title already exists) a note attached to the imported account; furthermore, NOTE_TEXT is mapped to the text attribute of the note |
|
generic / model-driven
|
the importer can also handle single-valued attributes of the types listed in the left-hand column in a generic / model-driven fashion; examples are:
the importer also handles multi-valued code attributes:
individual values for multi-valued attributes can be separated by a semicolon (“;”), e.g. 2;29;113;468 consult the openCRX UML Model for information on which attributes are available: |
|
|
Field names supported by MS Outlook match the names produced
|
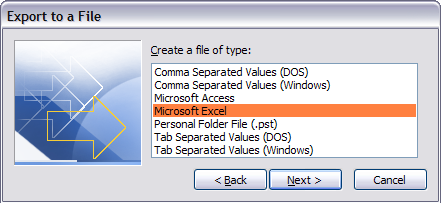
The Importer produces a detailed on-screen report with clickable links and a summary report stating the total number of created/updated accounts:
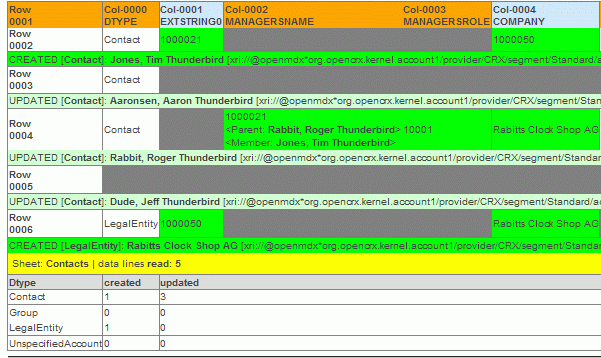
Figure 69: Import Accounts from Excel Sheet – Import Report
|
|
Before you launch an import of thousands of accounts, verify the structure of your Excel sheet with a few lines/accounts only. |
14.2.2 Importing vCard Files ( openCRX Contacts)
vCard is file format standard for personal data interchange, specifically electronic business cards (additional information is for example available from http://en.wikipedia.org/wiki/VCard).
These are the steps to import a vCard file:
click on the provider Accounts and navigate to an existing Contact (or create a new one)
select the operation File > Import vCard to unhide the import dialog:
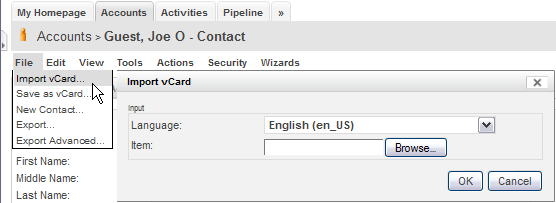
Figure 70: Operation vCard Import
select the appropriate language
click the Browse button and navigate to the vCard file you want to import
click the OK button to start the import operation
14.2.3 Importing E-Mails
Please refer to the Chapter 8 E-mail Services, in particular chapter Error: Reference source not found Error: Reference source not found.
14.2.4 Other Options
There are various other options to consider. You could for example develop a custom-tailored JSP Wizard to import data on demand or on a regular basis (e.g. controlled by the openCRX WorkflowController).
Sometimes it is more appropriate to develop a specific openCRX client to handle imports, and in a typical enterprise class environment you will probably consider developing adapters to connect/integrate openCRX with 3rd party systems on a real-time basis.
14.3 Exporting Data from openCRX
The task of exporting data is handled by exporters. The Open Source distribution of openCRX includes exporters for vCard and iCalendar files in addition to the XML exporter.
This allows you to export contacts and meetings/sales visits or any other object from openCRX. vCard and iCalendar files can be imported by a large variety of other applications, including Microsoft Outlook. This chapter shows how to export data.
14.3.1 Exporting XML Files
Navigate to the object to be exported as XML file and execute the operation File > Export Advanced as shown below:
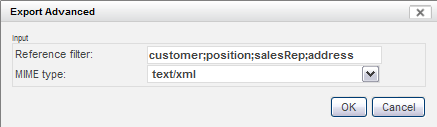
Figure 71: Exporting SalesOrder as XML File
In order to better control which additional objects (composites, referenced objects, ...) the XLM exporter should export together with the object loaded in the Inspector, you can (optionally) provide a reference filter (optionally with a navigation level). By default, only the current object will be exported. If you provide – for example when exporting a sales order – customer;address as a reference filter, the customer and all referenced addresses will be exported together with the main object. If you export a contact and provide the reference filter member[1] you will get direct members of this contact.
If the export is successful the exporter will terminate with status OK and you will be provided with a link to the file Export.zip containing the raw data:

Figure 72: XML Exporter provides XML data file and code tables as ZIP file
The openCRX ICS Adapter can also export iCalendars in XML format:
ICS URL (to get XML file with authentication):
http://<crxServer>:<Port>/opencrx-ical-<Provider>/activities
?id=<Provider>/<Segment>/<Calendar
Selector>&type=xml
Example:
http://localhost:8080/opencrx-ical-CRX/activities?id=CRX/Standard/tracker/main&type=xml
|
|
See chapter 9.4.2 Calendar Selectors (ICS and CalDAV) for information on how to construct calendaring URLs. |
You can also export the data contained in an openCRX grid to an XML file by executing Actions > Export --> XML on any grid.
14.3.2 Exporting Data to MS Excel / Open Office Calc Files
Navigate to the object to be exported as spreadsheet file and execute the operation File > Export Advanced as shown below:
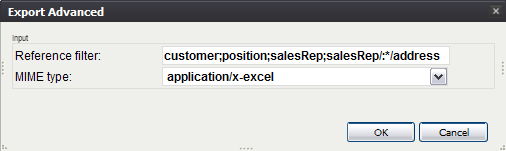
Figure 73: Exporting SalesOrder as Spreadsheet File
In order to better control which additional objects (composites, referenced objects, ...) the XLM exporter should export together with the object loaded in the Inspector, you can (optionally) provide a reference filter. By default, only the current object will be exported. If you provide – for example – :*/:* as a reference filter, all composites up to 2 levels deep will be exported together with the main object (this should be sufficient for most use cases). You can also provide a reference filter to dereference and export referenced objects like the customer or the salesRep of a sales order.
If the export is successful the exporter will terminate with status OK and you will be provided with a link to the file Export.xls containing the raw data:
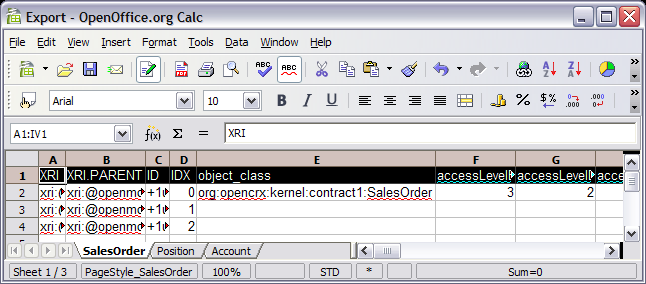
Figure 74: Exported Spreadsheet File
Based on such spreadsheet files end-users can easily create reports or do some ad-hoc data analysis without the need to know anything about Java or writing JSPs. The standard distribution of openCRX includes various example reports based on this technology.
You can also export the data contained in an openCRX grid to an Excel file by executing Actions > Export --> XLS on any grid.
14.3.3 Exporting openCRX Contacts ( MS Excel Files)
These are the steps to manually export group of contacts to an Excel file:
navigate to the account group you want to export
start the wizard Wizards > Manage Members
click the button [Export]
click on the spreadsheet icon to download the Excel file containing the exported accounts
|
|
The exported MS Excel file can be imported again. Hence, if you want to make bulk changes (e.g. change to domain of an e-mail address, etc.) you can first export the relevant accounts to an Excel file, make the desired changes in Excel and then reimport the Excel file with the Importer wizard (see 14.2.1 Importing Excel Files ( openCRX Accounts)). |
14.3.4 Exporting openCRX Contacts ( vCard Files)
These are the steps to manually export a contact to a vCard file:
navigate to the contact you want to export
click on the tab Account
select the contents of the field vCard and copy it to an empty text file
save the text file with any name and extension “vcf”, e.g. contact.vcf:

Figure 75: Manually Export Contact as vCard
There is also a wizard vCard.jsp available which allows you to export individual accounts or batches of accounts as vCards.
Navigate to an Account and select File > Save as vCard to start the export:
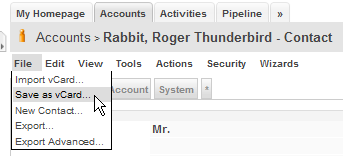
Figure 76: Export individual Contact as vCard with Wizard
In order to export multiple accounts as vCards, create an Account Filter that selects the desired accounts and then navigate to this Account Filter. Select File > Save Filtered Accounts as vCard:
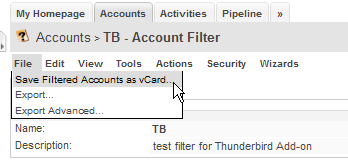
Figure 77: Export multiple Contacts as vCards with Wizard
14.3.5 Exporting openCRX Meetings ( iCalendar Files)
These are the steps to export an individual activity (e.g. a meeting or a sales visit) to an iCalendar file:
navigate to the meeting (or sales visit) you want to export
click on the tab Details
select the contents of the field iCal and copy it to an empty text file
save the text file with any name and extension “ics”, e.g. meeting.ics:
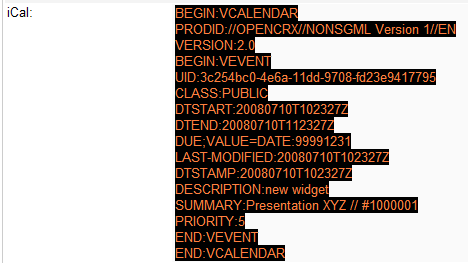
Figure 78: Exporting Meeting / Sales Visit as iCalendar File
There is also a wizard iCal.jsp available which allows you to export individual activities or batches of activities as iCals.
Navigate to an Activity and select File > Save as iCal to start the export:
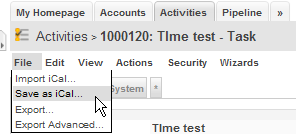
Figure 79: Export individual Activity as iCal with Wizard
In order to export multiple activities as iCals, navigate to an Activity Group (Activity Tracker, Category, Milestone), to an Activity Filter (or to any other object that features a list of assigned activities like Userhome, Account) and then select File > Save Filtered Activities as iCal (Save Assigned Activities as iCal).
14.3.6 Exporting E-Mails
Please refer to the Chapter 8 E-mail Services, in particular chapter 8.2.3 Export E-mails.
14.3.7 Exporting openCRX Grids
Any openCRX Grid can be exported to an XML or an XLS file. The exporters are accessible through Actions > Export → xxx:
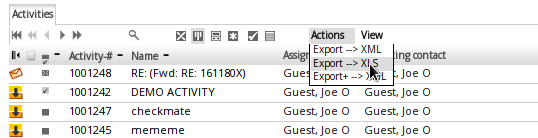
14.3.8 Other Options
There are various other options to consider. You could for example develop a custom-tailored JSP Wizard to export data on demand or on a regular basis (e.g. controlled by the openCRX WorkflowController).
Sometimes it is more appropriate to develop a specific openCRX client to handle exports, and in a typical enterprise class environment you will probably consider developing adapters to connect/integrate openCRX with 3rd party systems on a real-time basis.
If you have a REST client available, then exporting via REST is also a very viable option.
15 Customizing openCRX
Please refer to the guides available at http://www.opencrx.org/documents.htm for detailed information regarding UI customization and localization.
15.1 Managing Locales
The default installation of openCRX activates all locales that are included in the Open Source distribution. The openCRX administrator may wish to deactivate certain locales from the locale list. This chapter shows how you can achieve this.
The locale list is contained in the file
opencrx-core-CRX\opencrx-core-CRX\WEB-INF\web.xml
Look for the section <!-- locales --> to find a list of available locales:
Listing 28: Locales in web.xml
<!-- locales
-->
<init-param>
<param-name>locale[0]</param-name>
<param-value>en_US</param-value>
</init-param>
<init-param>
<param-name>locale[1]</param-name>
<param-value>de_CH</param-value>
</init-param>
<init-param>
<param-name>locale[2]</param-name>
<param-value>es_MX</param-value>
</init-param>
...
You can deactivate locales by simply commenting them out. The following example shows how to deactivate the locale de_CH.
Listing 29: Activating/Deactivating Locales in web.xml
<!-- locales
-->
<init-param>
<param-name>locale[0]</param-name>
<param-value>en_US</param-value>
</init-param>
<!--
<init-param>
<param-name>locale[1]</param-name>
<param-value>de_CH</param-value>
</init-param>
-->
<init-param>
...
|
|
Please note that you must not deactivate the base locale (that is the locale with the id 0, typically en_US) as the base locale contains a lot of customizing information not present in other locales. |
15.2 Managing Packages
The default installation of openCRX activates all packages that are included in the Open Source distribution. The openCRX administrator may wish to deactivate certain packages if they are not used. This chapter shows how you can achieve this.
The package list is contained in the file
opencrx-core-CRX\opencrx-core-CRX\WEB-INF\web.xml
Look for the section <!-- Admin --> to find a list of available packages:
Listing 30: Packages in web.xml
<!-- Admin
-->
<init-param>
<param-name>rootObject[0]</param-name>
<param-value>xri:@openmdx:org.opencrx.kernel.admin1/provider/CRX/segment/${SEGMENT}</param-value>
</init-param>
<!-- Home -->
<init-param>
<param-name>rootObject[1]</param-name>
<param-value>xri:@openmdx:org.opencrx.kernel.home1/provider/CRX/segment/${SEGMENT}/userHome/${USER}</param-value>
</init-param>
<!-- Accounts -->
<init-param>
<param-name>rootObject[2]</param-name>
<param-value>xri:@openmdx:org.opencrx.kernel.account1/provider/CRX/segment/${SEGMENT}</param-value>
</init-param>
...
You can deactivate packages by simply commenting them out. The following example shows how to deactivate the package depot1:
Listing 31: Activating/Deactivating Packages in web.xml
...
</init-param>
<!-- Depots
-->
<!--
<init-param>
<param-name>rootObject[6]</param-name>
<param-value>xri:@openmdx:org.opencrx.kernel.depot1/provider/CRX/segment/${SEGMENT}</param-value>
</init-param>
-->
<!-- Documents -->
<init-param>
<param-name>rootObject[6]</param-name>
<param-value>xri:@openmdx:org.opencrx.kernel.document1/provider/CRX/segment/${SEGMENT}</param-value>
</init-param>
<!--
Buildings -->
...
|
|
Please note that you must renumber all the packages listed after the package you deactivated so that the package numbering does not have any gaps (i.e. package numbering starts at 0 and it must be consecutive). |
|
|
It is also possible to change the order of the active packages by renumbering them. However, you must still ensure both that the numbering starts at 0 and that the numbering is consecutive. |
15.2.1 Enabling/Disabling Root Menu Entries
Individual user can enable/disable root menu entries with the wizard User Settings (available on a user's Homage):
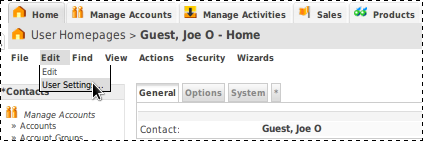
Figure 80: Launch Wizard User Settings
Once the wizard has loaded, uncheck entries you don't need (note that the settings can be different for different perspectives):
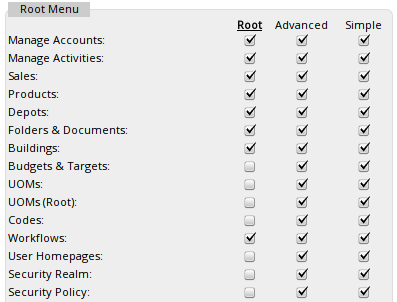
Figure 81: Wizard User Settings – enable/disable Root Menu Entries
|
|
Please note that entries corresponding to packages disabled by the openCRX administrator cannot be enabled with this wizard. Packages disabled in web.xml are not available at all! |
|
|
Depending on the width of your screen you can adjust the number of items shown as tabs in the top-level navigation in the same wizard by changing the value of Show max items in top navigation (fewer items for narrow screens, more items for wider screens). If you uncheck Show top navigation sub-levels the top-level tabs will not contain menus for sub-levels. |
15.3 Role-based GUI / GUI Permissions
15.3.1 Activating GUI Permissions
With the following steps you can active GUI permissions:
login as admin-Root
click on the tab [Security Policy]
in the bread-crum title, click on Security Policies as shown below:
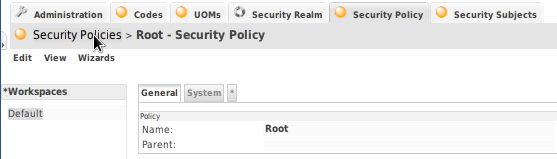
select New > Security Policy:
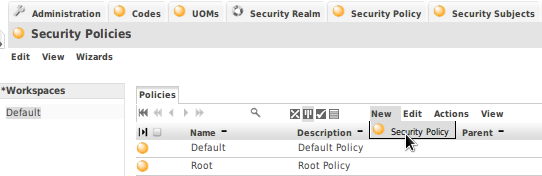
set both the name and the qualifier to Standard and enter Standard Policy as description as shown below – then click the button [Save]:
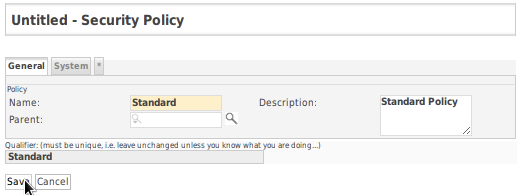
logoff and login as admin-Standard
click on the tab [Security Policy]
in the grid [Roles], select New > Role:
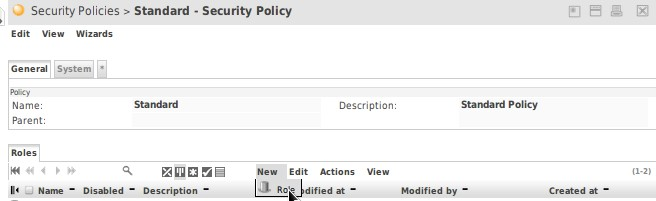
set both the name and the qualifier to Admin and enter Admin Role as description as shown below – then click the button [Save]:
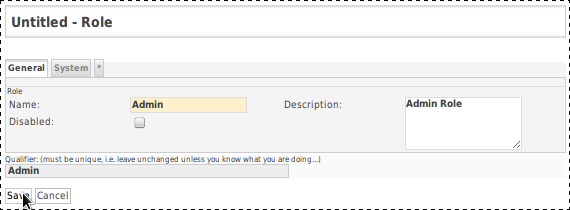
in the grid [Roles], select New > Role again set both the name and the qualifier to Public and enter Public Role as description as shown below – then click the button [Save]:
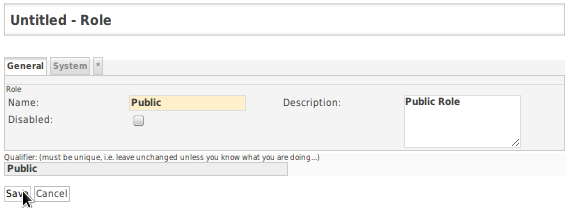
your default Security Policy Standard should now contain the 2 roles Admin and Public; this concludes the base configuration of GUI element security
15.3.2 Managing GUI Permissions
Only segment administrators (e.g. admin-Standard) can manage GUI permissions.
15.3.2.1 Granting a role to an openCRX user
With the following steps you can grant a role to an openCRX user:
login as segment administrator (e.g. admin-Standard)
select the top-level tab [Security Realm]
click on the tab [Principals] and locate and then navigate to the principal whom you want to grant a new role.
the grid [Granted Roles] contains the (ordered) list of roles currently granted to the respective principal
start typing the name of the role to be granted into the input box just below the menu Edit (as show below) and then select the desired role, e.g. Public:
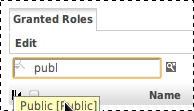
select the menu Edit > Add object to grant the role:
|
|
|
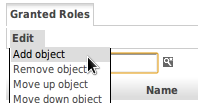 →
→
|
|
If permissions granted to roles contradict each other, the last role in the list of granted roles “wins”, i.e. the order in which roles are granted to a principal matters! You can use Edit > Move up object and Edit > Move down object to change the order of roles in the grid [Granted Roles]. |
|
|
Grant the role Public to all users (including segment administrators), but grant the role Admin to segment administrator only, to make it easy to disable certain GUI elements for normal users. |
15.3.2.2 Revoking a role previously granted to an openCRX user
With the following steps you can revoke a role previously granted to an openCRX user:
login as segment administrator (e.g. admin-Standard)
select the top-level tab [Security Realm]
click on the tab [Principals] and locate and then navigate to the principal whom you want to grant a new role.
the grid [Granted Roles] contains the (ordered) list of roles currently granted to the respective principal:
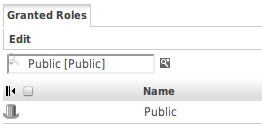
click on the line of the role to be revoked to select it (the selected line turns grey) and then select the menu Edit > Remove object to revoke the role:
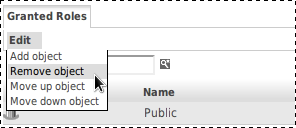
15.3.2.3 Enabling/Disabling GUI elements
With the following steps you can disable a GUI element:
login as segment administrator (e.g. admin-Standard)
navigate to the screen that contains the GUI element you want to disable
start the wizard Wizards > Manage GUI Permissions:
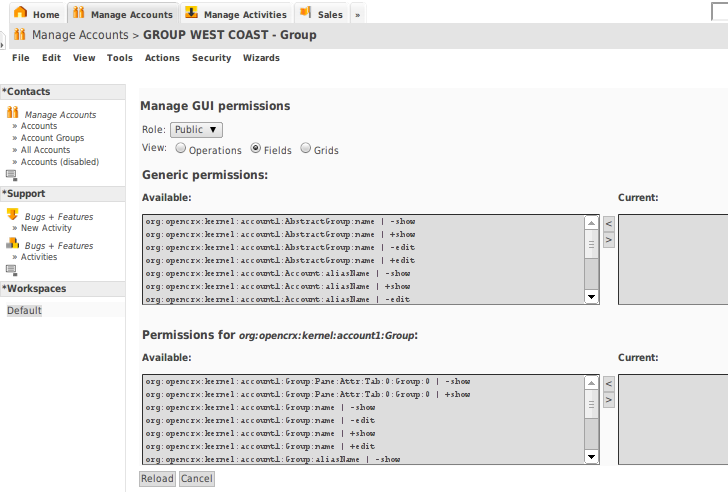
select the role you want to manage permissions for (e.g. Public)
select the type of GUI element you want to enable/disable (e.g. Operations, Fields, Grids)
use the buttons [>] and [<] to add/remove permissions
once you're done, click the button [Apply] to persist your changes
|
|
It usually takes a few seconds before the new permissions are applied by the GUI rendering engine. |
15.4 Custom Layout JSPs
openCRX is distributed with 2 default layout JSPs located in the directory opencrx-core-CRX\opencrx-core-CRX\WEB-INF\config\layout\en_US:
show-Default.jsp
This layout JSP renders all pages that show information (typically an Inspector containing information about the current object and all the grids containing associated information). This layout JSP is generic (it is provided by openMDX/portal) and it can handle any object.
edit-Default.jsp
Similarly, this layout JSP renders all pages that are used to edit objects.
If you have a need for specialized screens for a particular object in edit and/or show mode, you can write your own layout JSP and deploy it to the above-mentioned directory. The file name of your custom layout JSP determines which objects (or rather: objects of which class) will be handled by your custom layout JSP.
Example:
Let's assume you want to replace the default edit screen for openCRX Contacts (i.e. class org.opencrx.kernel.account1.Contact) with a custom layout JSP. Name your file
edit-org.opencrx.kernel.account1.Contact.jsp
and deploy it to the directory ...\WEB-INF\config\layout\en_US. After restarting Tomcat or your application server your new layout JSP will be active.
|
|
If you develop localized JSPs you can create new directories for the respective locales and then deploy your localized JSPs there. The fallback algorithms are comparable to those in ui customization. |
16 Integration with Office Application
openCRX provides various technologies that enable you to easily integrate common office suites like Open Office or Microsoft Office.
16.1 MS Word, LibreOffice Writer, OpenOffice Writer, etc.
openCRX supports the JSP-wizard-based generation of RTF documents. You can generate RTF documents from scratch or merge data with existing RTF templates. The RTF documents are generated on the fly and can be opened with any RTF-compatible word processor including OpenOffice Writer and MS Word.
You can test this feature on our demo server (or on your own installation if you installed the openCRX Server) with the following steps:
connect and login as user guest
navigate to any contact and execute the operation
Tools > Mail Merge --> RTF Document
the wizard will provide a list of suitable templates and then generate the RTF document on the fly

Figure 82: RTF Document generated by merging live data with template
If you installed the openCRX SDK you will find the templates and the JSP wizard in the following locations:
<SDK_Install_Dir>\opencrx-2.9.1\core\src\data\org.opencrx\documents
<SDK_Install_Dir>\opencrx-2.9.1\core\src\data\org.opencrx\wizards\en_US\MailMerge.jsp
With this approach it is quite easy to generate all kinds of documents, including letters, invoices, purchase orders, etc.
16.2 MS Excel, LibreOffice Calc, OpenOffice Calc, etc.
openCRX supports both a raw spreadsheet export of data and the JSP-wizard-based generation of XLS documents. You can generate XLS documents from scratch or merge data with existing XLS templates. The XLS documents are generated on the fly and can be opened with any XLS-compatible spreadsheet program including OpenOffice Calc and MS Excel.
You can test this feature on our demo server (or on your own installation if you installed the openCRX Server) with the following steps:
connect and login as user guest
navigate to Accounts
execute the operation Reports > Contacts Report as shown below
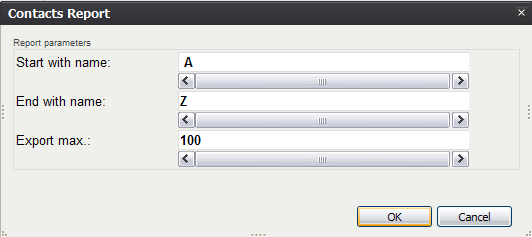
Figure 83: Contacts Export Dialog
the Spreadsheet is generated on the fly and can be downloaded from the openCRX server by clicking on the link provided in the operation result
You might also want to look at the information provided in the chapters
14.3.2 Exporting Data to MS Excel / Open Office Calc Files
17.1 Standard Reports
16.3 MS Outlook, Thunderbird/Lightning, Sunbird, etc.
See chapters 9 Cloud Services and 10 openCRX AirSync Server (ActiveSync compatible) for more information.
17 Reporting
openCRX provides various technologies that enable you to create reports of a wide variety, anything from simple ad-hoc reports to large scale bulk reports.
17.1 Standard Reports
Included in the openCRX standard distribution are the following reports:
Account List (available on Account Filters)
Account Member List (available on Groups)
Activity List (available on Activity Groups and Filters)
Activity List with Follow-Ups (available on Activity Groups and Filters)
Contract List (available on Contract Filters)
Contract List with Positions (available on Contract Filters)
You can install these standard reports into any openCRX Segment with the wizard Segment Setup. The reports are based on spreadsheet templates. If you installed the openCRX SDK you will find the templates in the following location:
<SDK_Install_Dir>\opencrx-2.5.1\core\src\data\org.opencrx\documents\
|
|
The templates contain VBA macros to “beautify” the reports. These macros will probably not work in Open Office Calc... |
You can test – for example – the Report Account List with the following steps:
connect and login as user guest
navigate to Accounts > Account Filters and select All Accounts
select the Menu File > Export
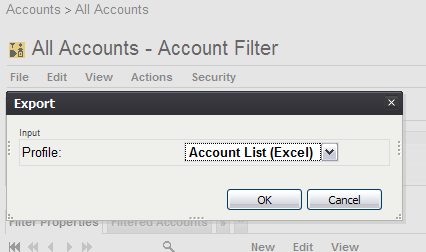
click the button [OK] to generate Export.xls
open Export.xls with Excel (enable Macros) to get an alphabeticallly sorted list of accounts complete with e-mail address and phone numbers
17.2 Ad-hoc Reporting
See chapter 14.3.2 Exporting Data to MS Excel / Open Office Calc Files.
Standard office suite know how (and maybe a bit of macro programming) should get you a long way. Once you're ready to “institutionalize” a report you can prepare a template and an openCRX Export Profile. Consult the templates and the Export Profiles provided by the opeCRX distribution for examples.
17.3 Large Scale Reporting
If your task is to produce a large number of reports (e.g. monthly reporting for all your clients) or reports based on large amounts of data, spreadsheet-based reporting is probably not the way to go. Maybe you want to generate reports in a format other than XLS. On the one hand, openCRX already includes libraries to generate reports and documents in various formats, on the other hand you can easily add additional libraries to openCRX.
|
Format |
Library / Additional Information |
|
XLS |
Apache POI / http://poi.apache.org/ |
|
|
iText / http://www.lowagie.com/iText/ |
|
RTF |
Simple RTF Writer / http://www.it-s-easy.com/downloads.htm |
Obviously, there are many more possibilities, like for example exporting data in XML format and then doing some kind of fancy transformation. One such example is available from http://www.koalix.org/
In terms of how to generate your reports, there are also various options available depending on your preferences:
JSP-Based Reporting
This approach is typically recommended if you need on-demand reporting and the generation of the report does not put an undue burden on the server. The following screen shot shows an example HTML-report: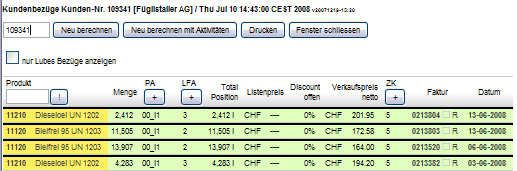
Java Program
Large-scale batch reporting can be done with a Java Program (basically an openCRX client programmed in Java that prepares the desired reports).BI-Reporting Suite
If you plan to use a BI-Reporting Suite (e.g. Crystal Reports, Pentaho, BIRT, etc.), you should keep in mind that directly accessing the openCRX database is not a very good idea. We strongly recommend you either retrieve data through the openCRX API (e.g. with REST) or set up a dedicated reporting DB (the process to populate such a reporting DB should retrieve data from the openCRX DB through the openCRX API). The reason for not accessing the openCRX database directly is the following one: while the openCRX API is stable, the OO-to-relational mapping is not and hence the schema of the openCRX DB is subject to change over time. Hence, if you access the openCRX DB directly you will have to adapt your reports if the DB schema changes, a potentially expensive proposition. Furthermore, whenever you access the openCRX DB directly there is no access control...
18 Miscellaneous Topics
18.1 Configuration of AutoCompleter
The AutoCompleter works by default with objects in the current segment. To determine the so called 'lookup object' it also considers the 'root objects' configured in web.xml. By default, web.xml has two configured UOM segments:
xri:@openmdx:org.opencrx.kernel.uom1/provider/CRX/segment/${SEGMENT}
xri:@openmdx:org.opencrx.kernel.uom1/provider/CRX/segment/Root
If there are multiple root objects of the same type, the AutoCompleter takes the first (see org.openmdx.portal.servlet.DefaultPortalExtension.getLookupObject() for details).
Hence, if you want to give the root UOMs priority you can switch the orders of the UOM XRIs in the web.xml. If you want to have some more sophisticated logic you can override the method getLookupObject() or getAutoCompleter().
18.2 Extended Service for openCRX/Tomcat Management
18.2.1 Multiple Instances of Tomcat
Extended Service is a Tomcat extension which allows to start multiple Tomcat instances with the same configuration and allows to stop / start the connectors of these instances individually.
The class org.openmdx.catalina.core.ExtendedService allows to handle the requested scenario. Adapt the server.xml as follows:
...
<Server
port="${tomcat.server.port}"
shutdown="SHUTDOWN">
...
<Service
name="Catalina" port="${tomcat.service.port}"
className="org.openmdx.catalina.core.ExtendedService">
...
The system properties are set per Tomcat instance, e.g.
Instance A:
-Dtomcat.server.port=8005
-Dtomcat.service.port=8006
Instance B:
-Dtomcat.server.port=8105
-Dtomcat.service.port=8106
|
|
If instance A and instance B have to run with different versions of EARs/WARs, create a Tomcat directory for each instance. |
* Start instance A. The connectors are started.
* Start instance B. The connectors can not be started because of port conflicts.
Switch from instance A to B as follows:
* telnet localhost 8006 and enter command stopConnectors
* telnet localhost 8106 and enter command startConnectors
If the property org.openmdx.catalina.core.ExtendedService.autostartConnectors is unset or the property is set to true then the connectors will be started at startup of Tomcat. Otherwise the connectors are not started.
18.2.2 IMAPServer: pause / resume
The IMAPServlet (opencrx-imap-CRX/IMAPServlet) provides a GUI which allows to pause and resume the IMAPServer. The Wizard IMAPServer.jsp available as admin-Root redirects to the IMAPServlet. The IMAPServlet accepts the system property org.openmdx.catalina.core.ExtendedService.autostartConnectors. If unset or set to true, the IMAPServer is started at startup. If set to false, then the IMAPServer has to be started manually.
18.2.3 WorkflowController: pause / resume
The WorkflowControllerServlet accepts the new commands pause and resume. Pause stops pinging the controlled WorkflowServlets. The new commands are available via the GUI. The WorkflowControllerServlet accepts the system property org.openmdx.catalina.core.ExtendedService.autostartConnectors. If it is unset or set to true the WorkflowController is activated on startup. If set to false the WorkflowController has to be started/resumed manually.
18.3 SNMP Monitoring (with Sun JVM)
The SNMP agent for the Sun JVM can be enabled as described at http://java.sun.com/j2se/1.5.0/docs/guide/management/SNMP.html and http://www.ilikespam.com/blog/monitoring-the-jvm-with-snmp.
Put snmp.acl in TOMCAT_LWC_HOME/bin and give read access to the file for the owner only.
#The communities public and private are allowed access from the local host.
acl = {
{
communities = public, private
access = read-only
managers = localhost
}
}
# Traps are sent to localhost only
trap = {
{
trap-community = public
hosts = localhost
}
}
Add the following options to tomcat.sh -Dcom.sun.management.snmp.port=8161 -Dcom.sun.management.snmp.acl.file=TOMCAT_LWC_HOME/bin/snmp.acl
After startup the variables can be retrieved with
snmpwalk -c public -v2c localhost:8161 .1.3.6.1.4.1.42.2.145.3.163.1.1.4.1.
See http://support.ipmonitor.com/mibs/JVM-MANAGEMENT-MIB/oids.aspx for a list of all OIDs supported by the JVM.
A simple cron-based monitoring environment can invoke snmpwalk periodically and send mail if a monitored parameter violates a predefined constraint. Use gkrellm with the snmp extension (see http://triq.net/gkrellm_snmp.html) or OpenNMS (see http://www.opennms.org/) for more advanced monitoring.
This approach only works for the Sun JVM.
18.4 Tomcat w/ openCRX and LDAP-based Authentication
You can connect Tomcat w/ openCRX with OpenLDAP as follows:
replace the JDBC Realm entry in the file opencrx-core-CRX\opencrx-core-CRX\META-INF\context.xml with the following entry:
<Realm
className="org.apache.catalina.realm.JNDIRealm"
debug="99"
connectionName="cn=Manager,dc=opencrx,dc=org"
connectionPassword="secret"
connectionURL="ldap://localhost:389"
userPassword="userPassword"
userPattern="cn={0},ou=people,dc=opencrx,dc=org"
roleBase="ou=groups,dc=opencrx,dc=org"
roleName="cn"
roleSearch="(uniqueMember={0})"
/>
Users must be entered into your LDAP server as follows (userPattern):
# Users
dn: cn=guest,ou=people,dc=opencrx,dc=org
objectClass:
organizationalPerson
sn: guest
cn: guest
userPassword:
opencrx
dn:
cn=admin-Root,ou=people,dc=opencrx,dc=org
objectClass:
organizationalPerson
sn: admin-Root
cn:
admin-Root
userPassword: opencrx
dn:
cn=admin-Standard,ou=people,dc=opencrx,dc=org
objectClass:
organizationalPerson
sn: admin-Standard
cn:
admin-Standard
userPassword: opencrx
Groups must be entered into your LDAP server as follows (roleBase, roleName, and roleSearch):
# Groups
dn: ou=groups,dc=opencrx,dc=org
objectClass:
organizationalUnit
ou: groups
dn:
cn=OpenCrxRoot,ou=groups,dc=opencrx,dc=org
objectClass:
groupOfUniqueNames
cn: OpenCrxRoot
uniqueMember:
cn=admin-Root,ou=people,dc=opencrx,dc=org
dn:
cn=OpenCrxAdministrator,ou=groups,dc=opencrx,dc=org
objectClass:
groupOfUniqueNames
cn: OpenCrxAdministrator
uniqueMember:
cn=admin-Standard,ou=people,dc=opencrx,dc=org
dn:
cn=OpenCrxUser,ou=groups,dc=opencrx,dc=org
objectClass:
groupOfUniqueNames
cn: OpenCrxUser
uniqueMember:
cn=guest,ou=people,dc=opencrx,dc=org
18.5 OpenEJB / Reestablishing dropped DB Connection
Add the 3 highlighted lines (TimeBetweenEvictionRunsMillis, ValidationQuery, TestWhileIdle) to the datasource definition in the file openejb.xml (or tomee.xml) so that dropped database connections are reestablished automatically:
<?xml version="1.0"
encoding="UTF-8"?>
<openejb>
...
<!--
openCRX with PostgreSQL, DB: CRX_CRX -->
<Resource
id="jdbc_opencrx_CRX" type="DataSource">
...
ValidationQuery SELECT object_oid FROM prefs_preference WHERE object_oid = 'PERSISTENCE:type' AND object_idx = 0
TestWhileIdle true
TimeBetweenEvictionRunsMillis 1000
</Resource>
...
</openejb>
More information is available from http://openejb.apache.org/3.0/containers-and-resources.html.
19 Next Steps
You might want to have a look at some of the additional documentation published at http://www.opencrx.org/documents.htm.